18 Beautiful Crochet Home Decorations to Make for Cozy Charm
I picked up a crochet hook for the first time four years ago because I wanted a wall hanging for my bedroom and could not find one I liked in any store. I watched one tutorial, bought a skein of cotton yarn, and made something that looked close enough to hang on my wall. It was uneven in three places. I kept it up for two years anyway.
Crochet home decorations add handmade texture and visual warmth to any room without requiring expensive materials or professional skill. Most beginner-friendly projects use only two basic stitches: the chain stitch and the single crochet. Those two stitches alone produce coasters, wall hangings, plant holders, and table runners.
I have made over 30 crochet decor items for my own home and as gifts. Some took 45 minutes. Some took three weeks. Every single one cost less than buying a similar item from a home goods store.
This guide covers 18 crochet home decorations that I have personally made or studied in detail. Each section includes the yarn type, hook size, skill level, and key steps involved. Whether you are a complete beginner or someone who already crochets regularly, you will find a project here that fits your current skill level.
1. Crochet Wall Hanging
A crochet wall hanging is a decorative textile panel made from yarn and attached to a wooden dowel for display on a wall. Wall hangings work as the starting point for most beginners because they require no shaping, no counting beyond basic rows, and no seaming. I made my first one using a 5mm hook and natural cotton yarn in under three hours.

Yarn and Hook Selection
Use cotton or wool yarn in a medium weight, labeled as size 4 on the yarn band. A 5mm crochet hook works well with this yarn weight. Cotton yarn holds its shape better than acrylic for wall hangings because it does not stretch under its own weight over time. I used undyed natural cotton for my first hanging and the neutral tone worked with every wall color I tried it against.
Basic Construction Steps
Chain 40 stitches for the starting row. Work single crochet across each row until the panel reaches your desired length, typically 12 to 18 inches. Fasten off and leave long yarn tails at the bottom, which become the fringe. Attach the top edge to a wooden dowel using a lark’s head knot on each stitch. Trim the fringe ends evenly using sharp scissors.
2. Crochet Coasters
Crochet coasters are small circular or square yarn pieces used to protect table surfaces from drink condensation. Cotton yarn produces the most practical coasters because it absorbs moisture and withstands repeated washing without losing shape. I made a set of six coasters in one afternoon using leftover cotton yarn from a previous project and gave them as a housewarming gift.
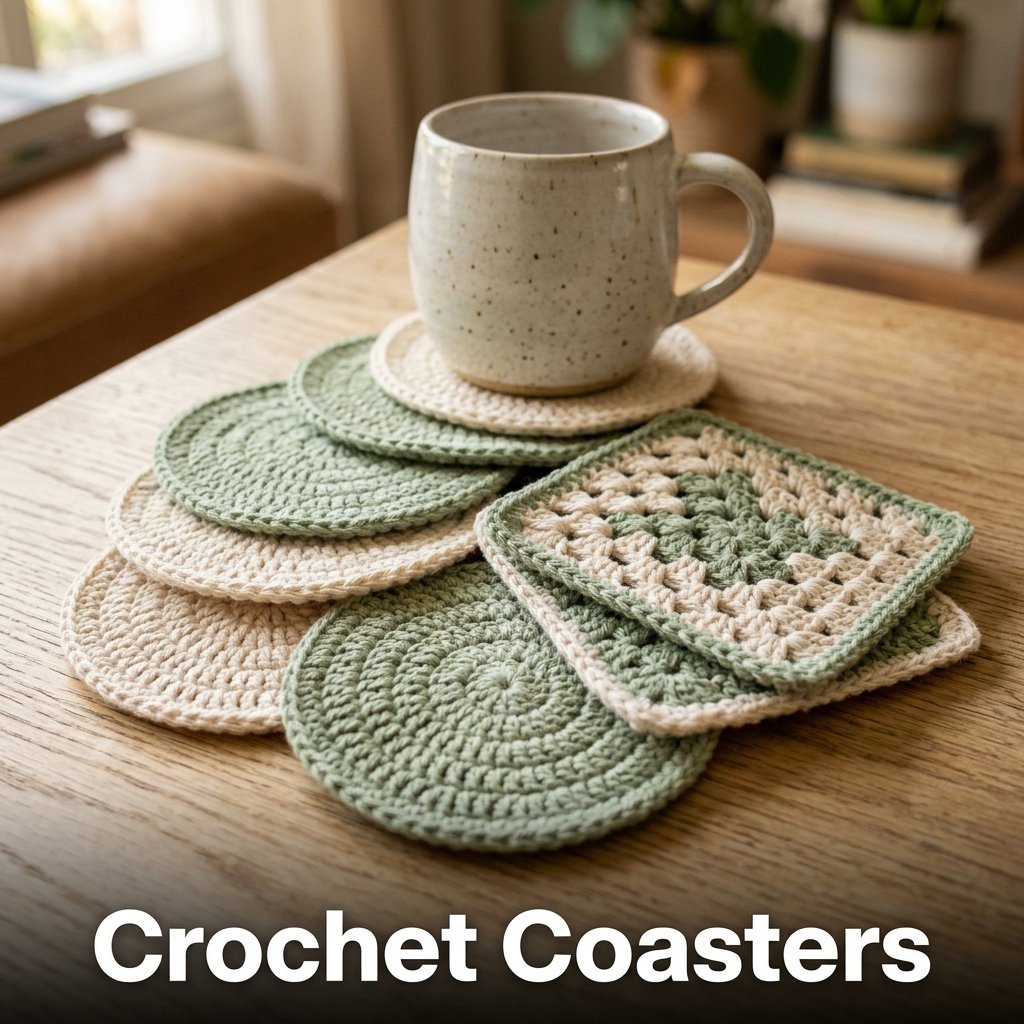
Choosing the Right Pattern
Round coasters start with a magic ring and expand outward using double crochet increases in each round. Square coasters use a granny square construction, starting from the center and adding rounds until the desired size is reached. Both shapes work well as crochet decor for beginners because neither requires more than 30 minutes per piece once you understand the starting technique.
Finishing the Coasters
Work a single crochet border around the outer edge of each coaster to create a clean, finished rim. Weave in all yarn ends using a yarn needle. Block the finished coasters by wetting them, pressing them flat, and pinning them into shape on a foam mat. Allow them to dry completely before use. Blocking takes six to eight hours but produces a noticeably flatter, more even result.
3. Crochet Plant Holder
A crochet plant holder, also called a plant hanger, suspends a potted plant from the ceiling or a wall hook using a knotted or crocheted yarn structure. Cotton macrame cord or thick cotton yarn in size 5 weight produces the strongest plant holders because it handles the weight of a pot without stretching excessively. I hung one in my kitchen window holding a small pothos plant for over a year without any sagging.
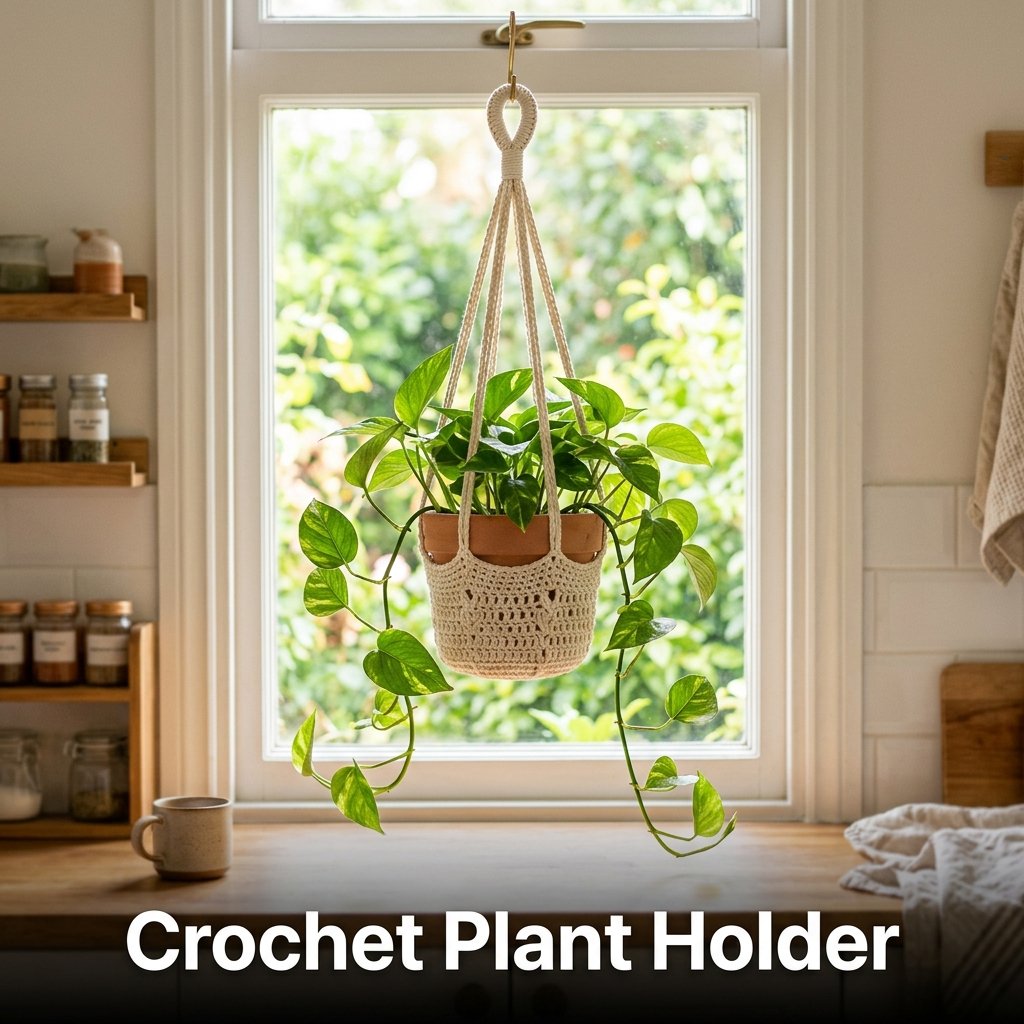
Building the Base Cup
Start with a magic ring and work eight single crochet stitches into the ring. Increase in each stitch on the next round to create 16 stitches. Continue increasing every other round until the base cup fits snugly under your pot. The base cup holds the pot from below while the upper strands distribute the weight evenly across the hanging point.
Creating the Hanging Strands
After completing the base cup, divide the working yarn into four equal sections and chain 20 stitches on each section to form the upper strands. Gather all four strands together and work 10 single crochet stitches around all four chains combined to form the hanging loop. Reinforce the loop with a second round of single crochet. Test the holder with the pot before hanging.
4. Crochet Table Runner
A crochet table runner is a long, narrow textile piece placed along the center of a dining or coffee table as a decorative surface covering. Cotton yarn in a neutral color produces a table runner that works across multiple table finishes, including wood, glass, and painted surfaces. I made a 48-inch runner for my dining table using size 4 cotton yarn and a 4.5mm hook over four evenings.
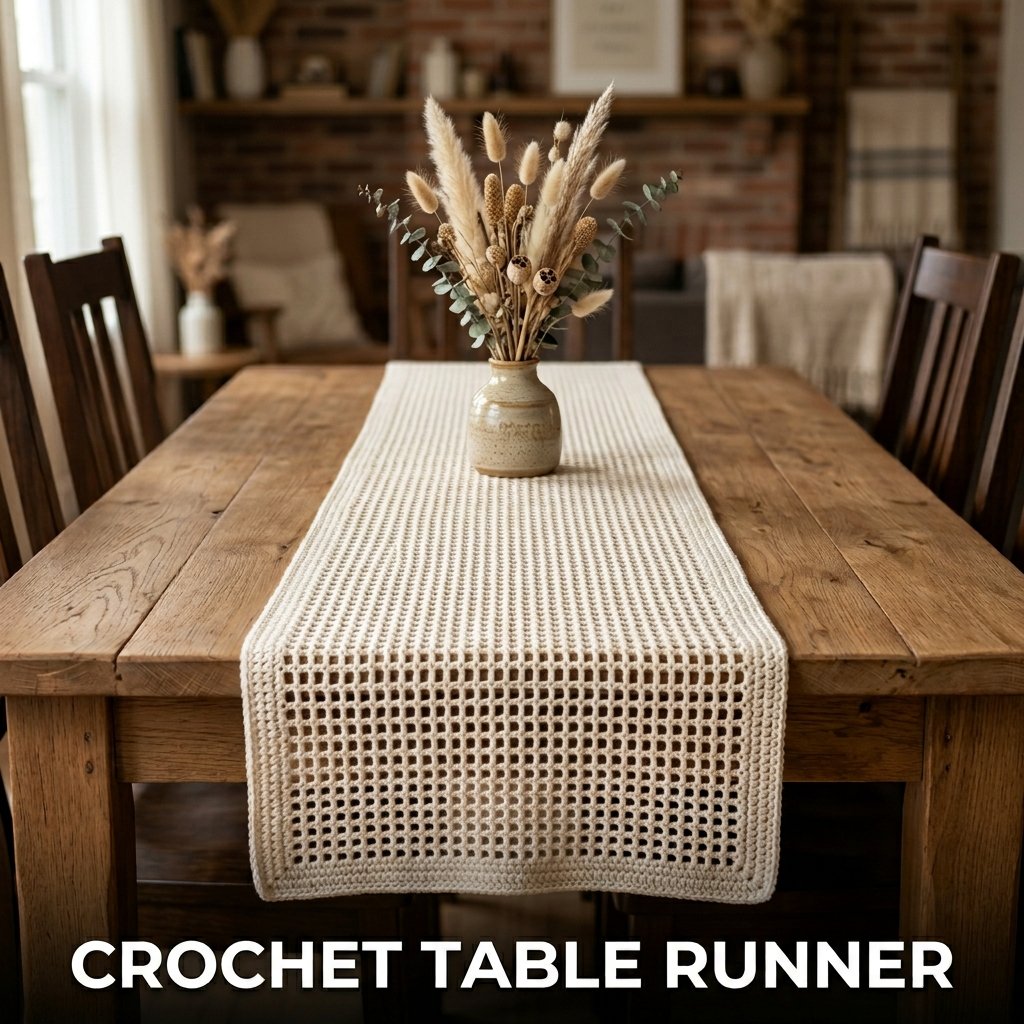
Calculating the Size
Measure your table length before starting. A standard table runner covers the center third of the table length and hangs 6 inches over each end. For a 60-inch table, make a runner approximately 72 inches long. Work the runner in a rectangle using a simple mesh stitch or a half double crochet pattern, which creates a flat, even surface with minimal bulk.
Finishing and Blocking
Add a border of single crochet around all four edges to prevent the runner from curling at the corners. Weave in all ends securely using a yarn needle. Wet block the finished runner by soaking it in cool water, pressing out the excess water without wringing, and pinning it flat to the correct dimensions on a blocking board. Allow it to dry for 12 hours.
5. Crochet Cushion Cover
A crochet cushion cover is a removable yarn cover made in two flat panels sewn together on three sides with a button or zipper closure on the fourth side. Acrylic yarn in a bulky weight produces cushion covers that hold their shape through regular use and wash easily in a standard washing machine. I made two cushion covers for my sofa using size 6 bulky acrylic yarn and a 6mm hook in about five hours each.
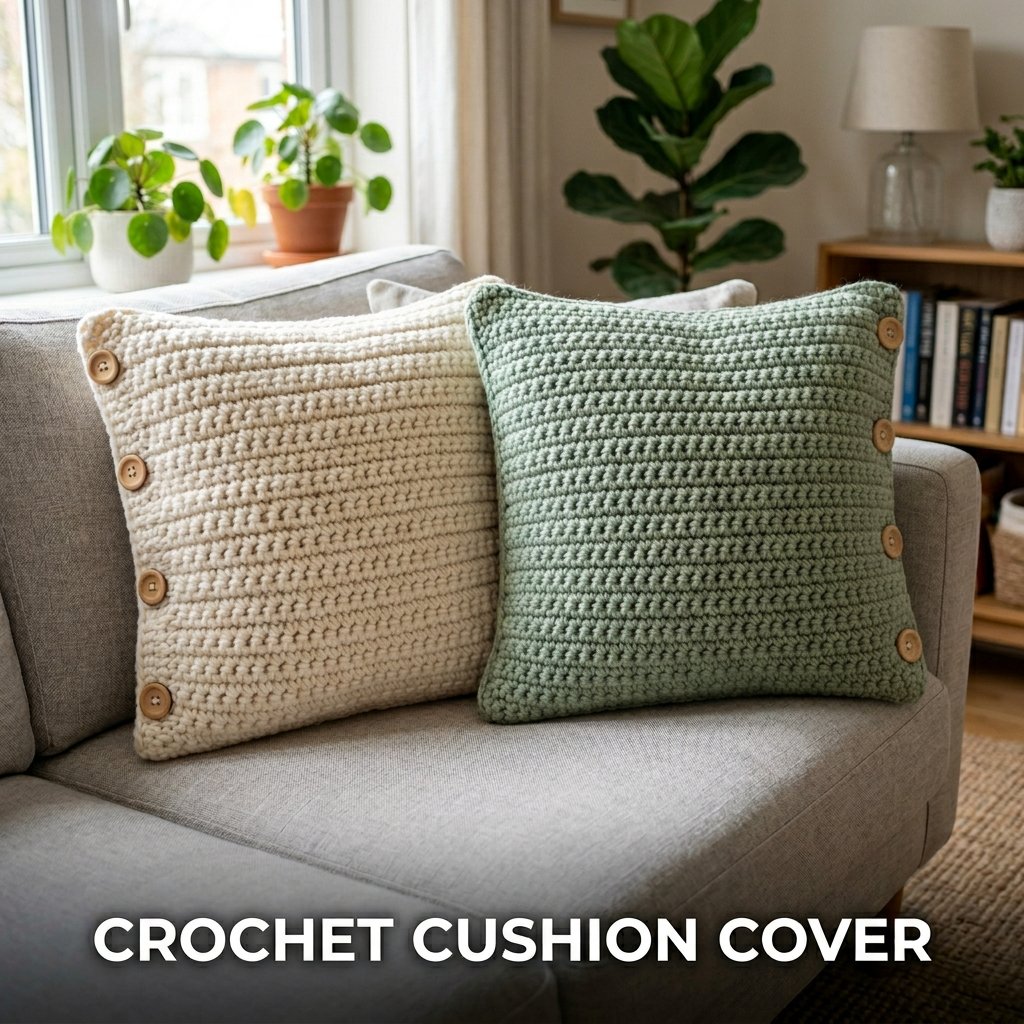
Working the Front Panel
Make a foundation chain equal to the width of your cushion insert plus two stitches. Work rows of half double crochet until the panel height matches the cushion insert height. Half double crochet creates a dense, textured fabric that looks intentional and holds up well against daily use. Count stitches at the end of each row to keep the panel edges straight.
Assembling the Cover
Make a second panel identical to the first. Hold both panels together with wrong sides facing each other. Join the two panels along three sides using a slip stitch seam worked through both layers. On the fourth side, attach four evenly spaced buttons to one panel and work four button loops on the opposite panel using chain stitches. This closure allows the insert to be removed for washing.
6. Crochet Basket
A crochet basket is a structured yarn container used for storage of items such as blankets, toys, yarn, or small household objects. Thick cotton rope yarn or t-shirt yarn in size 6 super bulky weight produces baskets that hold their upright shape without a frame. I made a laundry basket using 200 grams of grey cotton rope yarn and a 10mm hook in one sitting of about three hours.
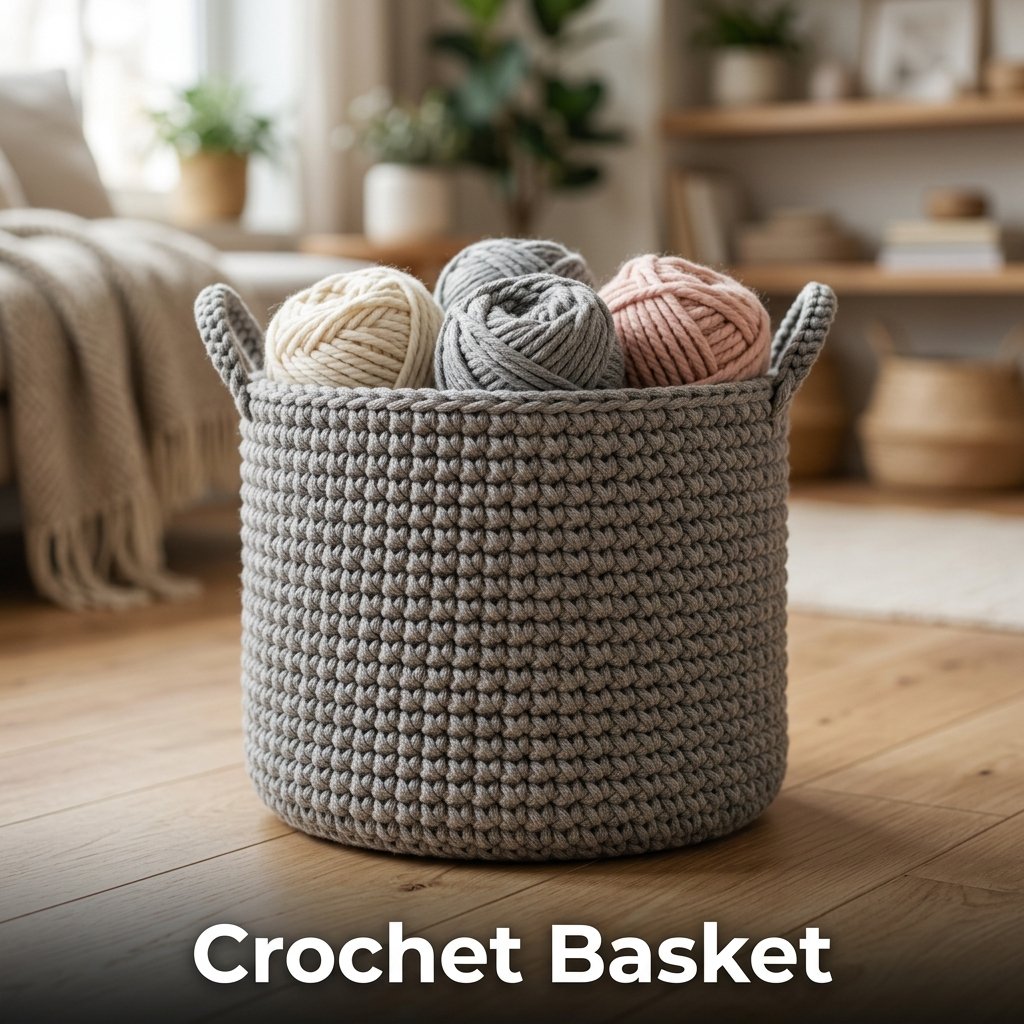
Starting the Base
Work a flat oval or circle base using single crochet increases until the base reaches your desired diameter. For a medium basket, aim for a base diameter of 10 to 12 inches. After reaching the desired size, stop increasing and work single crochet in each stitch for every subsequent round. This transition from increasing to straight rounds creates the upright walls of the basket automatically.
Building the Walls
Continue working single crochet rounds without increasing until the basket walls reach the desired height. For a storage basket, 8 to 10 inches of wall height holds folded blankets or clothing neatly. Work a final round of slip stitches for a smooth top edge. Add two handles by chaining 15 stitches at two opposite points on the top edge and securing each chain end back into the basket wall.
7. Crochet Rug
A crochet rug is a thick, flat textile worked in the round or in rows using bulky yarn or multiple strands held together, placed on the floor as a decorative and functional covering. Holding two strands of size 4 yarn together and using a 9mm hook produces a rug dense enough for light floor traffic. I made a small bathroom rug measuring 20 inches in diameter using this method over two evenings.

Yarn and Hook for Rugs
Use cotton yarn specifically for rugs placed in high-moisture areas like bathrooms or kitchens because cotton withstands washing and dries faster than wool. Acrylic yarn works for rugs in dry areas like bedrooms or living rooms. Hold two strands together throughout the entire project to create the necessary thickness. A single strand produces a rug that is too thin and flexible for floor use.
Working the Rug in the Round
Start with a magic ring and work 12 double crochet stitches into the ring. Increase by adding two stitches into each stitch on round two to reach 24 stitches. Continue increasing by 12 stitches every round to keep the rug lying flat. Stop increasing when the rug reaches your desired diameter and work one final slip stitch round to finish the edge cleanly.
8. Crochet Curtain Panel
A crochet curtain panel is an open-weave yarn textile hung in a window frame to filter light while adding decorative texture to the room. Cotton yarn in a fine weight, size 2 or 3, produces curtain panels with enough drape to hang straight without bunching. I made a pair of small window panels for my bathroom using white size 2 cotton yarn and a 2.75mm hook over two weeks.
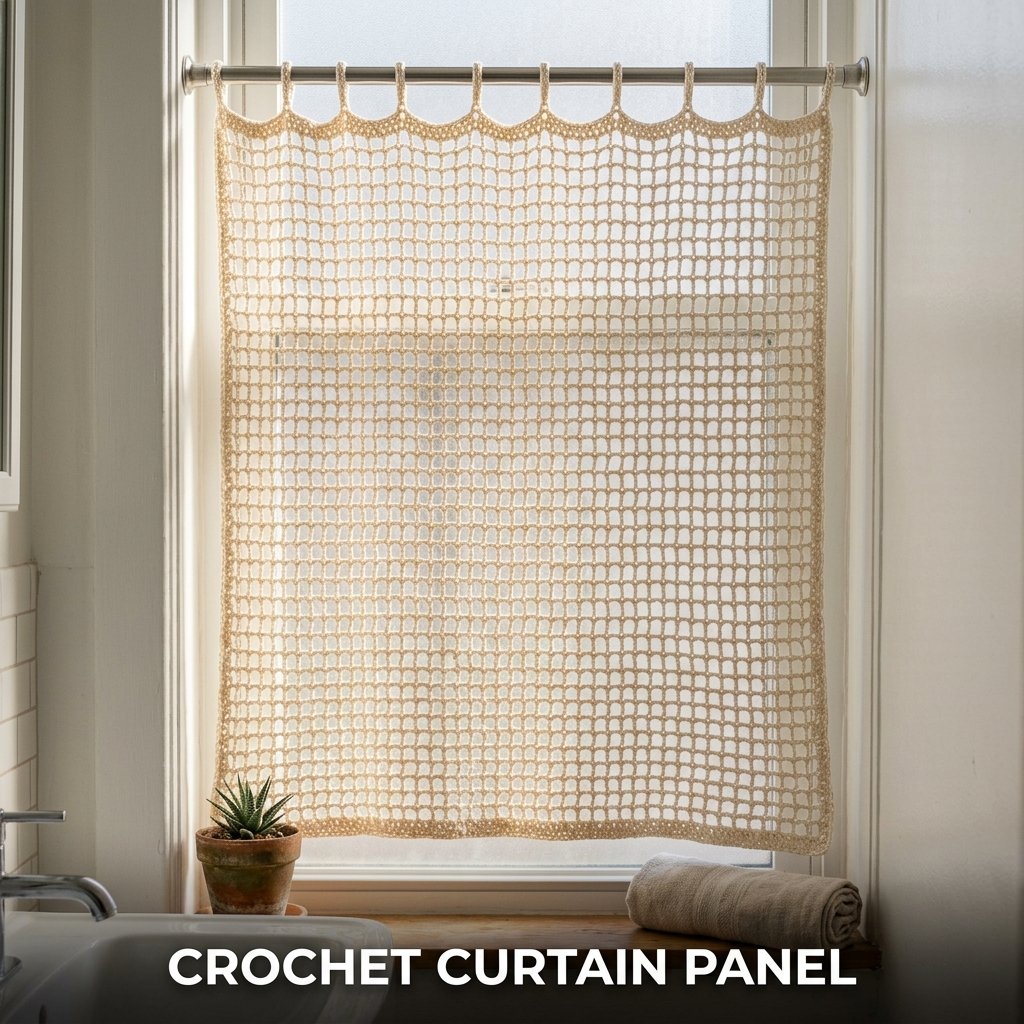
Choosing an Open Stitch Pattern
Use a mesh stitch, a shell stitch, or a simple lace pattern for curtain panels. These open-stitch patterns allow light to filter through the panel while still providing some visual privacy. A solid single crochet fabric blocks too much light for curtain use. I used a basic mesh pattern: chain two, skip one stitch, single crochet into the next, repeated across each row.
Hanging the Panel
Finish the top edge of the panel with a row of chain loops spaced two inches apart. These loops slide directly onto a curtain rod without needing rings or clips. Measure the window opening before starting the panel and add two inches to the width for natural gathering. Block the finished panel before hanging to straighten the edges and open up the lace pattern fully.
9. Crochet Dishcloths
Crochet dishcloths are small square or rectangular cotton yarn pieces used in the kitchen for washing dishes or wiping surfaces. 100% cotton yarn produces dishcloths that are absorbent, heat-resistant, and machine washable, making them more practical than acrylic for kitchen use. I keep a rotating set of eight crocheted dishcloths in my kitchen and have not bought a sponge in over two years.
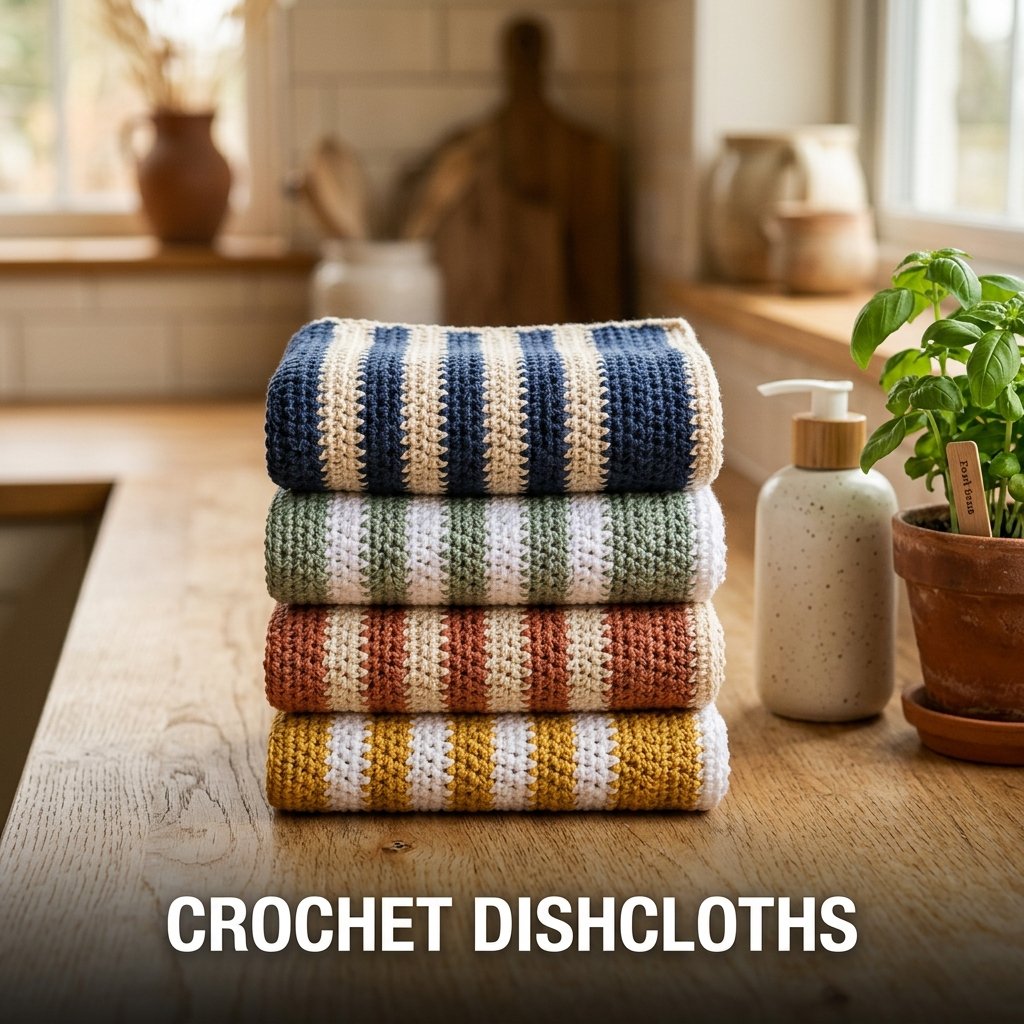
Simple Construction Method
Cast on a foundation chain of 25 stitches. Work rows of single crochet back and forth until the cloth measures approximately 8 inches square. Single crochet creates a tight, dense fabric that scrubs surfaces effectively without scratching. Change colors at the start of any new row to create stripes, which helps track which cloths are clean and which have been used.
Care and Replacement
Wash crocheted dishcloths in the washing machine on a hot cycle after each use. Cotton yarn withstands temperatures up to 60 degrees Celsius without shrinking if the yarn is pre-washed before the first use. Replace dishcloths every three to four months depending on use frequency. Each cloth takes under 30 minutes to make, so replacing worn ones costs almost nothing in time or materials.
10. Crochet Lampshade Cover
A crochet lampshade cover is an open-weave yarn piece worked in the round to fit over an existing lampshade, adding texture and filtering the light output of the lamp. White or cream cotton yarn in size 3 weight produces covers that soften lamp light without blocking it completely. I fitted a cover over a plain white drum lampshade in my bedroom and the change in light quality was immediate and noticeable.
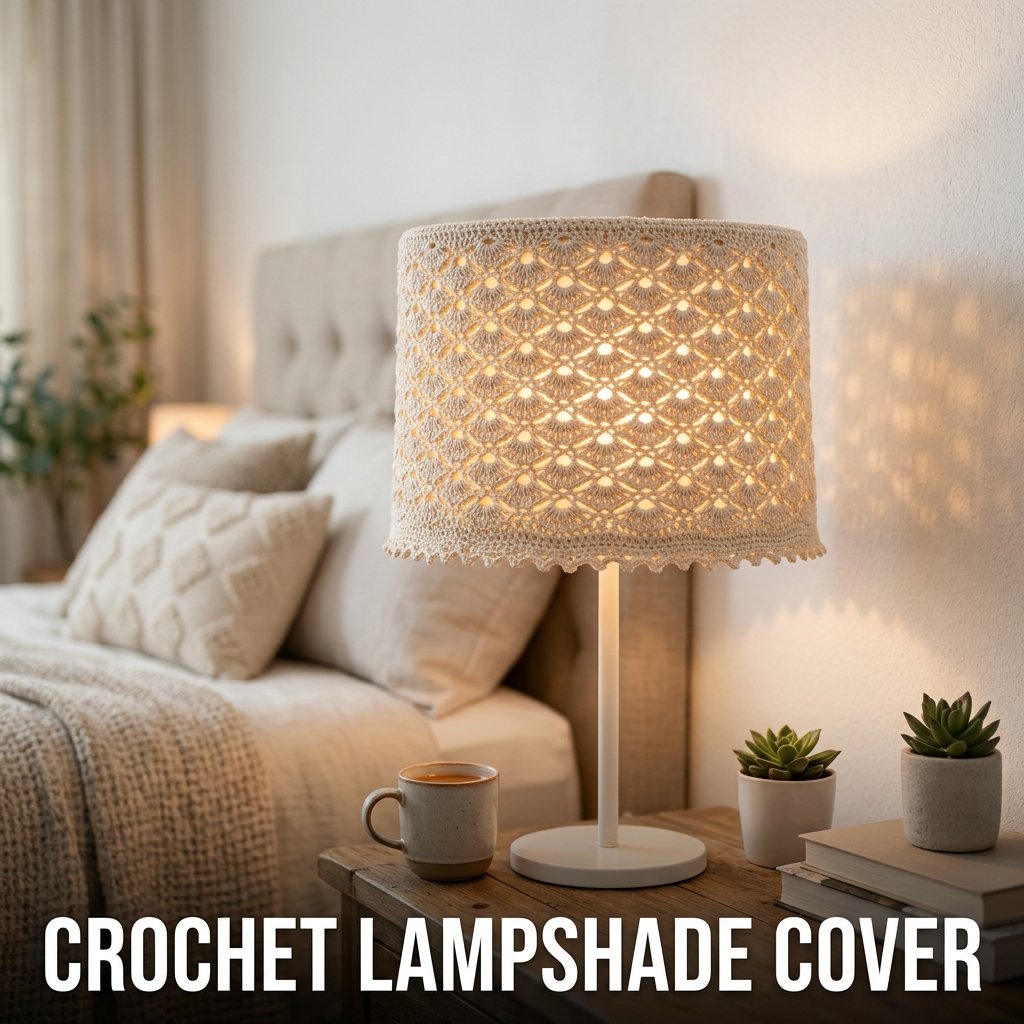
Measuring the Lampshade
Measure the circumference of the top ring and the bottom ring of the lampshade separately, along with the height from top to bottom. Most drum lampshades have equal top and bottom circumferences, which makes the cover construction straightforward. For tapered lampshades, increase stitches gradually from the top ring measurement to the bottom ring measurement across the cover height.
Working the Cover
Start at the top edge with a chain equal to the top circumference divided by your stitch gauge. Join into a ring with a slip stitch and work downward in rounds using a mesh or shell pattern. Try the cover on the shade every few rounds to check the fit. Finish the bottom edge with a picot border or a row of shells to create a decorative lower hem that rests against the lampshade frame.
11. Crochet Bookmarks
Crochet bookmarks are small, narrow yarn pieces worked in a simple stitch pattern and used to mark pages in books. Size 10 crochet thread and a steel hook size 7 produce the thinnest, most practical bookmarks that sit flat between book pages without adding bulk. I made a set of 10 bookmarks in one afternoon and gave them alongside handmade gifts for three different friends.

Basic Bookmark Construction
Chain six stitches and join into a ring. Work single crochet stitches in a flat strip from the ring, keeping a consistent stitch count of six stitches per row, until the strip reaches seven inches in length. The ring at the top becomes the decorative header of the bookmark. Finish with a slip stitch and fasten off, leaving a six-inch tail for adding a tassel.
Adding a Tassel
Cut eight strands of yarn each measuring four inches long. Fold the bundle in half and pull the folded loop through the bottom end of the bookmark using a crochet hook. Pass the loose yarn ends through the loop and pull tight to secure. Trim all tassel ends to the same length using sharp scissors. A tassel measuring two inches hangs neatly below the bookmark strip without getting caught between pages.
12. Crochet Garland
A crochet garland is a series of small crocheted shapes, such as stars, hearts, leaves, or circles, connected along a chain or cord and hung as wall or shelf decoration. Acrylic yarn in size 3 or 4 weight produces garland pieces that hold their shape after stuffing or blocking and do not sag when hung over long distances. I made a star garland for my living room shelf using leftover yarn in five colors over three evenings.
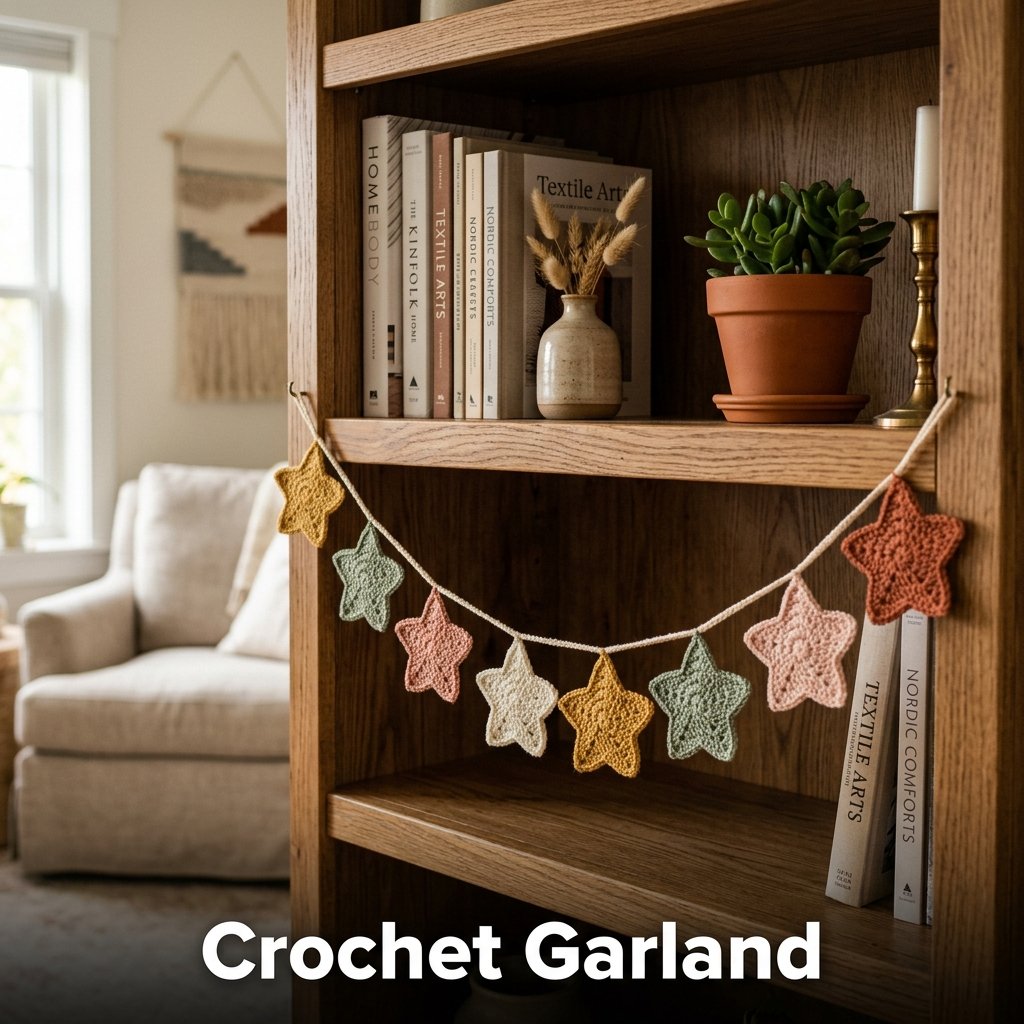
Making Individual Motifs
Work each motif separately using a standard pattern for the chosen shape. A five-point star uses increases and decreases across five rounds. A small heart uses two chain loops joined at the base. Keep all motifs the same size by using the same hook and the same number of rounds for each piece. Block each motif flat before joining to produce a consistent finished size across the garland.
Joining the Garland
Cut a length of thin cord or chain a long strip of yarn to serve as the garland base. Attach each motif to the base cord at regular intervals using a slip stitch or a short length of yarn tied through the top of each piece. Space motifs four to six inches apart for a light, open look. I used five-inch spacing across a 48-inch shelf and attached 10 stars total.
13. Crochet Storage Pouch
A crochet storage pouch is a small yarn bag with a drawstring or button closure used to store small items such as jewelry, hair accessories, or craft supplies. Cotton yarn in size 4 weight and a 4mm hook produce pouches with tight enough stitching to hold small objects without them slipping through the fabric. I made four pouches in different sizes and use them to organize items in my dresser drawers.
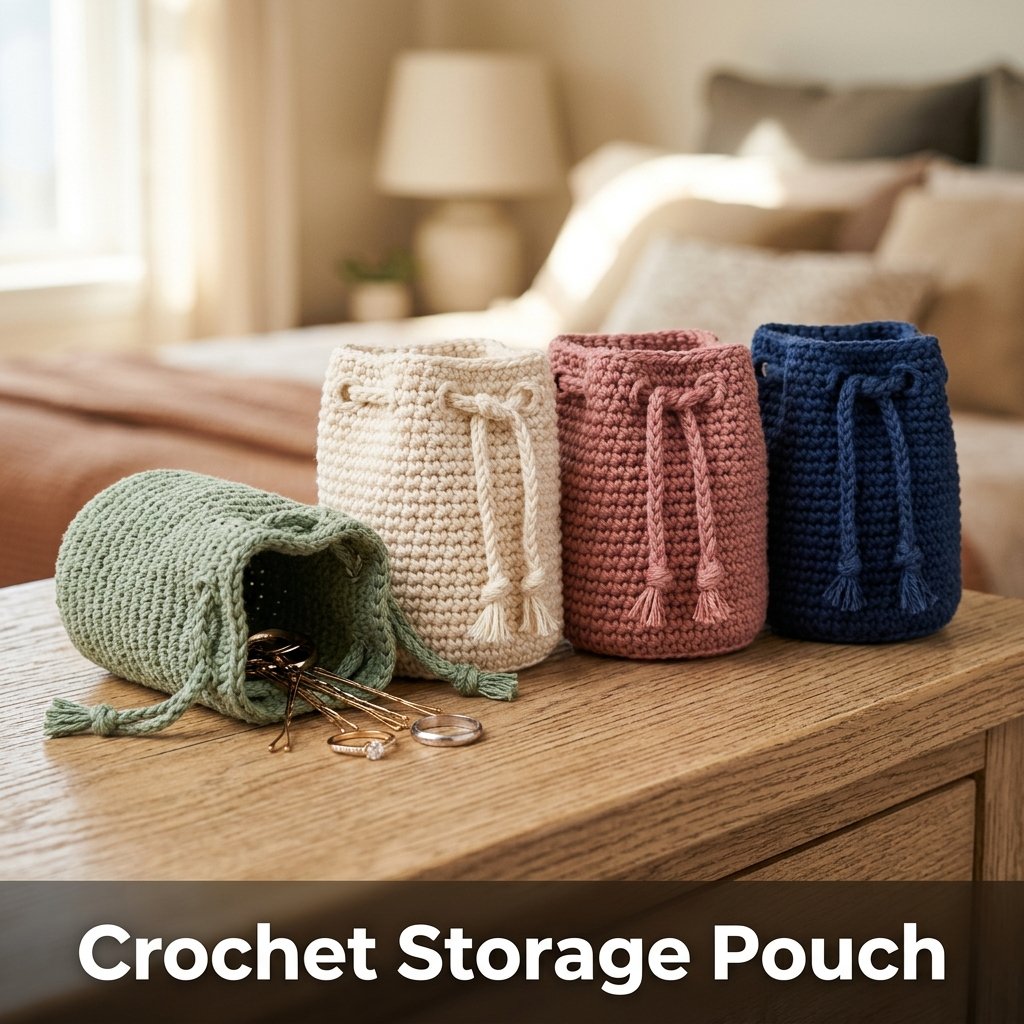
Working the Pouch Body
Start with a magic ring and work single crochet rounds in a continuous spiral without joining until the pouch body reaches the desired height. For a small jewelry pouch, work 20 rounds of single crochet on a base of 30 stitches. This produces a pouch approximately four inches tall and three inches in diameter. Use a stitch marker to track the beginning of each round throughout the construction.
Adding the Drawstring Closure
On the final round of the pouch body, work alternating chain-two spaces and single crochet stitches to create a series of small eyelets around the top edge. These eyelets serve as the drawstring channel. Thread a length of twisted cord or ribbon through each eyelet using a safety pin as a threading tool. Tie the cord ends together and adjust the length so the pouch closes fully when pulled.
14. Crochet Bottle Cozy
A crochet bottle cozy is a fitted yarn sleeve worked in the round to cover a water bottle or jar, protecting hands from cold or heat and adding a decorative element to an everyday object. Acrylic yarn in size 4 weight and a 4mm hook produce a cozy that stretches slightly to fit standard water bottle sizes measuring 2.5 to 3 inches in diameter. I made one for my reusable bottle and it now gets more compliments than any other item I carry.
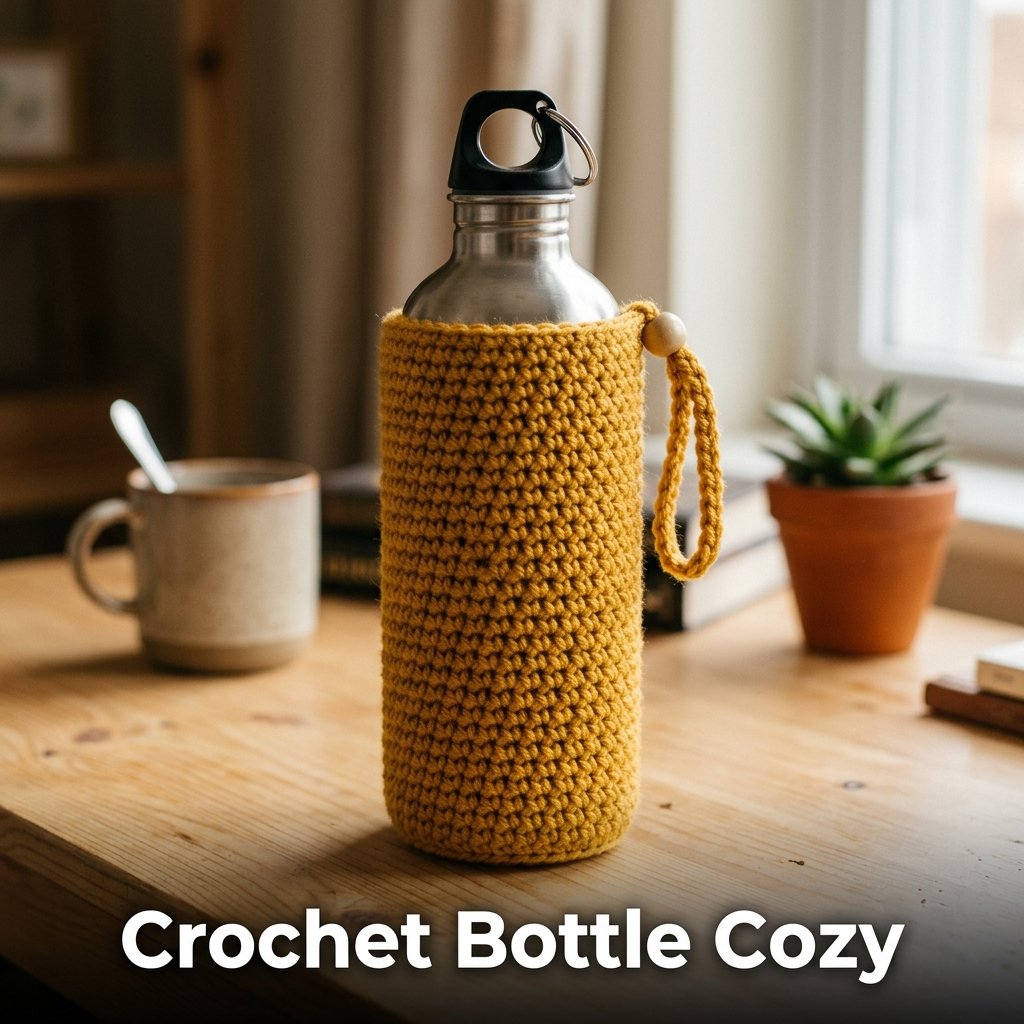
Measuring and Starting the Cozy
Measure the circumference of your bottle at its widest point. Divide that measurement by your stitch gauge to determine the starting chain count. Work a foundation chain and join into a ring, then work single crochet rounds upward without increasing until the cozy reaches the bottle height. Try the cozy on the bottle every five rounds to track the fit before it becomes too long to adjust easily.
Adding a Base and Handle
Work a flat circle base using the same method as a coaster to close the bottom of the cozy. Sew the base to the bottom edge of the cozy using a yarn needle and mattress stitch. Add a short handle by chaining 20 stitches at one point on the top edge and securing the other end of the chain two inches away on the same edge. The handle allows carrying the bottle by the cozy alone.
15. Crochet Dream Catcher
A crochet dream catcher combines a crocheted circular web worked in an open stitch pattern with decorative feathers and beads hung below, displayed as wall art. Cotton yarn in size 3 weight and a 3.5mm hook produce a web fine enough to create an open, lace-like pattern that resembles the appearance of a traditional woven dream catcher. I made one for my bedroom wall using white cotton yarn and natural wooden beads.
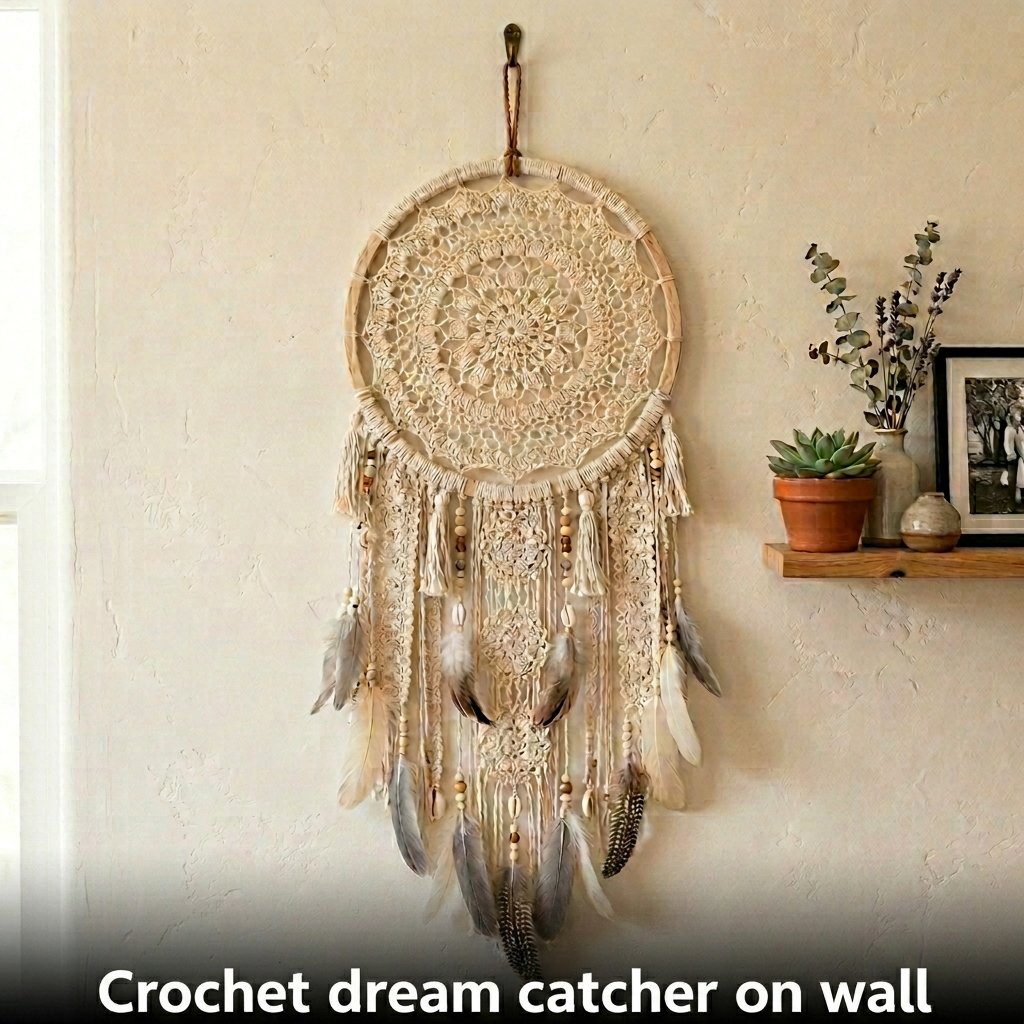
Working the Web
Start with a magic ring and work the web outward in rounds using a combination of chain spaces and single crochet stitches. Each round adds longer chain spaces to create the open mesh effect. Work eight to ten rounds until the web reaches a diameter of eight to ten inches. The finished web hangs from a wooden or metal ring that frames the outer edge of the piece.
Attaching the Decorations
Cut eight strands of yarn in varying lengths between six and twelve inches and attach them to the bottom half of the outer ring using lark’s head knots. Thread wooden beads onto some strands and tie knots below each bead to hold it in place. Attach small craft feathers to the bottom of each strand using a dab of clear-drying craft glue. Allow the glue to dry fully before hanging the finished piece.
16. Crochet Trivet
A crochet trivet is a thick, heat-resistant pad placed on a kitchen or dining table surface to protect it from hot pots and pans. 100% cotton yarn worked in multiple layers produces trivets that resist heat transfer effectively because cotton does not melt under normal cooking temperatures the way acrylic yarn does. I made a set of three trivets in different sizes for my kitchen using worsted weight cotton and a 5mm hook.
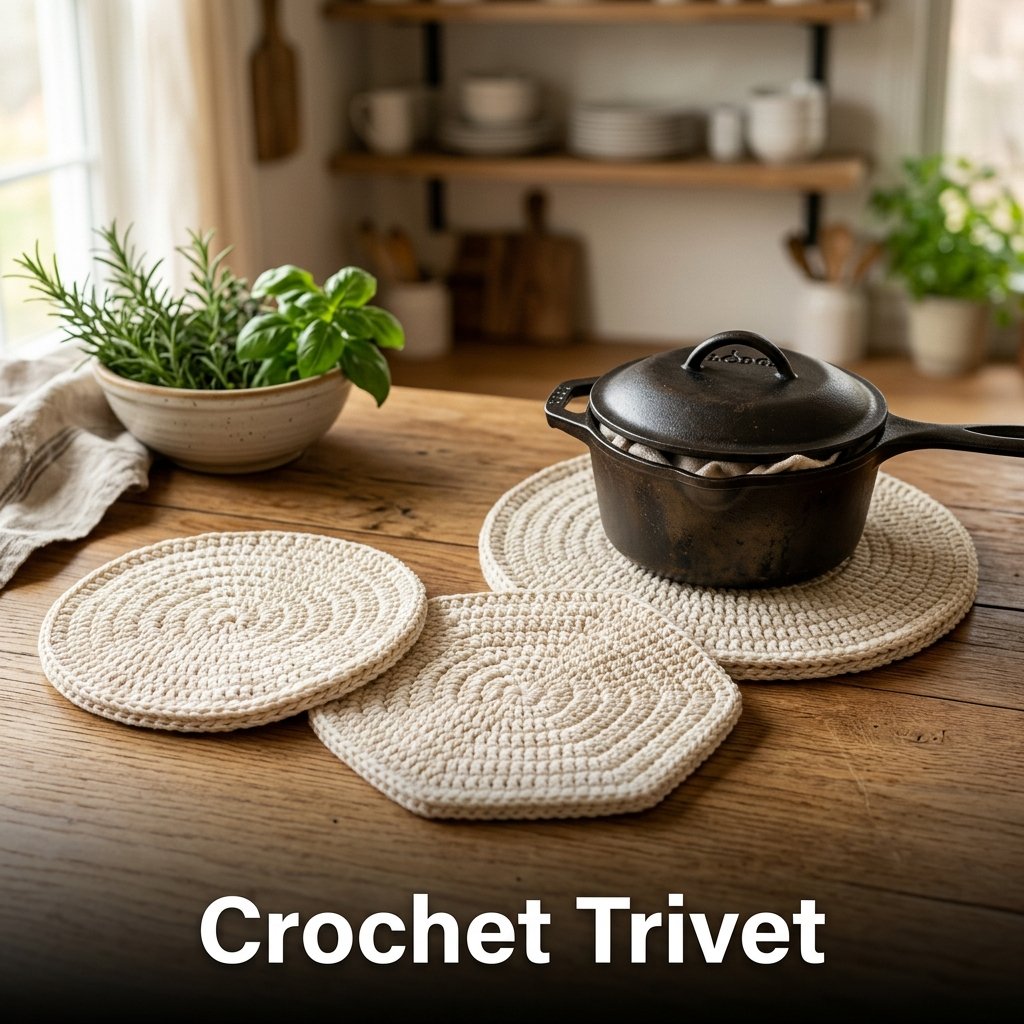
Selecting Cotton Yarn Only
Use only 100% cotton yarn for trivets. Acrylic and wool yarns melt or scorch at temperatures produced by hot cookware. Check the yarn label to confirm fiber content before purchasing. I use Lion Brand 24/7 Cotton yarn for all kitchen crochet items because it is widely available, machine washable, and clearly labeled as 100% cotton on every skein.
Construction Method
Work a flat circle or hexagon shape using double crochet increases, following the same method as a coaster but working to a larger finished diameter of eight to ten inches. After completing the first layer, make a second identical piece and sew both layers together using a whip stitch around the outer edge. The double layer adds thickness and improves heat resistance compared to a single-layer trivet.
17. Crochet Photo Frame Border
A crochet photo frame border is a crocheted strip sewn or glued around the outer edge of a plain picture frame to add a handmade textile detail to an existing home decor item. Size 3 cotton yarn and a 3.5mm hook produce a border strip narrow enough to fit most standard frame widths without covering the glass or the photo behind it. I added a cream crochet border to four plain black frames in my hallway and the change was immediate.
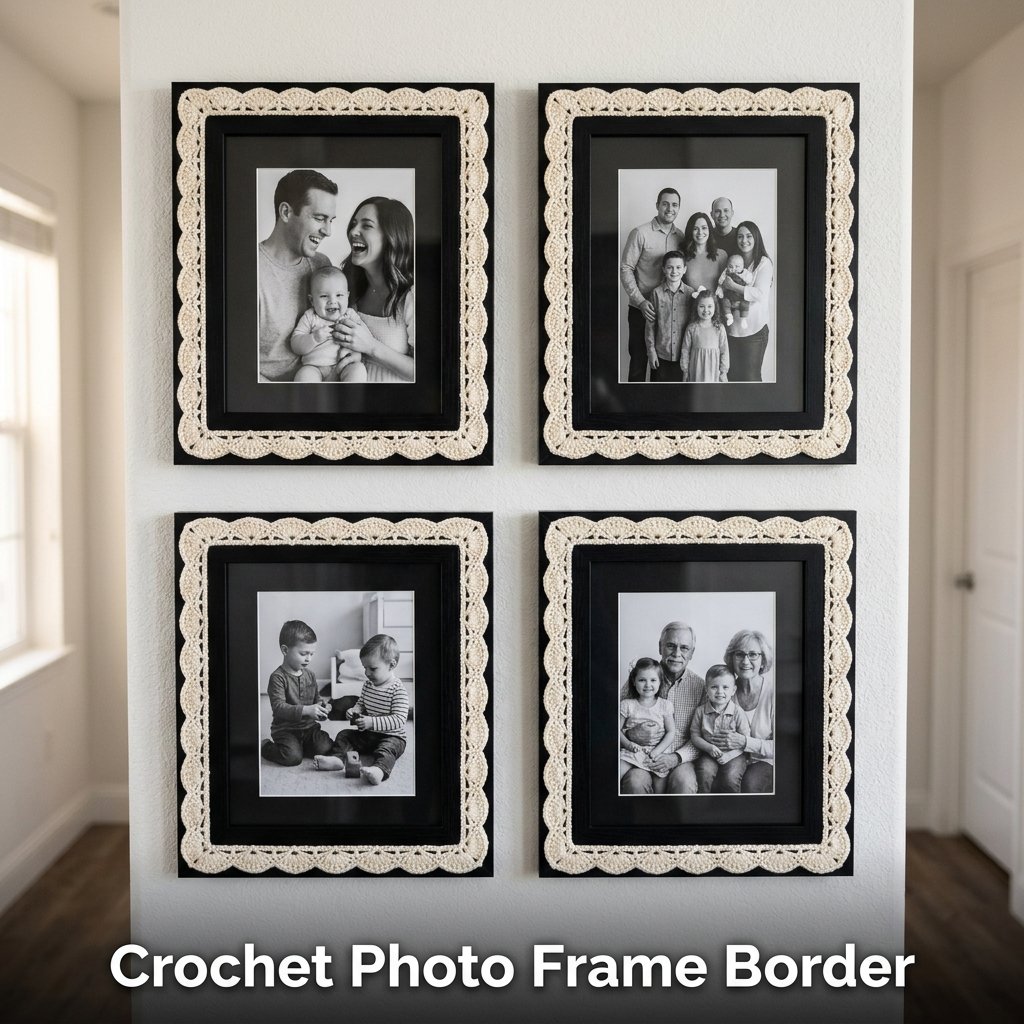
Making the Border Strip
Work a strip of shell stitch or moss stitch in a width matching the frame border width, typically half an inch to one inch. Measure the total perimeter of the frame and work the strip to that exact length plus two inches for overlap at the corners. I worked my strips to the exact perimeter length and mitered the corners by folding the strip at a 45-degree angle at each corner point.
Attaching the Border
Pin the completed strip to the frame border before gluing to check the fit and corner alignment. Apply fabric glue or hot glue to the back of the strip in small sections and press it firmly onto the frame surface. Hold each section for 30 seconds before moving to the next. Allow the glue to cure for two hours before handling the frame. Remove any visible glue strings using a pair of tweezers after the glue sets.
18. Crochet Advent Calendar
A crochet advent calendar is a set of 24 small crocheted pouches or bags hung in a row or on a decorative ladder, each holding a small gift or treat for the 25 days leading up to Christmas. Acrylic yarn in size 4 weight produces pouches that are quick to make and strong enough to hold small sweets, coins, or folded notes. I made my first set of 24 pouches over three weeks and hung them on a wooden dowel using ribbon ties.
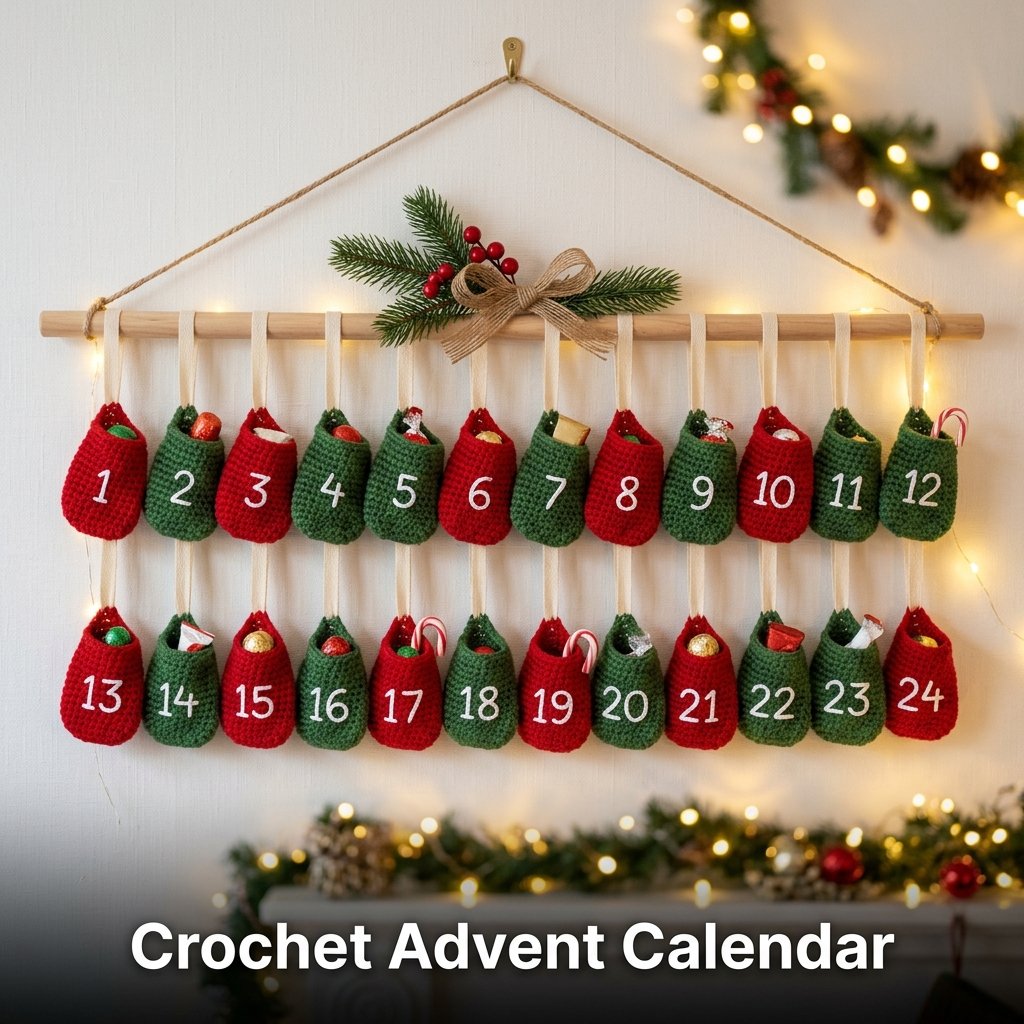
Making 24 Matching Pouches
Work each pouch using the same construction method as the storage pouch in idea number 13, but reduce the size to a base of 20 stitches worked for 12 rounds. This produces a pouch approximately three inches tall and two inches wide, large enough for a small chocolate or a folded note. Use the same yarn color for all 24 pouches or alternate between two colors for a striped set effect.
Numbering and Hanging the Pouches
Stitch the numbers one through 24 onto each pouch using a contrasting yarn color and a yarn needle. Alternatively, attach iron-on number patches to the front of each pouch. Tie a six-inch length of ribbon to the top of each pouch and use the ribbon to hang them from a wooden dowel, a branch, or a ladder display. Space the pouches evenly across the hanging structure so all 24 are visible at once.
Frequently Asked Questions
What yarn works best for crochet home decorations?
Cotton yarn works best for most crochet home decorations because it holds its shape, resists stretching, and withstands washing. Size 4 worsted weight cotton suits projects like baskets, coasters, dishcloths, and table runners. Size 2 or 3 cotton suits finer items like curtain panels and lampshade covers. Acrylic yarn works well for cushion covers, garlands, and bottle cozies where softness matters more than moisture resistance. Avoid acrylic for any kitchen item that contacts heat, including trivets and dishcloths, because acrylic melts at high temperatures unlike cotton.
Can a complete beginner make crochet home decorations?
Yes, a complete beginner produces finished crochet home decorations using only two stitches: the chain stitch and the single crochet. Projects like coasters, dishcloths, bookmarks, and wall hangings require no shaping, no counting beyond basic rows, and no seaming. I started with a wall hanging as my first project and finished it in one sitting. Most beginner-friendly projects in this list take between 30 minutes and three hours to complete. Start with coasters or bookmarks before moving to larger items like baskets or rugs, which require more consistent tension across more rounds.
How much yarn do I need for crochet home decor projects?
The yarn quantity varies by project size and yarn weight. A set of six coasters uses approximately 100 grams of size 4 cotton yarn. A table runner uses 150 to 200 grams depending on length. A storage basket uses 200 grams of super bulky cotton rope yarn. A cushion cover uses 150 grams of bulky acrylic yarn per cover. A wall hanging uses 100 to 150 grams depending on fringe length. Always buy one extra skein beyond your estimated requirement because dye lots vary between production batches and a mismatched skein affects the finished color consistency.
How long does it take to make crochet home decorations?
Most small crochet home decorations take between 30 minutes and five hours to complete depending on the project size and the crocheter’s experience level. Coasters take 20 to 30 minutes each. Bookmarks take 15 to 20 minutes. A wall hanging takes two to four hours. A basket takes three to five hours. A table runner takes six to ten hours depending on length. A full set of 24 advent calendar pouches takes 12 to 18 hours of total work spread across several sessions. Experienced crocheters complete each project in roughly half the time listed above.
Can I sell crochet home decorations on Etsy?
Yes, crochet home decorations sell consistently on Etsy across multiple categories including home decor, nursery decor, and handmade gifts. The strongest sellers in this list for Etsy include: wall hangings, plant holders, baskets, coasters, and advent calendar sets. Price each item by adding material cost, packaging cost, Etsy fees, and your hourly labor rate together. Research existing Etsy listings before setting prices. Most handmade crochet wall hangings sell between 25 and 75 dollars depending on size. Crochet baskets sell between 20 and 55 dollars. Coaster sets of four sell between 12 and 25 dollars on average.