10 Easy Pottery Painting Ideas You’ll Love
I walked into a paint-your-own pottery studio for the first time three years ago with zero painting experience and left two hours later with a mug covered in slightly wobbly botanical leaves that I genuinely loved. I used that mug every single morning for a year before I chipped it. Then I bought a plain white mug from a discount store and repainted it at home. That second mug is still in daily use today.
If you want pottery painting ideas, all 10 options here work on bisque-fired ceramics at a paint-your-own studio or on plain ceramic items painted at home with ceramic or acrylic paint. Every idea suits beginners with no prior painting experience.
These ideas cover mugs, plates, bowls, vases, planters, and decorative tiles. I selected each one because the design requires no advanced brush control, the color palette stays simple, and the finished result looks intentional rather than accidental.
Most designs here complete in 30 to 90 minutes. Several qualify as simple pottery painting ideas for kids that produce clean, recognizable results without any adult assistance on the painting steps.
Each section states the ceramic type, paint colors needed, brush sizes used, and one specific tip that studio instructors give to beginners on their first session.
1. Minimalist Botanical Leaf Design
A minimalist botanical leaf design paints simple elongated leaf shapes in green tones on a white mug or vase using a single round brush and 2 to 3 shades of green ceramic paint. I painted this design on my first studio mug and it became the most-requested design I have shared on any platform. The leaf shapes require no drawing skill because each leaf is a single brushstroke made by pressing a loaded round brush onto the surface and pulling it in a curve.
Botanical leaf designs are among the most searched pottery painting ideas on Pinterest because they suit both minimalist and boho ceramic aesthetics with the same basic technique.
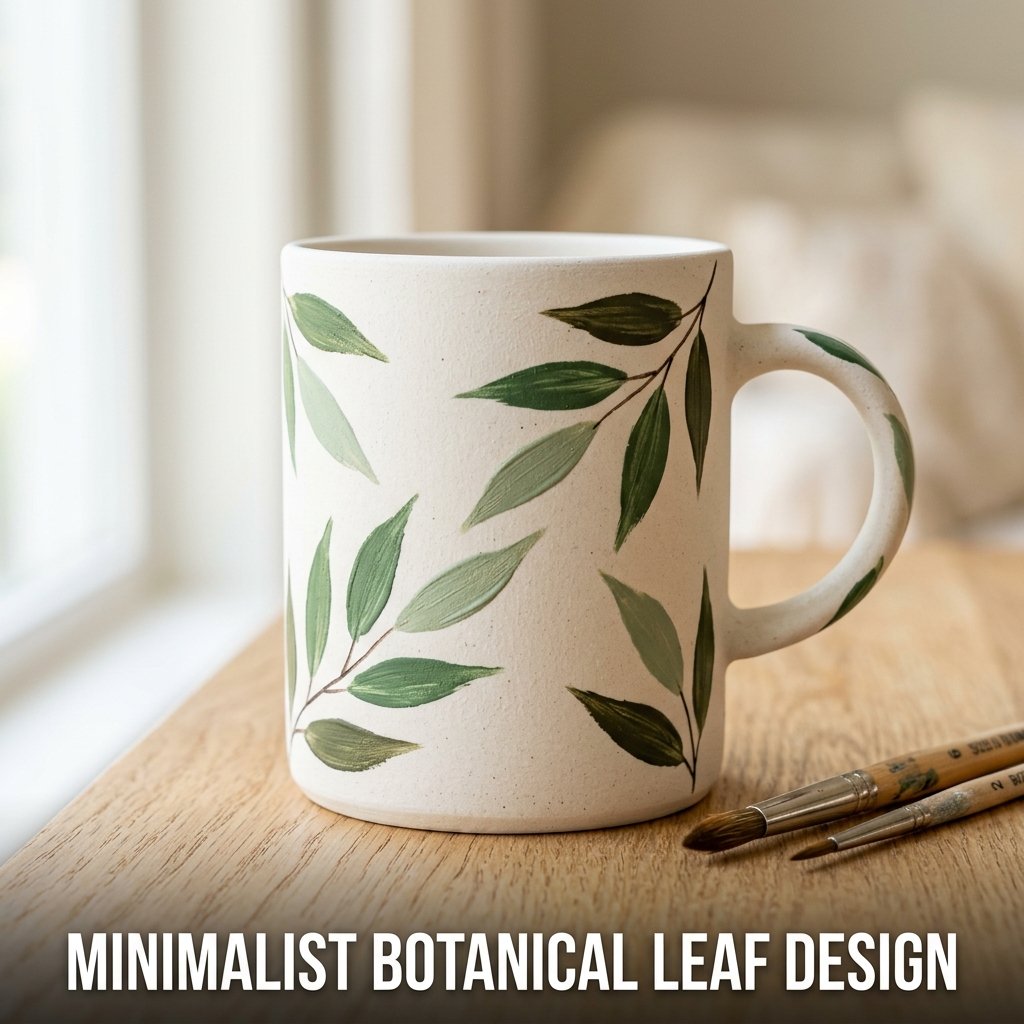
Colors and Brush Size for Botanical Leaves
Use 3 green shades for botanical leaf pottery painting ideas: a light sage, a medium forest green, and a dark olive. Apply all 3 shades without mixing them to keep each leaf shape distinct from adjacent ones. Use a size 6 round brush for the larger leaves and a size 2 round brush for the smaller accent leaves and thin stem lines. Mix a small amount of white into the sage green for a muted, natural tone that reads as botanical rather than cartoon-style on the finished ceramic surface.
Painting Leaf Shapes With a Single Brushstroke
Load a size 6 round brush fully with green ceramic paint. Touch the tip of the brush to the ceramic surface at the base of the leaf position. Press the brush down firmly so the full bristle width contacts the surface, then pull the brush upward and lift gradually to produce a pointed leaf tip. Each leaf takes one press-and-pull stroke. Vary the leaf angle across the ceramic surface to produce a natural, scattered arrangement rather than a uniform grid pattern.
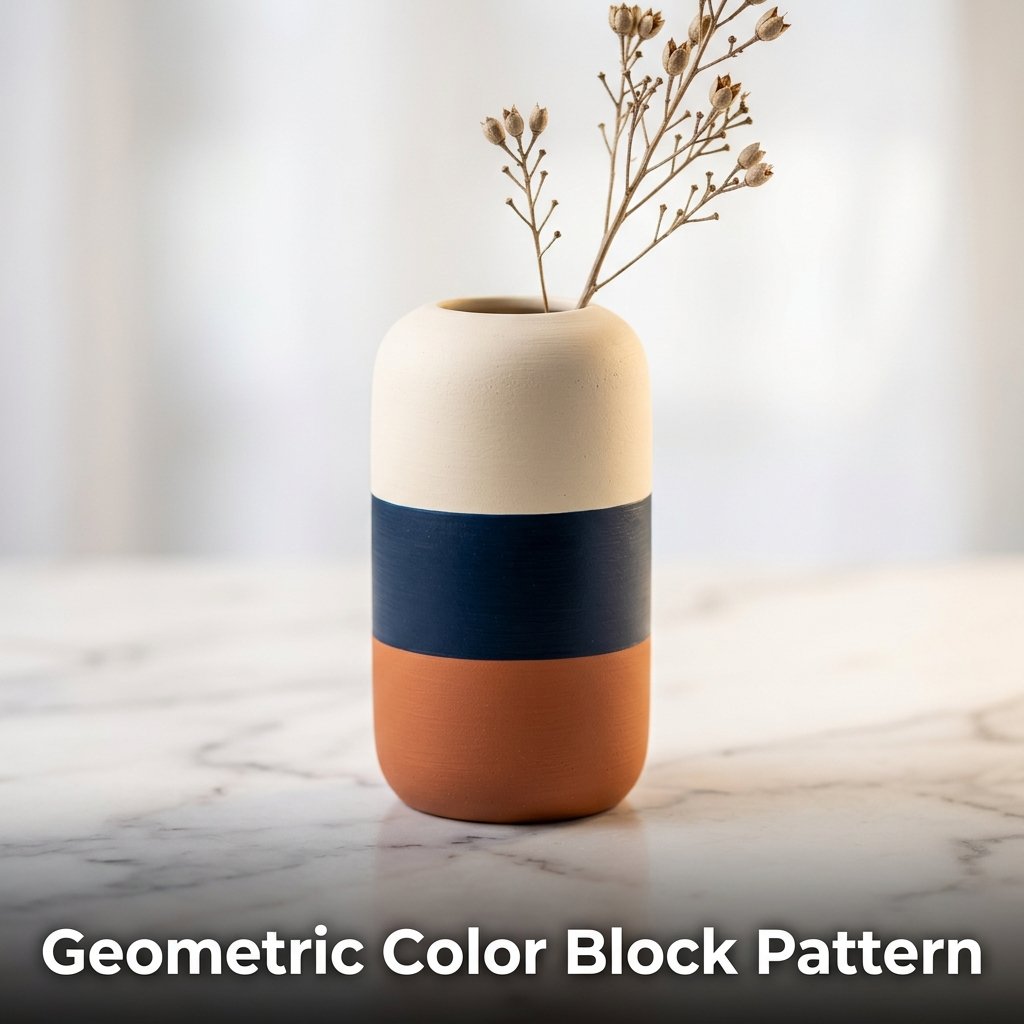
2. Geometric Color Block Pattern
A geometric color block pattern divides the surface of a mug, bowl, or vase into distinct sections using masking tape and fills each section with a flat ceramic paint color to produce a clean, modern design without any freehand painting skill required. I painted a color block vase using navy, terracotta, and cream sections divided by tape lines and the result looked like a purchased item from a home decor store. Total studio time was 45 minutes.
Geometric pottery painting ideas suit beginners specifically because the masking tape creates perfectly straight dividing lines without any ruler or brush control needed during the color application step.
Applying Masking Tape for Clean Lines
Press strips of low-tack masking tape firmly onto the dry ceramic surface in the desired line positions before applying any paint. Run a fingernail along both edges of each tape strip to seal the tape completely against the ceramic surface and prevent paint from bleeding under the tape edge during application. Apply the paint color up to and slightly over the tape edge using a flat brush. Allow the paint to dry for 10 minutes before removing the tape at a 45-degree angle to produce a clean, sharp color boundary line.
Color Combinations for Geometric Pottery
Three-color geometric combinations produce the most balanced result on a mug or vase surface. Navy and cream with a single terracotta accent section suits modern Scandinavian interior aesthetics. Sage green, cream, and dusty pink suits boho home styling. Black and white with a single gold accent suits a minimalist modern design approach. Apply 2 coats of each color for solid, even coverage over the bisque ceramic surface because a single coat allows the white bisque to show through and reduces the final color saturation of the finished design.
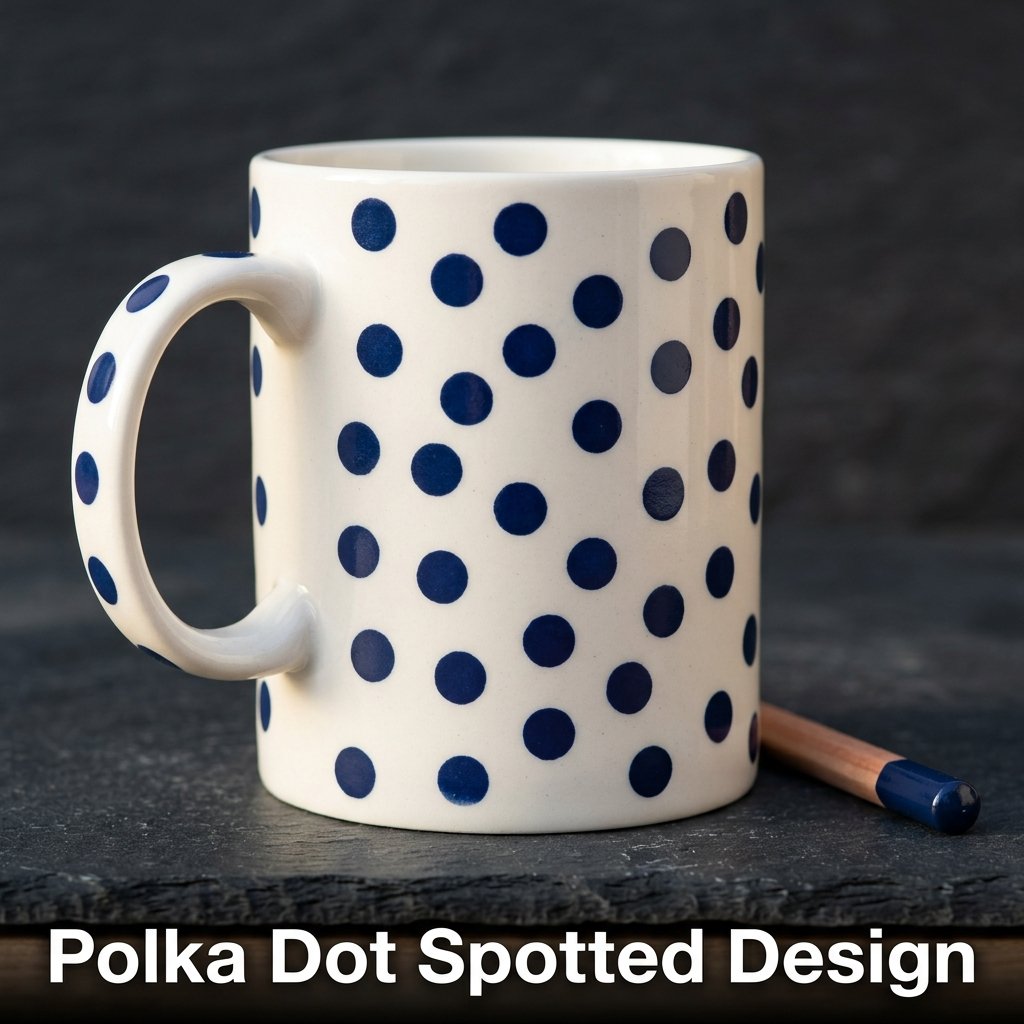
3. Polka Dot Spotted Design
A polka dot spotted design uses the eraser end of a pencil or a round dotting tool dipped in ceramic paint to produce a repeated circular dot pattern across the surface of a mug, plate, or bowl. I painted a set of 4 polka dot mugs for a friend’s birthday gift in one studio session. Each mug used a different color combination: navy dots on white, white dots on black, yellow dots on grey, and pink dots on cream. The set took 60 minutes total and cost 28 dollars at the studio.
Polka dot pottery painting ideas are the most accessible simple pottery painting ideas for kids because the dotting technique requires no brush control, no drawing skill, and no drying time between individual dots.
How to Make Consistent Polka Dots
Dip the eraser end of a standard pencil into a small pool of ceramic paint on a palette. Press the loaded eraser straight down onto the ceramic surface and lift straight up without dragging. Reload the eraser with paint before each dot press. A fully loaded eraser produces a crisp, filled circle. A partially loaded eraser produces a ring shape rather than a solid dot. Keep all dots the same size by using the same eraser and the same press pressure throughout the full design.
Dot Pattern Layouts for Pottery Painting
Three dot pattern layouts produce distinct visual results on ceramic surfaces. A uniform grid with dots spaced at equal intervals produces a formal, structured pattern. A random scatter with dots placed at varying distances produces a casual, organic result. A clustered arrangement with dots grouped in circular or floral formations produces a decorative, intentional design. I recommend the random scatter layout for first-time pottery painters because inconsistencies in spacing add to the handmade character of the finished piece rather than detracting from it.
4. Simple Floral Wreath Plate
A simple floral wreath plate paints a ring of small flower and leaf shapes around the inner border of a plain white ceramic plate using a size 4 round brush and 4 to 5 ceramic paint colors. I painted one for my mother as a birthday gift and she hung it on her kitchen wall as a decorative plate rather than using it for food. The wreath design took 70 minutes at a paint-your-own studio and cost 18 dollars including the plate and studio fee.
Floral wreath pottery painting ideas suit simple pottery painting ideas for adults specifically because the repetitive nature of painting small flowers around a border reduces the pressure of the first stroke and produces a satisfying finished result through accumulated small elements.

Painting Small Five-Petal Flowers
Load a size 4 round brush with pink or coral ceramic paint. Place the brush tip at the outer edge of a petal position. Press down and pull inward toward the flower center in a short curved stroke. Repeat 4 more times around the same center point to produce a 5-petal flower. Add a yellow dot at the center of each flower using the pencil eraser dotting method. Each flower takes under 2 minutes to paint. A standard 25 cm dinner plate border holds 12 to 15 flowers with leaf clusters filling the spaces between them.
Adding Leaves Between Flowers on a Wreath
Paint leaf pairs between each flower cluster using a size 2 round brush and 2 shades of green. Position one dark green leaf and one light sage leaf beside each flower, pointing outward toward the plate rim. This 2-shade leaf approach adds depth to the wreath without requiring any shading technique. Paint the stem lines connecting all elements using a size 0 liner brush loaded with dark green paint pulled in thin, curved lines across the plate surface between the flower and leaf positions.
5. Watercolor-Effect Abstract Vase
A watercolor-effect abstract vase applies diluted ceramic paint in loose, overlapping washes to a ceramic vase surface to produce a soft, translucent color effect that resembles watercolor paper painting on a 3-dimensional ceramic form. I painted a small vase using diluted cobalt blue, lavender, and pale pink ceramic paints at a studio session. The overlapping color washes blended at their edges during application and produced a result that looked significantly more advanced than the 40 minutes of technique it required.
Watercolor-effect pottery painting ideas suit aesthetic pottery painting styles specifically because the soft, blended color results photograph well and suit the neutral, earthy interior aesthetics popular on Pinterest and home decor platforms.

Diluting Ceramic Paint for a Watercolor Effect
Add water to ceramic paint at a 2:1 paint-to-water ratio for a translucent wash consistency. The diluted paint should flow off the brush in a thin stream rather than dropping in thick blobs. Test the consistency on a scrap piece of paper before applying to the ceramic surface. Apply the diluted paint in broad, loose strokes using a large flat brush. While the paint remains wet, add a second color adjacent to the first and pull the two colors together at their meeting point with one light brush pass.
Building Depth With Multiple Wash Layers
Apply the first color wash across the full vase surface and allow 5 minutes of partial drying time. Apply a second color wash over specific sections of the first layer while the base remains slightly damp. The two layers blend softly where they overlap on the damp surface. Apply a third concentrated layer in a darker tone at the base of the vase for a graduated color effect that shifts from light at the top to deep at the base. This 3-layer approach produces the visual depth that distinguishes a watercolor-effect vase from a plain single-color painted piece.
6. Animal Face Mug Design
An animal face mug design paints a simplified cartoon animal face on the front panel of a plain white ceramic mug using black outline paint and solid color fill to produce a cute pottery painting idea for kids and adults. I painted a fox face mug for my niece using orange, white, and black ceramic paints. She has used it as a pencil holder on her desk for 14 months and the paint has not chipped, cracked, or faded through regular handling and light cleaning.
Animal face pottery painting ideas for kids suit ages 5 and above for independent painting and produce a recognizable finished result because the simplified cartoon shapes require only basic circle and triangle forms.

Sketching an Animal Face on a Mug
Draw the animal face outline lightly on the mug surface using a pencil before painting. Pencil lines on bisque ceramics wipe away with a damp cloth if a mistake occurs before painting begins. For a fox face, draw a large triangle pointing downward for the face shape, 2 small triangles at the top for the ears, a small inverted triangle for the nose, and 2 almond shapes for the eyes. Keep all shapes large enough to fill with paint using a size 4 round brush without requiring precise fine brush work inside the shapes.
Painting and Outlining an Animal Face
Fill all pencil-outlined shapes with flat ceramic paint colors using a size 4 round brush: orange for the main face, white for the inner ear and muzzle area, and black for the eyes and nose. Allow each color section to dry for 5 minutes before painting an adjacent section to prevent color blending at the borders. Apply the black outline last using a size 0 liner brush loaded with black ceramic paint. Outline all major shape boundaries and add whisker lines extending from the muzzle area to complete the animal face design.
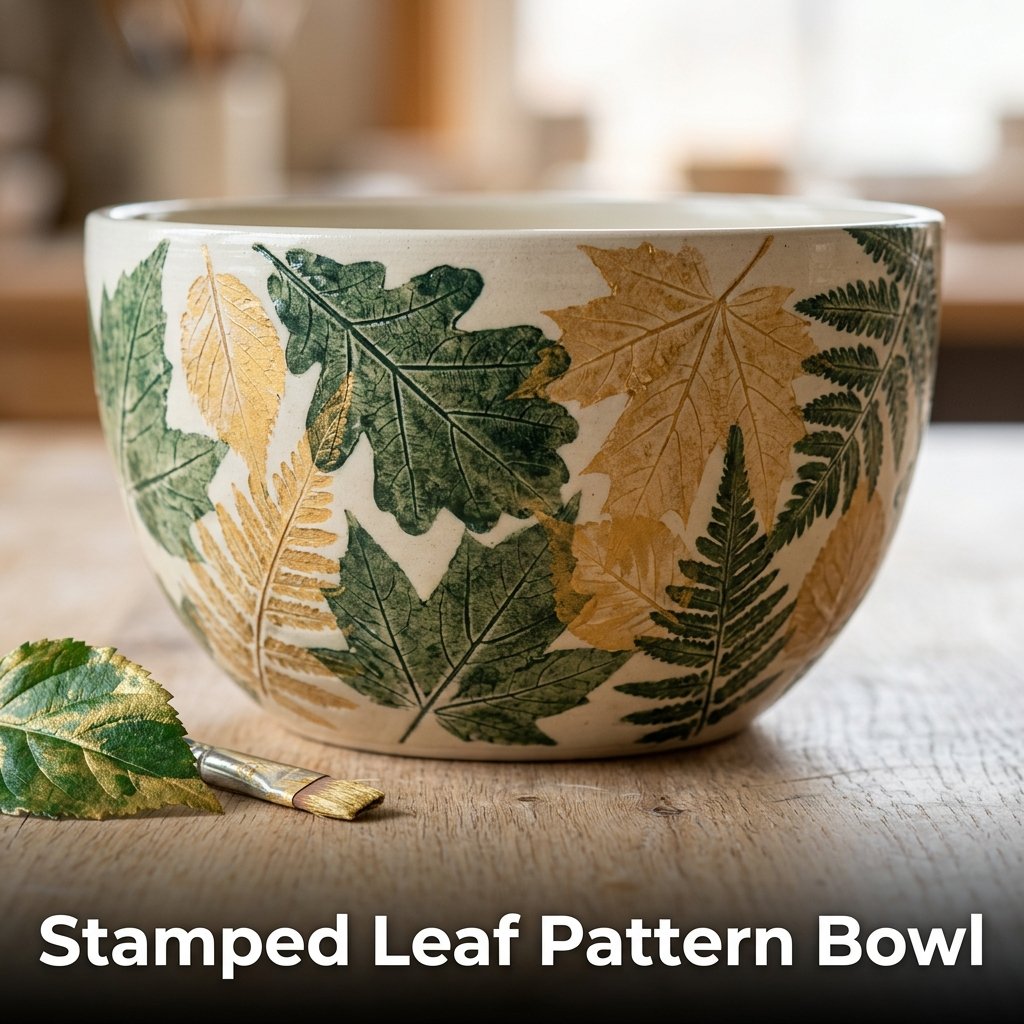
7. Stamped Leaf Pattern Bowl
A stamped leaf pattern bowl uses real leaves or leaf-shaped foam stamps dipped in ceramic paint and pressed onto the exterior of a ceramic bowl to produce a nature-print pattern across the full bowl surface. I collected 6 different leaf shapes from my garden, dipped them in green and gold ceramic paint, and pressed them across a wide ceramic bowl at a studio session. The finished bowl produced a different pattern in every section because the leaf shapes overlapped and rotated, and no two sections looked identical.
Leaf stamp pottery painting ideas are one of the most approachable simple pottery painting ideas for adults because the stamping technique produces an organic, artisan result that looks intentional regardless of exact placement precision.
Preparing Leaves for Pottery Stamping
Select fresh leaves with clearly defined veining on the underside because the vein impressions transfer to the ceramic surface during stamping and add textural detail to the finished print. Press each fresh leaf flat between two sheets of paper for 10 minutes to flatten any curl before dipping in paint. Apply ceramic paint to the underside of the leaf using a flat brush rather than dipping it directly into a paint pool to control the paint thickness and prevent excess paint from bleeding outside the leaf edge during stamping.
Pressing Leaves Onto a Ceramic Bowl
Press the paint-loaded leaf underside firmly onto the ceramic bowl exterior with even pressure across the full leaf surface. Lift the leaf straight upward without sliding to produce a clean impression. Rotate the leaf to different angles between prints to produce a scattered, natural arrangement. Overlap some prints partially over earlier dried prints to add depth to the finished pattern. Reload the leaf with paint after every 2 prints to maintain consistent color saturation across all impressions on the full bowl surface.
8. Stripe Pattern Mug
A stripe pattern mug applies horizontal or vertical stripes in 2 to 4 ceramic paint colors around the full circumference of a plain white mug using masking tape guides for clean edges and a flat brush for color application. I painted a vertical stripe mug in navy, terracotta, and cream at a studio session in 35 minutes. The finished mug photographs clearly from every angle because the stripe pattern wraps around the full mug surface rather than being confined to one face.
Stripe pattern pottery painting ideas are the most time-efficient simple pottery painting ideas because the stripe application requires no drawing, no detailed brush work, and no color mixing to produce a finished, professional-looking result.

Applying Horizontal Stripes With Masking Tape
Wrap strips of low-tack masking tape horizontally around the mug at regular intervals, spacing each tape strip 1 cm apart for narrow stripes or 2 cm apart for wider stripes. Press all tape edges firmly against the mug surface. Apply the first color between the first and second tape strips using a flat brush. Skip one tape section and apply the same color to the third section. Fill the remaining sections with a second or third color in an alternating or sequential pattern. Remove all tape after all colors dry.
Vertical Stripe Variation on a Mug
Mark 6 to 8 equally spaced vertical lines around the mug circumference using masking tape strips running from the base rim to the top rim. Measure the mug circumference and divide by the desired number of stripes to calculate the spacing before applying the tape. Apply alternating colors between the vertical tape strips. Vertical stripes on a mug produce a taller visual appearance than horizontal stripes at the same mug dimensions because the stripe direction leads the eye upward rather than around the circumference.
9. Celestial Moon and Stars Design
A celestial moon and stars design paints crescent moon shapes, small star dots, and simple planet circles in gold, navy, and white ceramic paint on a dark-glazed or dark-painted ceramic mug or bowl to produce an aesthetic pottery painting idea inspired by night sky imagery. I painted a navy mug with gold stars and a white crescent moon at a studio session and the result generated the most positive responses of any pottery piece I have shared publicly. The design took 55 minutes and used only 3 paint colors.
Celestial pottery painting ideas suit aesthetic pottery painting styles on Pinterest because the dark background with metallic gold details produces high-contrast photography results that photograph clearly in both natural and artificial light conditions.

Painting a Dark Background Base Coat
Apply 2 coats of navy or midnight blue ceramic paint to the full mug exterior using a flat brush in smooth, overlapping horizontal strokes. Allow each coat to dry for 10 minutes before applying the next. The dark base coat produces the night sky background that the gold and white celestial details rest against. Apply the base coat evenly across the full surface including the mug handle exterior, as an unpainted handle on a dark-background mug creates a visual inconsistency that disrupts the finished design.
Adding Moon, Stars, and Planet Details
Paint a crescent moon shape on the mug front using titanium white ceramic paint and a size 4 round brush. Add 5 mm star shapes scattered across the mug surface using a size 0 liner brush loaded with gold ceramic paint. Paint small circle planets in 3 different sizes using gold and white paint beside the crescent moon. Add ring lines around 2 of the planet circles to produce Saturn-style details. Apply all gold and white details after the dark base coat dries completely to prevent the dark base color from mixing into the lighter paint colors during application.
10. Hand-Lettered Quote Mug
A hand-lettered quote mug paints a short word, name, or phrase on the front panel of a plain white ceramic mug using a fine liner brush and black or colored ceramic paint to produce a personalized pottery painting idea for gifts. I painted a mug with my sister’s name in simple block letters for her birthday. She uses it daily and the letters have stayed fully intact through 200-plus dishwasher cycles because I applied a kiln-fired ceramic paint rated for fired finishes rather than oven-bake acrylic.
Hand-lettered pottery painting ideas for gifts are among the most purchased categories on Etsy for personalized ceramics, with individual hand-lettered mugs listing at 18 to 35 dollars each.

Transferring a Lettering Design Onto a Mug
Write the desired text on a strip of paper cut to the same height as the mug’s paintable area. Tape the paper strip inside the mug so the text shows through the exterior surface as a guideline visible through the translucent mug wall. Trace over the visible text guidelines using a pencil on the exterior mug surface. The traced pencil outline provides a letter position guide for painting without requiring freehand lettering directly on the mug surface with no reference.
Painting Letters With a Liner Brush
Load a size 0 liner brush with black ceramic paint thinned slightly with water to a fluid consistency. Paint each letter by following the pencil outline, keeping the brush tip in contact with the ceramic surface at all times rather than lifting and repositioning mid-stroke. Complete all downstrokes first across all letters before adding all upstrokes and crossbars. This sequence prevents smearing wet downstroke paint with the brush during subsequent stroke directions. Allow full drying before applying a second coat over any thin or patchy letter sections.
FAQ
What paint works best for pottery painting ideas at home?
Ceramic paint rated for air-dry or oven-bake application works best for pottery painting ideas at home without kiln access. FolkArt Enamel, DecoArt Americana Multi-Surface, and Pebeo Ceramic paints all adhere to glazed ceramic surfaces and cure to a dishwasher-safe finish after oven baking at 150 to 180 degrees Celsius for 30 minutes. Acrylic craft paint applies to ceramic surfaces but requires a clear ceramic sealant topcoat for durability. Ceramic paint rated for oven baking produces a harder, more chip-resistant surface than acrylic with sealant on items that receive daily handling and regular washing.
What are the easiest pottery painting ideas for beginners?
The easiest pottery painting ideas for beginners are polka dot designs, stripe patterns, and color block geometric designs. Polka dots require only a pencil eraser dipped in paint, which eliminates all brush control requirements. Stripe patterns require only masking tape and a flat brush for color filling. Color block designs require masking tape dividing lines and 2 to 3 flat color sections. All 3 designs complete in under 45 minutes on a plain white ceramic mug or bowl. None of the 3 requires any drawing skill, prior painting experience, or advanced brush technique to produce a clean, finished result.
What pottery painting ideas work best for kids?
Pottery painting ideas that work best for kids are polka dot patterns, animal face mugs, handprint bowls, and simple stripe mugs. Polka dot patterns use a pencil eraser stamp, which requires no brush control. Animal face mugs use pre-drawn pencil guides that children paint inside without precise line work. Handprint bowls press a paint-coated hand directly onto the bowl surface for an instant personalized print. Stripe mugs use masking tape to define all color boundaries. All 4 designs suit children aged 5 and above for independent completion at a paint-your-own pottery studio session lasting 60 to 90 minutes.
How do I seal pottery painting at home without a kiln?
Seal pottery painting at home without a kiln by oven baking ceramic paint at 150 to 180 degrees Celsius for 30 minutes after a 72-hour air-drying period. Place the painted ceramic item in a cold oven, then set the temperature and bake for the full 30 minutes. Turn the oven off and allow the ceramic to cool inside the oven before removing. This cold-start method prevents thermal shock cracking that occurs when a ceramic item is placed into a preheated oven. Alternatively, apply 2 coats of clear ceramic sealant spray over fully dried acrylic paint for a non-kiln protective finish.
What pottery painting ideas suit a vase specifically?
Pottery painting ideas that suit a vase specifically are watercolor-effect abstract washes, stamped leaf patterns, geometric color blocks, celestial moon and star designs, and simple botanical leaf designs. All 5 designs work across the curved, tall surface of a vase without requiring the painter to fit a design into a fixed circular shape as a plate requires. Watercolor washes suit cylindrical and irregular vase shapes equally. Stamped leaf patterns suit wide-bodied vases best because the larger surface area accommodates more leaf prints. Geometric color blocks suit narrow-necked vases because the clean tape lines produce strong visual impact on a limited surface width.