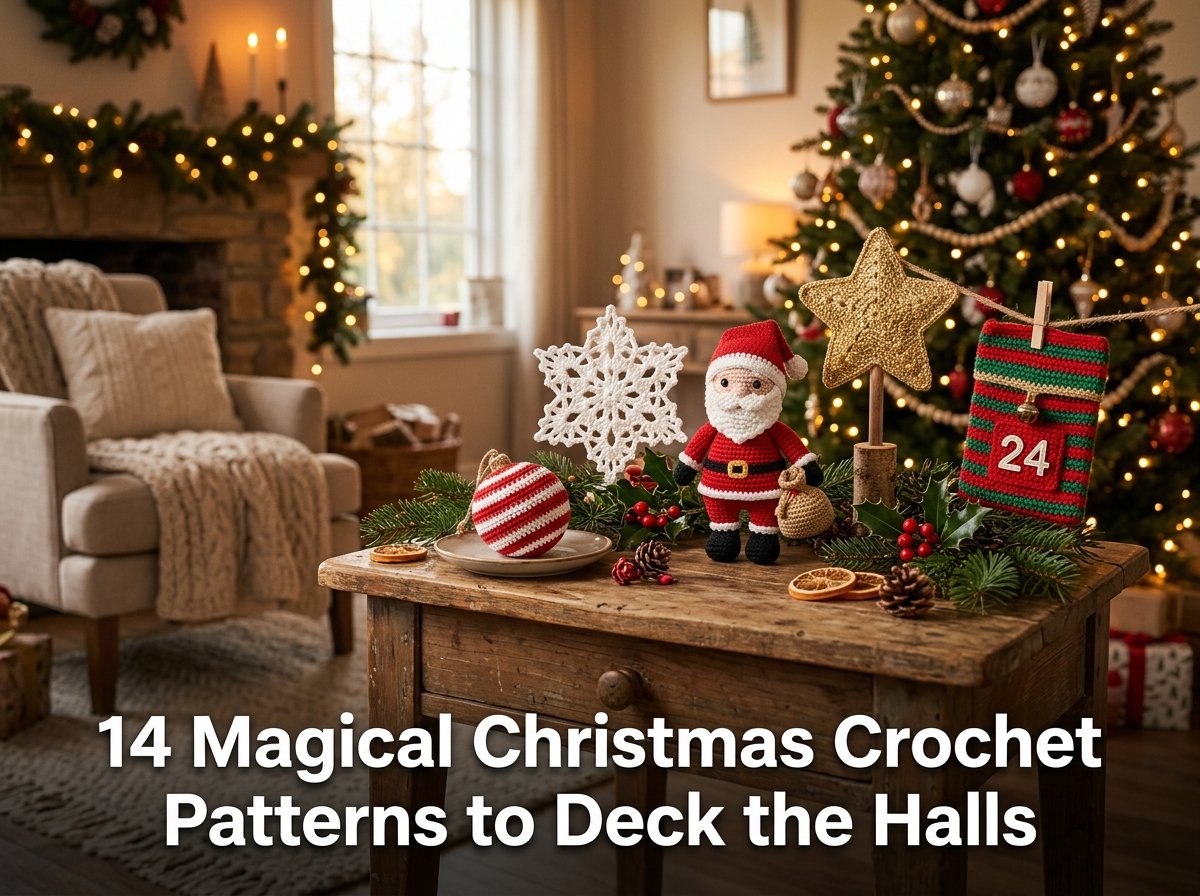
14 Magical Christmas Crochet Patterns to Deck the Halls
I picked up a crochet hook for the first time in November three years ago with one specific goal: make something to hang on my Christmas tree. Six hours of practice later, I had a small red and white striped ornament that looked more like a deflated balloon than a decoration. I hung it on the tree anyway. The following year I made 23 ornaments, a wreath, and a Santa amigurumi that my niece immediately claimed as her personal toy.
If you want Christmas crochet patterns, all 14 options here range from true beginner projects to intermediate designs. Every pattern uses accessible materials: acrylic or cotton yarn, a standard crochet hook, scissors, and a yarn needle.
These patterns cover ornaments, amigurumi figures, home decorations, and gift items. I selected each one because the stitch count stays manageable, the construction sequence is clear, and the finished piece looks intentional rather than practice-level.
Most projects here finish in 1 to 4 hours. Several qualify as easy Christmas crochet patterns for beginners who know only chain stitch, single crochet, and slip stitch. Each section states the yarn weight, hook size, difficulty level, and approximate completion time.
Free versions of most patterns on this list are available on Ravelry and crochet blog sites.
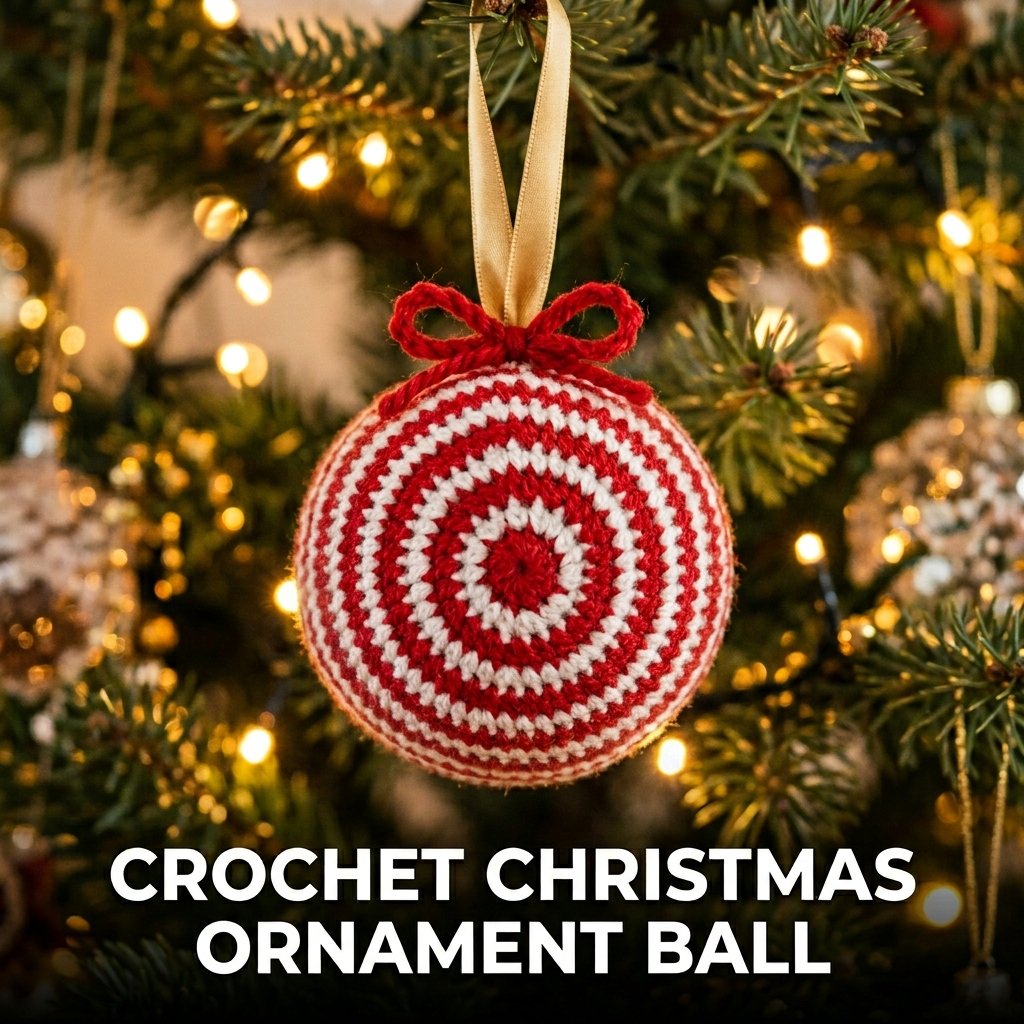
1. Crochet Christmas Ornament Ball
A crochet Christmas ornament ball uses single crochet worked in the round over a plain plastic or foam ball to produce a covered ornament for tree hanging. I made a set of 12 in red and white striped acrylic yarn over one weekend. Each ornament took 45 minutes and used less than 20 grams of yarn. The finished set hung on my tree for the full December season and stored flat in a small box without damage.
This is one of the most popular beginner Christmas crochet patterns because it uses only single crochet, requires no shaping, and produces a finished result in under an hour.
Yarn and Hook for a Crochet Ornament Ball
Use DK weight acrylic yarn with a 3.5 mm crochet hook for standard 60 mm plastic ornament balls. Acrylic yarn produces a consistent stitch definition and is available in every Christmas color combination including red and white, green and gold, and navy and silver. One 100-gram skein of DK acrylic covers 5 to 6 ornament balls in a single color. Two colors for a striped pattern use approximately 10 grams per color per ornament.
How to Cover an Ornament Ball With Crochet
Start with a magic ring. Single crochet 6 stitches into the ring and pull it closed. Increase every stitch in round 2 to reach 12 stitches. Increase every other stitch in round 3 to reach 18 stitches. Continue increasing at the same interval until the crochet panel fits the widest point of the ball. Work straight rounds for the middle section. Decrease in the same intervals used for increasing to close the panel over the bottom half of the ball. Slip stitch to close and weave in all yarn ends.
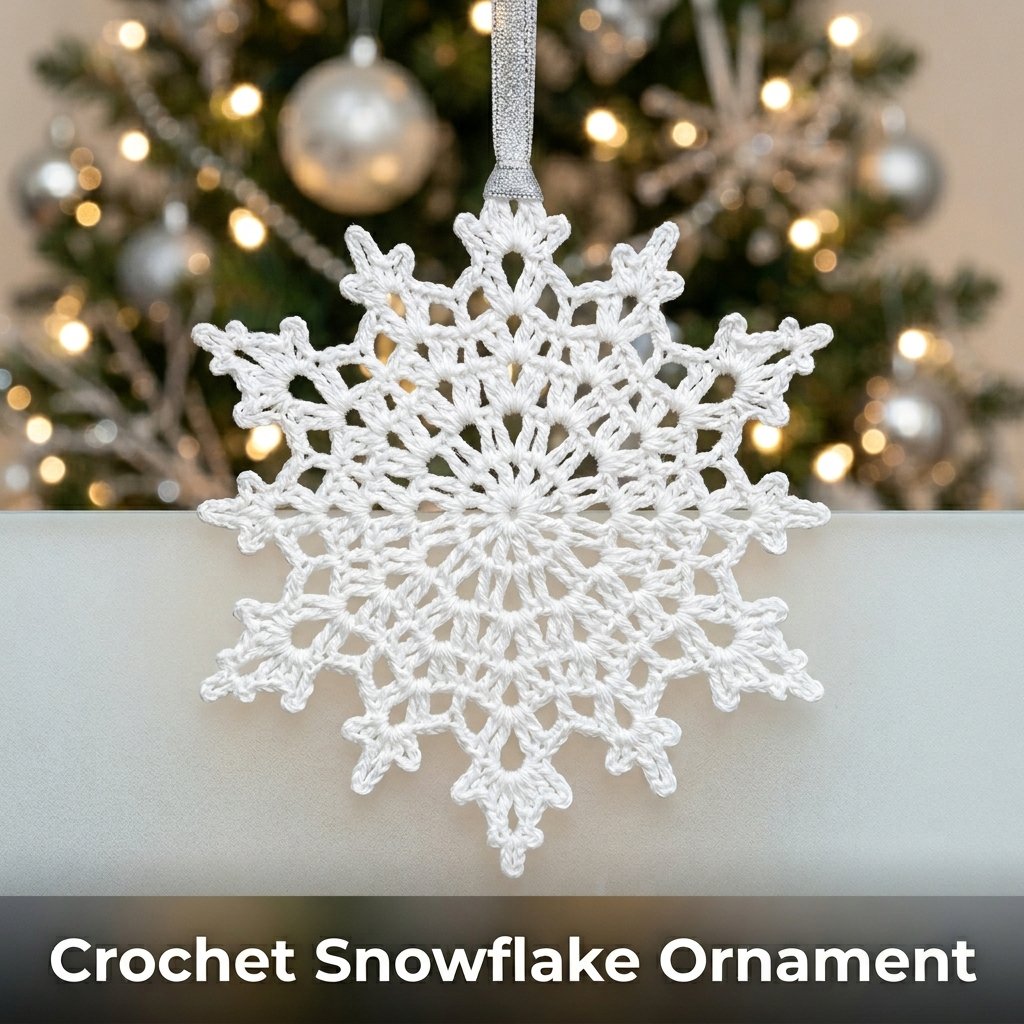
2. Crochet Snowflake Ornament
A crochet snowflake ornament uses cotton thread and a fine crochet hook to produce a flat, lace-textured decoration for tree hanging, window display, or gift topping. I crocheted my first set of 8 snowflakes using size 10 white cotton thread and a 1.5 mm steel hook. Each snowflake took 30 minutes and measured 10 cm across after blocking with liquid starch. The starched snowflakes held their shape flat and rigid throughout the Christmas display season.
Crochet thread Christmas patterns use thinner materials than standard yarn patterns and produce a more detailed, lace-like texture suited for traditional and vintage Christmas aesthetics.
Materials for a Crochet Snowflake
Use size 10 white or silver metallic cotton crochet thread with a 1.5 to 2.0 mm steel crochet hook. A single 50-gram ball of size 10 thread produces 15 to 20 standard snowflakes. Metallic silver thread produces a more visually striking ornament under tree lights than plain white cotton. Block each finished snowflake with liquid starch mixed at 2 tablespoons of starch per 250 ml of water. Pin the blocked snowflake flat on a foam board and allow 4 hours of drying time for a rigid, flat finished shape.
Basic Crochet Snowflake Construction
Work a magic ring with 6 chain-3 spaces joined by slip stitches to produce a 6-point base. Each subsequent round adds length and detail to the 6 arms of the snowflake. The simplest beginner snowflake uses only chain stitches, slip stitches, and single crochet stitches across 3 rounds. Free beginner snowflake Christmas crochet patterns are available on the Ravelry database under the “snowflake” search with the free and beginner filters applied. The most favorited free snowflake pattern on Ravelry has over 8,000 logged completed projects.
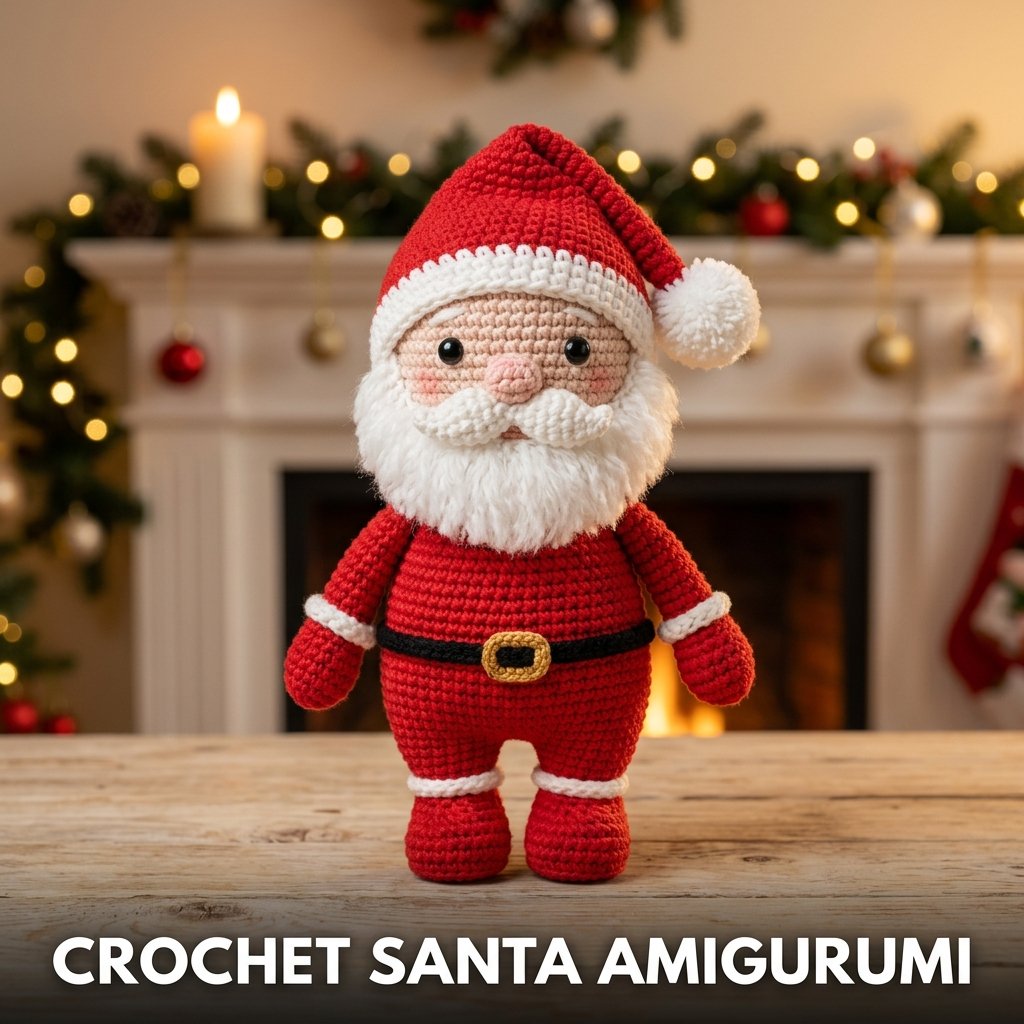
3. Crochet Santa Amigurumi
A crochet Santa amigurumi uses continuous rounds worked in the round from a magic ring to build a stuffed 3-dimensional Santa Claus figure as a tree ornament, shelf decoration, or handmade Christmas gift. I made a 15 cm Santa amigurumi as a gift last Christmas using red and white DK acrylic yarn and 15 mm safety eyes. The recipient placed it on their mantel rather than the tree because it stood independently and looked like a display figurine rather than a toy.
Free crochet patterns amigurumi Christmas figures including Santa, elves, and snowmen are among the most downloaded Christmas crochet patterns on Ravelry and LoveCrafts throughout November and December.
Yarn and Gauge for a Santa Amigurumi
Use DK weight red and white acrylic yarn with a 3.0 mm hook for a firm amigurumi fabric that holds the stuffed shape without gaps showing the polyfill inside. A standard 15 cm Santa uses approximately 40 grams of red yarn, 15 grams of white yarn, and 5 grams each of black, pink, and flesh-tone yarn for the belt, nose, and face sections. Work at a tighter gauge than the yarn label suggests for amigurumi to produce a dense, gap-free fabric.
Assembling a Santa Amigurumi
Crochet the body, head, arms, legs, hat, and beard as separate pieces. Stuff the body, head, and hat firmly with polyfill before closing each piece. Sew all pieces together using the yarn tail and a blunt tapestry needle. Attach safety eyes between rounds 10 and 11 of the head piece before stuffing, as inserting safety eyes after stuffing requires deflating the head section to access the interior washer attachment point. Embroider the nose using pink yarn and a satin stitch after all pieces are assembled.
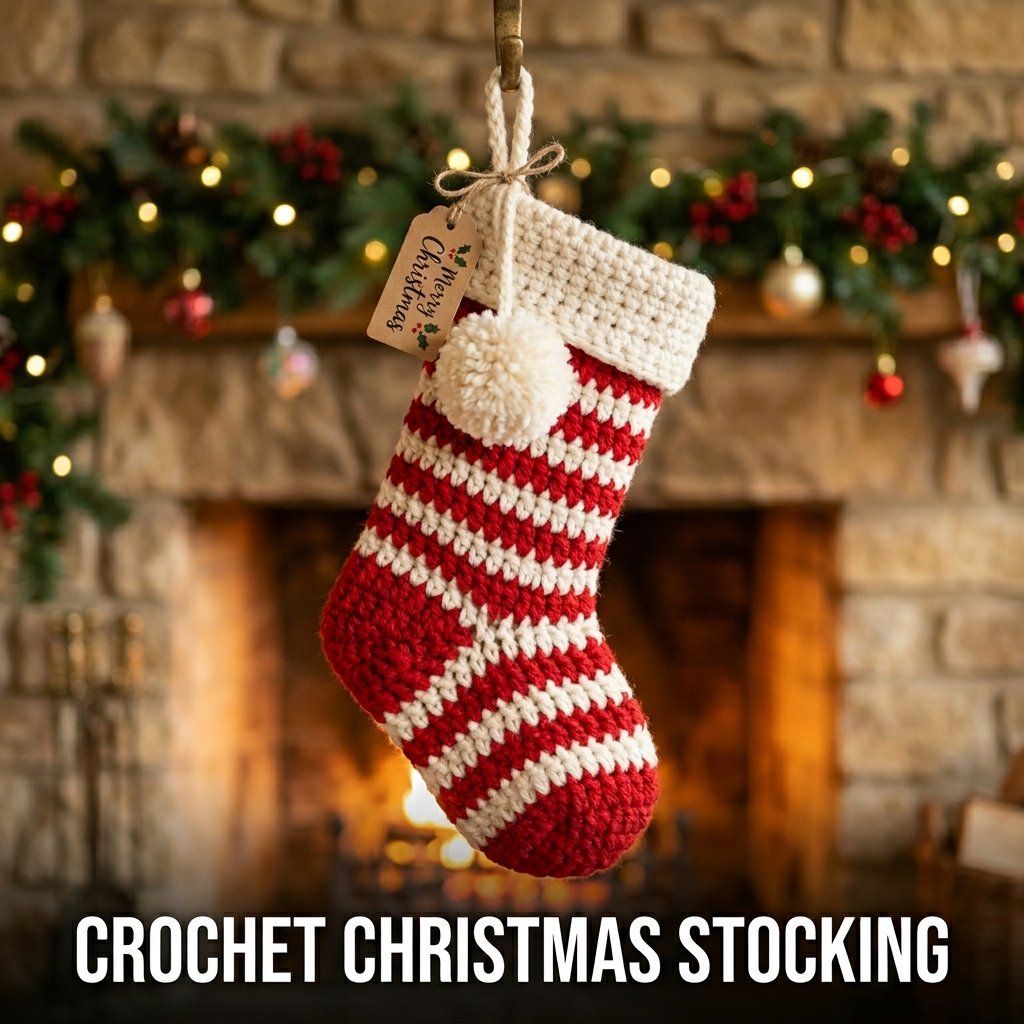
4. Crochet Christmas Stocking
A crochet Christmas stocking uses double crochet worked flat or in the round to produce a hanging stocking for mantel display and small gift filling. I crocheted a set of 4 matching stockings for my family using chunky red and white striped yarn on a 6.0 mm hook. Each stocking measured 35 cm from cuff to toe and took 3 hours to complete. The set hung on my mantel throughout December and each one held small gifts on Christmas morning.
Yarn Weight and Hook for a Crochet Stocking
Use chunky weight acrylic yarn at 100 to 150 grams per stocking with a 6.0 mm crochet hook for a stocking that works up quickly and holds its shape when filled with small gifts. DK weight yarn produces a smaller, more ornament-sized stocking at 15 to 20 cm when worked on a 3.5 mm hook. The chunky version suits mantel display and actual gift filling. The DK version suits tree ornament display and decorative use only because its smaller size limits fill capacity.
Constructing a Basic Crochet Stocking
Chain 30 for a standard adult-size stocking foot. Work double crochet rows back and forth for 20 cm to form the foot section. Shape the heel by working short rows across the final 15 stitches of the foot section. Join to work in the round for the leg section and continue for 15 cm. Fold the top edge down 5 cm and single crochet around the folded edge for the cuff. Add a chain loop at the back top edge for hanging. Attach a contrasting color pompom to the front center of the cuff as the final decoration.
5. Crochet Christmas Tree
A crochet Christmas tree uses treble crochet worked in the round with decreasing stitch counts per round to produce a dimensional cone-shaped tree that stands independently as a tabletop decoration. I made a set of 3 in small, medium, and large sizes using green DK yarn. The smallest measured 8 cm tall and the largest measured 22 cm tall. All 3 stood on my bookshelf as a seasonal display grouping throughout December.
Crochet Christmas tree patterns range from flat applique designs suited for cards and bunting to fully dimensional stuffed cone trees suited for tabletop display.
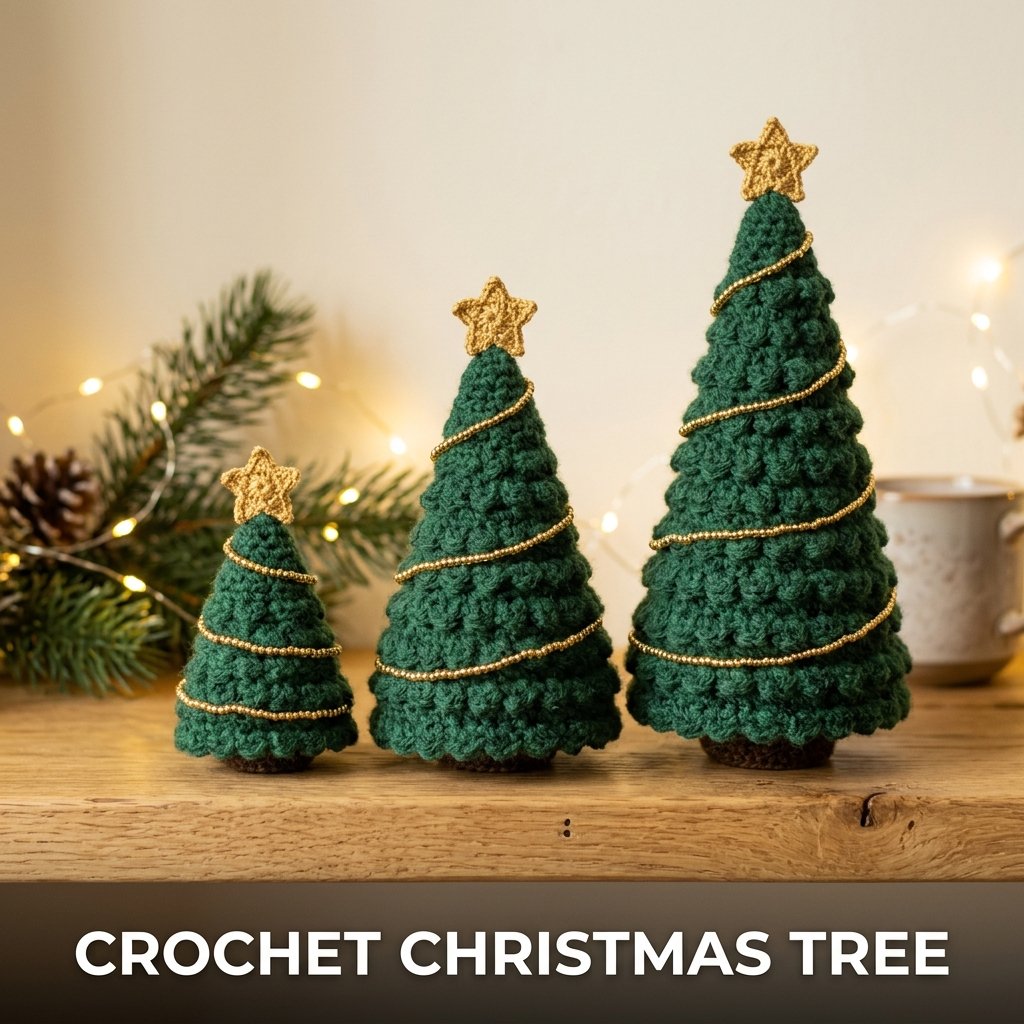
Shaping a Dimensional Crochet Christmas Tree
Start at the top of the tree with a magic ring and 3 chain-2 spaces. Work outward in rounds, increasing the stitch count in each round to build the gradually widening cone shape. The number of increase rounds determines the final tree height: 8 rounds produces an 8 cm tree and 15 rounds produces a 20 cm tree. Stuff the finished cone firmly with polyfill before closing the base. Sew a cardboard circle to the base interior to keep the tree standing flat without tipping during display.
Decorating a Crochet Christmas Tree
Sew small bead or sequin ornaments to the tree surface using a beading needle and matching thread. Thread 2 mm gold beads alternating with red beads on a strand of sewing thread and wind the strand around the tree in a spiral from base to tip to represent garland. Attach a small crocheted gold star to the top tip of the tree using 2 stitches of matching yarn. These 3 decoration elements require 20 minutes of finishing work and produce a decorated tree that reads as a complete miniature display piece.
6. Crochet Reindeer Amigurumi
A crochet reindeer amigurumi uses brown DK yarn, pipe cleaner antlers, and a red pompom nose to produce a Rudolph-style stuffed figure as a Christmas gift, ornament, or shelf decoration. I made one as a gift for a child last Christmas and it became the most-played-with gift they received. The pattern uses only single crochet and basic increases and decreases, which places it firmly within the easy Christmas crochet patterns category despite its detailed finished appearance.
Reindeer amigurumi figures sell consistently on Etsy at 15 to 30 dollars each during the November and December season, making them one of the most commercially useful small Christmas crochet projects for selling.
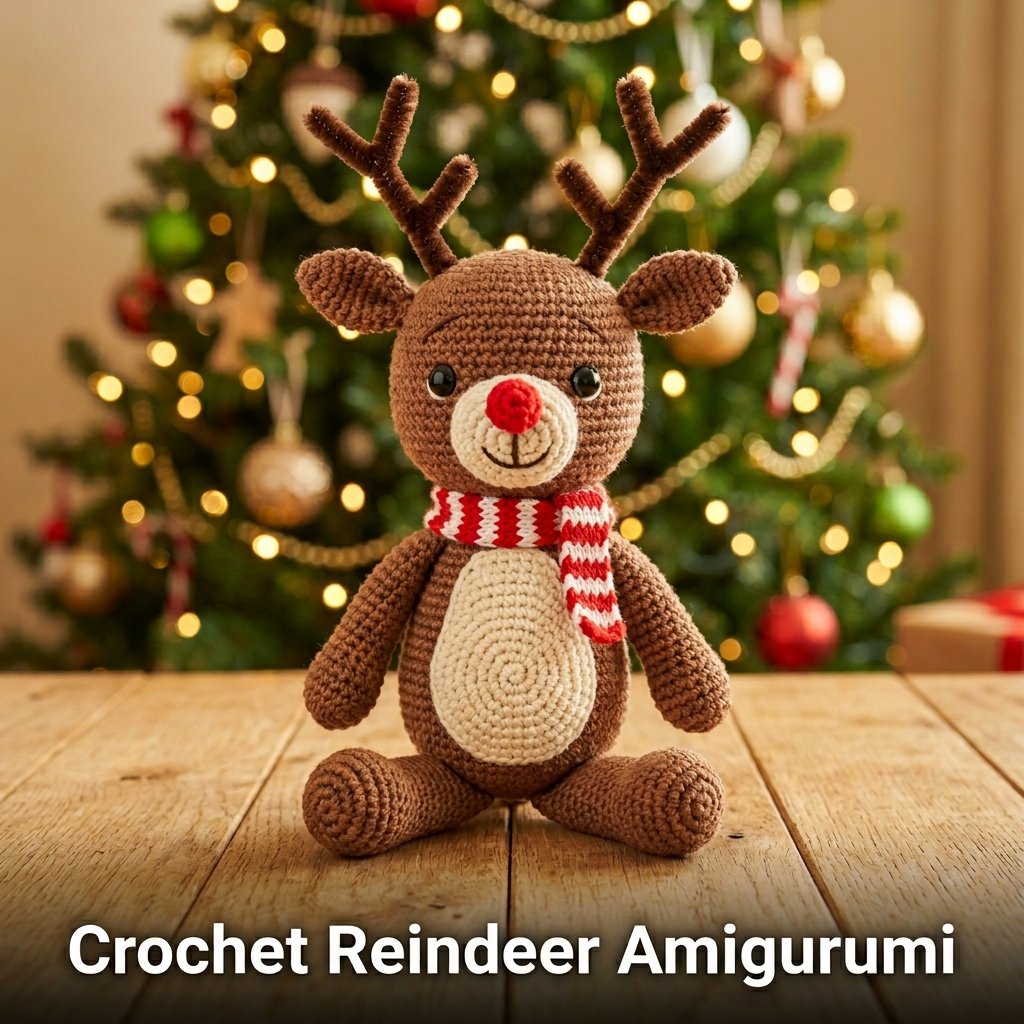
Materials for a Crochet Reindeer
Use 50 grams of brown DK acrylic yarn, 5 grams of cream yarn for the belly patch, and 5 grams of red yarn or a 15 mm red pompom for the nose. Use a 3.0 mm hook for a firm fabric. Cut two brown pipe cleaners at 15 cm each for the antlers. Fold each pipe cleaner into a Y shape with 2 upward branches. Attach the straight base of each pipe cleaner into the top of the finished head by threading it through the crocheted fabric and bending the base end inside the stuffed head to secure it.
Crochet Reindeer Construction Sequence
Crochet the body, head, 4 legs, 2 ears, and a tail as separate pieces. Work all pieces in continuous rounds starting from a magic ring. Stuff the body and head firmly before closing. Leave legs unstuffed for a poseable, floppy appearance or stuff lightly for a standing figure. Sew all pieces to the assembled body using the yarn tail and a tapestry needle. Attach 12 mm safety eyes between rounds 8 and 9 of the head. Add the pompom or embroidered nose below and between the safety eyes as the final assembly step.
7. Crochet Christmas Wreath
A crochet Christmas wreath uses a wire or foam wreath base covered in double crochet fabric and decorated with crocheted flowers, leaves, and berries to produce a front door or wall decoration. I made one using a 30 cm wire wreath form, 200 grams of green chunky yarn, and small crocheted red berries and white flowers. The finished wreath hung on my front door from December 1st through January and attracted comments from every visitor who saw it.
A crochet Christmas wreath is one of the most impactful Christmas crochet patterns for home decoration because the finished size creates a strong visual presence equivalent to a purchased wreath at a fraction of the cost.
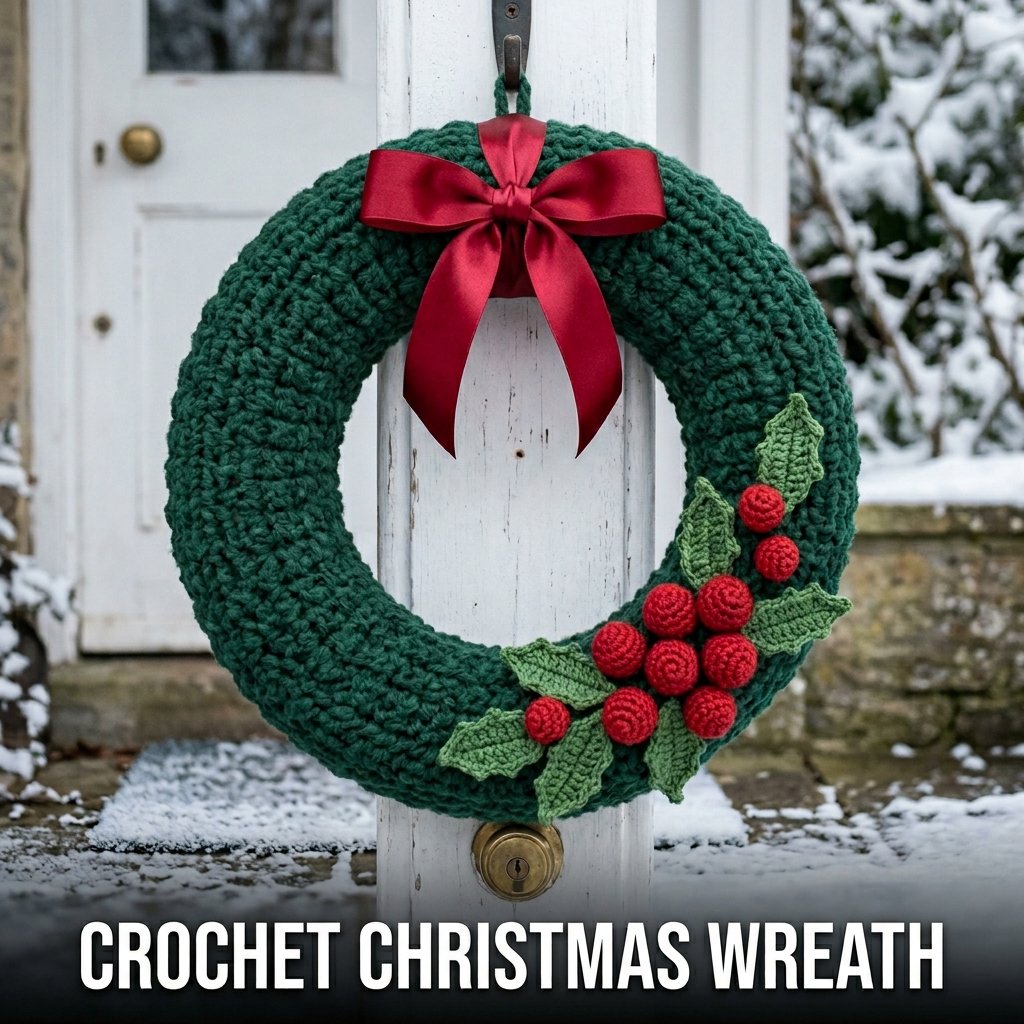
Covering a Wreath Form With Crochet
Cut yarn into 30 cm lengths. Fold each length in half and attach it to the wire wreath form using a lark’s head knot, pulling the folded loop through the wire and drawing the cut ends through the loop. Fill the entire wreath form with knotted yarn strips spaced 1 cm apart. Fluff and trim the yarn ends to create a full, even surface. Alternatively, single crochet directly around the wire form in continuous rounds to produce a smoother, denser covered surface than the knotted yarn method.
Adding Decorative Elements to a Crochet Wreath
Crochet 10 small red berries by working 6 single crochet stitches into a magic ring, pulling the ring closed, and stuffing with a small amount of polyfill before closing. Crochet 6 simple leaf shapes using a basic leaf pattern of chains and single crochet worked in rows. Sew the berries and leaves to the lower right section of the wreath in a clustered arrangement. Tie a wide red ribbon bow at the top of the wreath and attach it with a few stitches of matching yarn for a finished decorative wreath that suits both indoor and sheltered outdoor display.
8. Crochet Gift Topper Star
A crochet gift topper star uses a flat star pattern worked from the center out to produce a 5-pointed star ornament that sits on top of a wrapped Christmas gift as an alternative to a bow. I made 20 gift topper stars last Christmas using DK yarn scraps in red, green, and gold. Each star took 15 minutes and used under 5 grams of yarn. The total material cost for all 20 was under 2 dollars in leftover yarn.
Gift topper stars are one of the fastest and most material-efficient small Christmas crochet projects for producing multiple decorative items from minimal yarn investment.
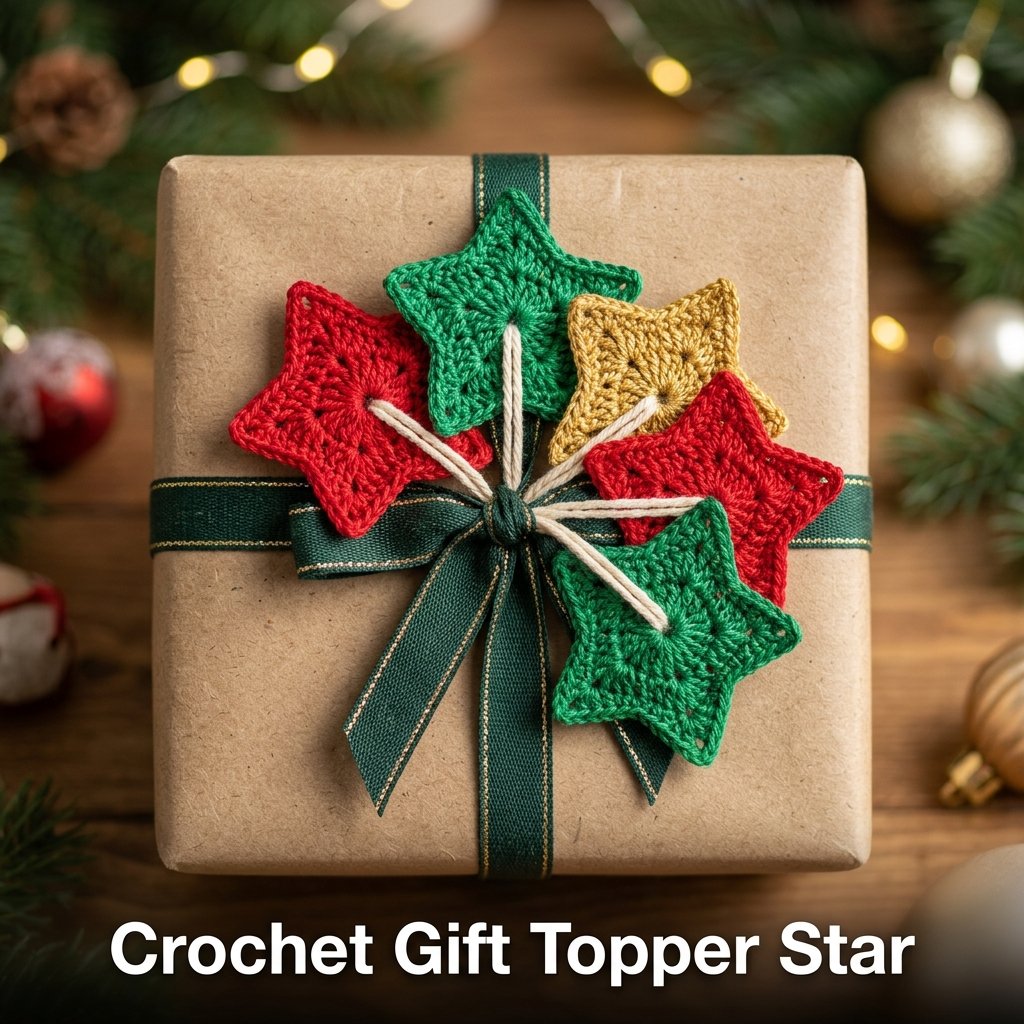
Pattern for a Basic Crochet Star
Start with a magic ring. Chain 3, double crochet 1 into the ring, chain 3, slip stitch into the ring. Repeat this sequence 4 more times to produce 5 points from the center ring. This produces a small 5-pointed star measuring 5 cm across in DK yarn. For a larger 10 cm star, extend each point by adding additional chains and double crochets to each of the 5 arms before closing. Weave in yarn ends and attach a short piece of yarn through the center for tying onto a gift.
Color Options for Crochet Gift Topper Stars
Single-color stars in red, green, or gold suit traditional Christmas gift wrapping aesthetics. Two-color stars produced by changing yarn color at the ring and using a contrasting color for the star arms create a more visual result. Metallic acrylic yarn in gold or silver produces a star that reflects light and suits darker gift wrapping colors including navy, forest green, and deep red. A set of 10 stars in 3 coordinating colors costs under 5 dollars in yarn and packages all gifts in a consistent decorative style.
9. Crochet Elf Amigurumi
A crochet elf amigurumi uses DK yarn in green, red, and flesh tones to produce a stuffed Christmas elf figure with a pointed hat, curled shoes, and a crocheted collar as a shelf decoration or handmade Christmas gift. I made 2 elves for my sister’s children last Christmas and they immediately placed them in their Christmas village display alongside purchased figures. The elves measured 18 cm tall and took 4 hours each to complete.
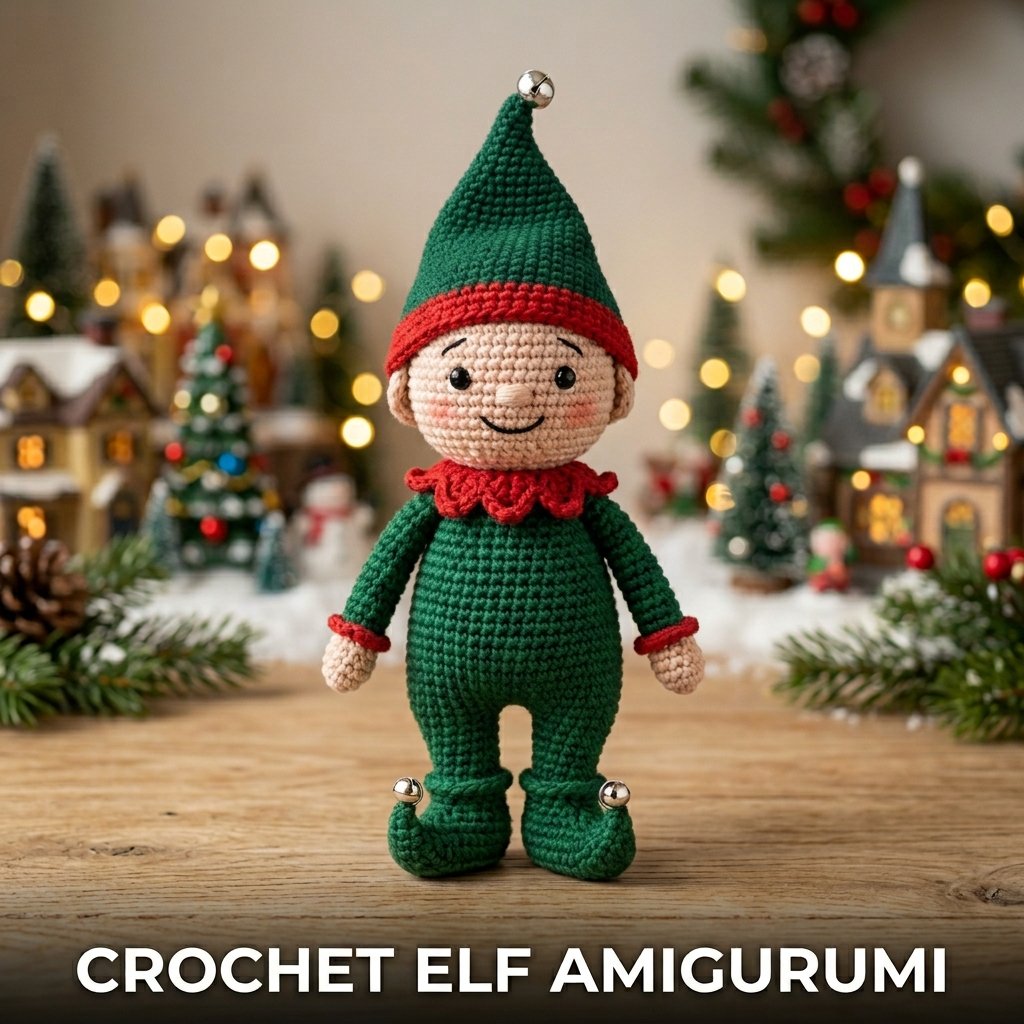
Elf Construction and Color Requirements
Use 40 grams of green yarn for the body, hat, and shoes, 10 grams of red yarn for the collar and hat trim, and 10 grams of flesh-tone yarn for the head and hands. Work the body, head, arms, legs, and hat as separate pieces, all in single crochet using a 3.0 mm hook. The pointed hat uses standard decreases without any special shaping: decrease every other stitch across each round until 6 stitches remain, then close the tip. Curl the shoe tips upward by stuffing the toe section with extra polyfill before sewing the shoes to the leg bases.
Finishing Details on a Crochet Elf
Embroider facial features using black yarn: 2 small cross stitches for eyes and 3 tiny straight stitches for a smile. Add a small red embroidered circle for each cheek using 5 satin stitches in a circular arrangement. Sew jingle bells to the tip of each shoe and the tip of the hat if the elf is intended for display use by adults or older children. Omit jingle bells on elves intended for children under 3 because detachable metal bells present a choking risk. Use embroidered yellow star shapes as a safe decorative alternative to bells on elves for younger children.
10. Crochet Baby Christmas Outfit
A crochet baby Christmas outfit uses soft acrylic or merino baby yarn to produce a hat and bootie set in red and white for a newborn or infant holiday photograph. I made one for a family member’s newborn using Paintbox Simply DK yarn in Christmas red and cream. The hat used 30 grams of red and 10 grams of cream. The bootie set used 20 grams of red and 5 grams of cream. Both pieces completed in 3 hours total and photographed better than any purchased holiday outfit the family owned.
Free baby Christmas crochet patterns for hats and booties are among the most downloaded beginner patterns on LoveCrafts and Ravelry during October and November for parents preparing for holiday season newborn photographs.
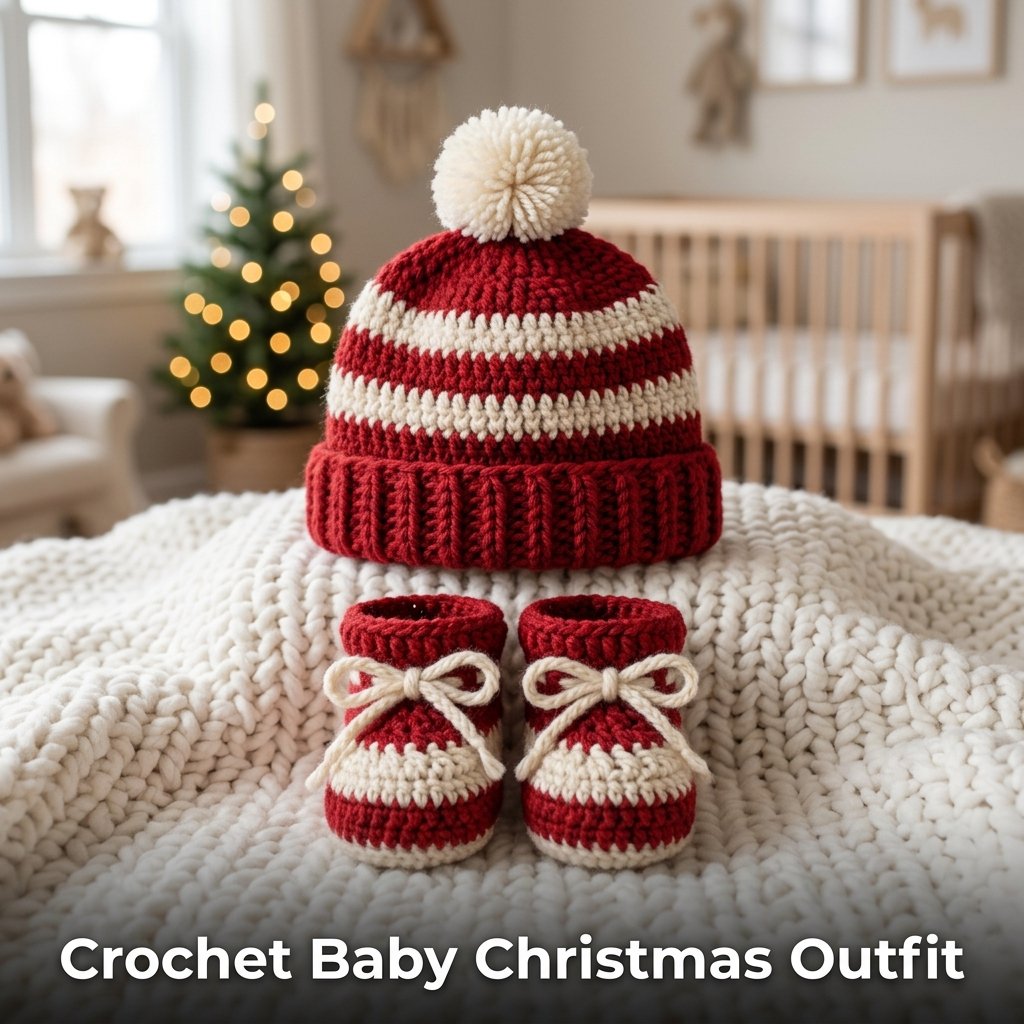
Yarn Safety for a Baby Crochet Outfit
Use yarn certified to OEKO-TEX Standard 100 for any item worn directly against infant skin. This certification confirms that the yarn and its dyes contain no harmful chemicals above safe limits for infant use. Paintbox Simply DK, Drops BabyMerino, and Scheepjes Larra all meet this standard and are available in red and cream colors suitable for Christmas outfit patterns. Acrylic yarn labeled as machine washable suits baby items because parents wash infant clothing frequently and hand-wash yarn adds significant ongoing inconvenience.
Sizing a Baby Christmas Hat
A newborn hat uses a starting chain of 40 stitches joined in a round, worked in single crochet for 14 rounds. A 3-month size uses a starting chain of 44 stitches for 16 rounds. A 6-month size uses 48 stitches for 18 rounds. Measure the circumference of the intended recipient’s head before beginning if possible, as newborn head sizes vary by 3 to 4 cm across a standard weight range. A hat that fits loosely at birth fits correctly at 4 to 6 weeks and produces a longer useful wearing period than a hat sized exactly to birth measurements.
11. Crochet Christmas Tree Skirt
A crochet Christmas tree skirt uses double crochet worked in the round to produce a flat, circular base covering for a Christmas tree stand. I crocheted one at 80 cm diameter using chunky red and cream striped yarn on a 6.5 mm hook. The skirt took 6 hours to complete over 2 evenings and has been the base of my Christmas tree display for 3 consecutive seasons without any stretching or color fading at the yarn surface.
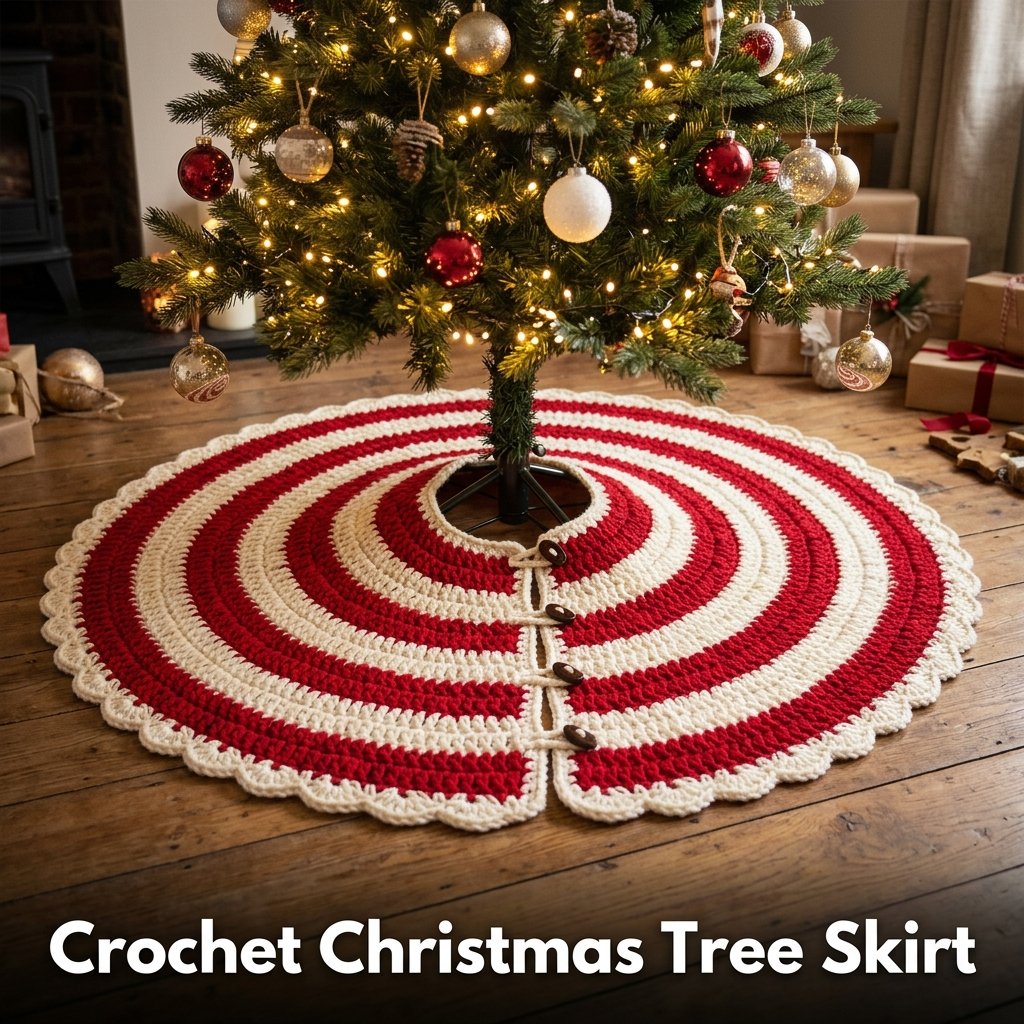
Yarn Requirements for a Tree Skirt
A standard 80 cm diameter tree skirt requires 300 to 400 grams of chunky yarn depending on stitch density. Red and cream stripes in 5-round color bands use approximately 150 grams of red and 150 grams of cream. Work in the round from the center outward, increasing 6 stitches every round for a flat circular growth. Cut an opening along one radius line to allow the skirt to wrap around the tree trunk. Crochet a simple button loop and sew a button to the opposite edge for a clean closure.
Edging and Finishing a Crochet Tree Skirt
Work a decorative border around the full outer circumference of the finished skirt using shell stitch or picot edging in a contrasting color. Shell stitch uses 5 double crochets worked into a single stitch spaced every 6 stitches around the edge, producing a scalloped border. Work the same edging around the inner trunk opening and both sides of the center slit for a fully finished appearance on all edges. Block the finished skirt flat by pinning it to the correct diameter on a flat surface and spraying with water, allowing 4 hours of drying time.
12. Crochet Christmas Star Tree Topper
A crochet Christmas star tree topper uses an easy Christmas star crochet pattern worked in gold or yellow DK yarn to produce a 5-pointed star at 20 to 25 cm diameter for positioning at the top of a Christmas tree. I made one last year using gold metallic DK yarn and a 4.0 mm hook. The finished star was stiffened with liquid starch and mounted on a 30 cm length of wooden dowel wrapped in gold ribbon. It has topped my tree for 2 seasons and remains rigid and flat.
Stiffening a Crochet Star Tree Topper
Mix liquid starch with water at 3 tablespoons per 250 ml. Submerge the finished crochet star in the solution and gently squeeze the liquid through all stitches. Pin the wet star to a foam board with all 5 points extended to their maximum length, using straight pins placed every 2 cm around the full star perimeter. Allow 6 hours of drying time at room temperature before removing the pins. The dried starch produces a rigid star that holds its shape under the weight of surrounding tree branches without bending or drooping.
Mounting a Crochet Star as a Tree Topper
Cut a 30 cm length of 6 mm wooden dowel. Wrap the dowel in gold ribbon secured at each end with a small dot of hot glue. Push the wrapped dowel into the top branch cluster of the tree. Sew the back center of the stiffened crochet star to the top 3 cm of the dowel using matching yarn and 4 to 5 secure stitches. The star faces outward from the dowel at a slight forward tilt that allows the full star face to be visible from the front of the tree at standing viewing height.
13. Crochet Christmas Bunting
A crochet Christmas bunting uses triangular pennant shapes worked in festive colors joined by a chain stitch cord to produce a hanging decoration for mantels, shelves, and doorways. I made a 2-meter bunting using 12 triangular pennants in red, green, and cream DK yarn for my living room mantel. Each pennant took 20 minutes and the full bunting completed in 4 hours. It has replaced my purchased tinsel garland for 2 consecutive Christmas seasons.
Crochet Christmas patterns for bunting and garlands suit intermediate beginners because each individual pennant is a small, fast project that builds the full decoration through repetition rather than a single long construction sequence.
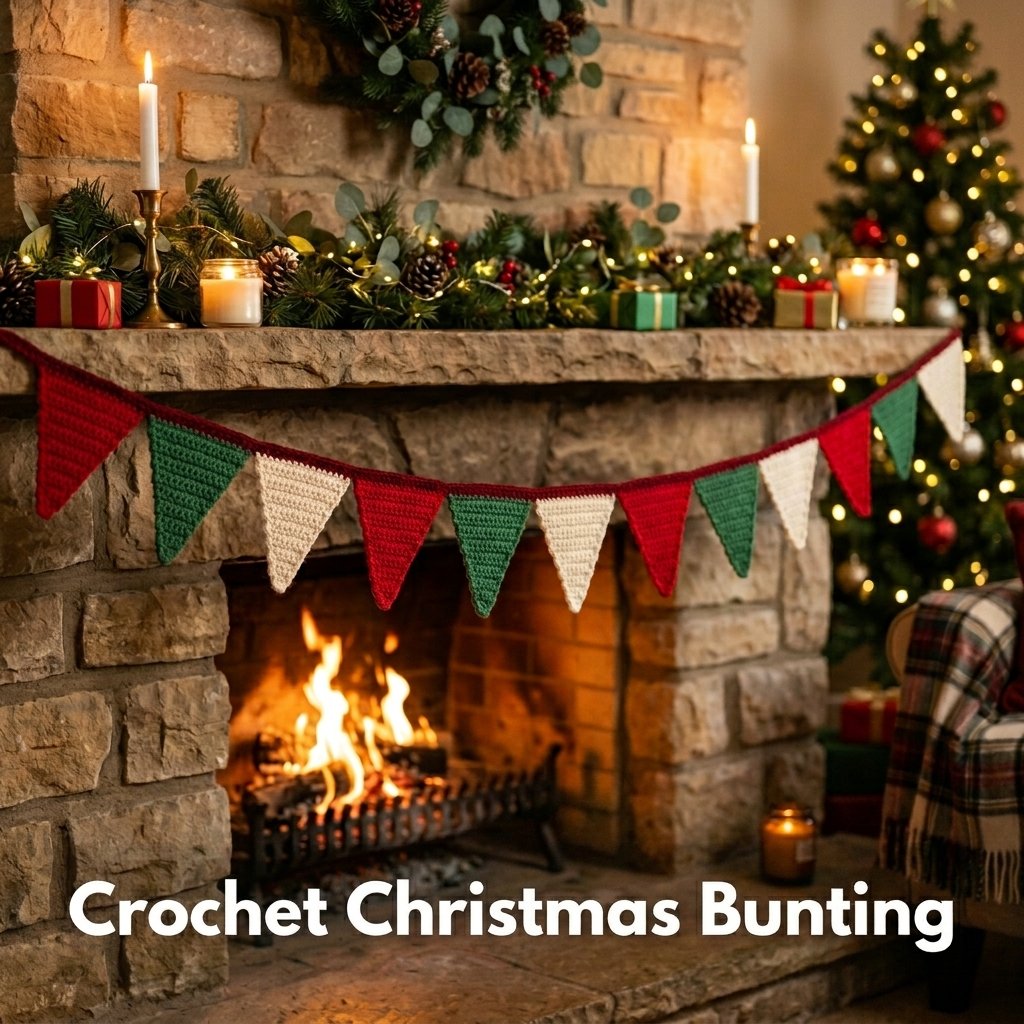
Crocheting a Triangle Pennant
Chain 2. Work 3 single crochet into the second chain from the hook. Turn. Increase both end stitches on every row by working 2 single crochet into each end stitch. Continue increasing until the triangle reaches the desired width: 10 increases produce a 20-stitch wide base and a 10 cm tall pennant in DK yarn on a 4.0 mm hook. Work the last row without increases to flatten the base edge. Fasten off and weave in both yarn ends before assembling the full bunting.
Joining Pennants on a Bunting Cord
Crochet a chain stitch cord at 20 cm longer than the desired total bunting length. Attach each pennant to the cord by slip stitching the top two corners of each pennant directly to the cord at equal intervals. Space pennants at 5 cm intervals for a dense, full bunting or 8 cm intervals for a more open, spaced arrangement. A 2-meter bunting uses 12 pennants at 5 cm spacing. Tie loop knots at each end of the cord for easy hanging on hooks or tacks without any additional hardware.
14. Crochet Advent Calendar Pockets
A crochet advent calendar uses 24 small crocheted pockets worked in festive colors, numbered 1 to 24, and hung on a cord to produce a reusable handmade advent calendar for filling with small Christmas treats and gifts. I made one using red and green DK yarn, taking 6 hours total across a weekend. Each pocket took 12 minutes and held a folded piece of paper, a small chocolate, or a tiny folded gift. My family has used the same calendar for 3 consecutive Decembers.
A crochet advent calendar is one of the most time-investment-justified Christmas crochet patterns because the finished item lasts for multiple years and serves a daily interactive purpose throughout the full month of December.
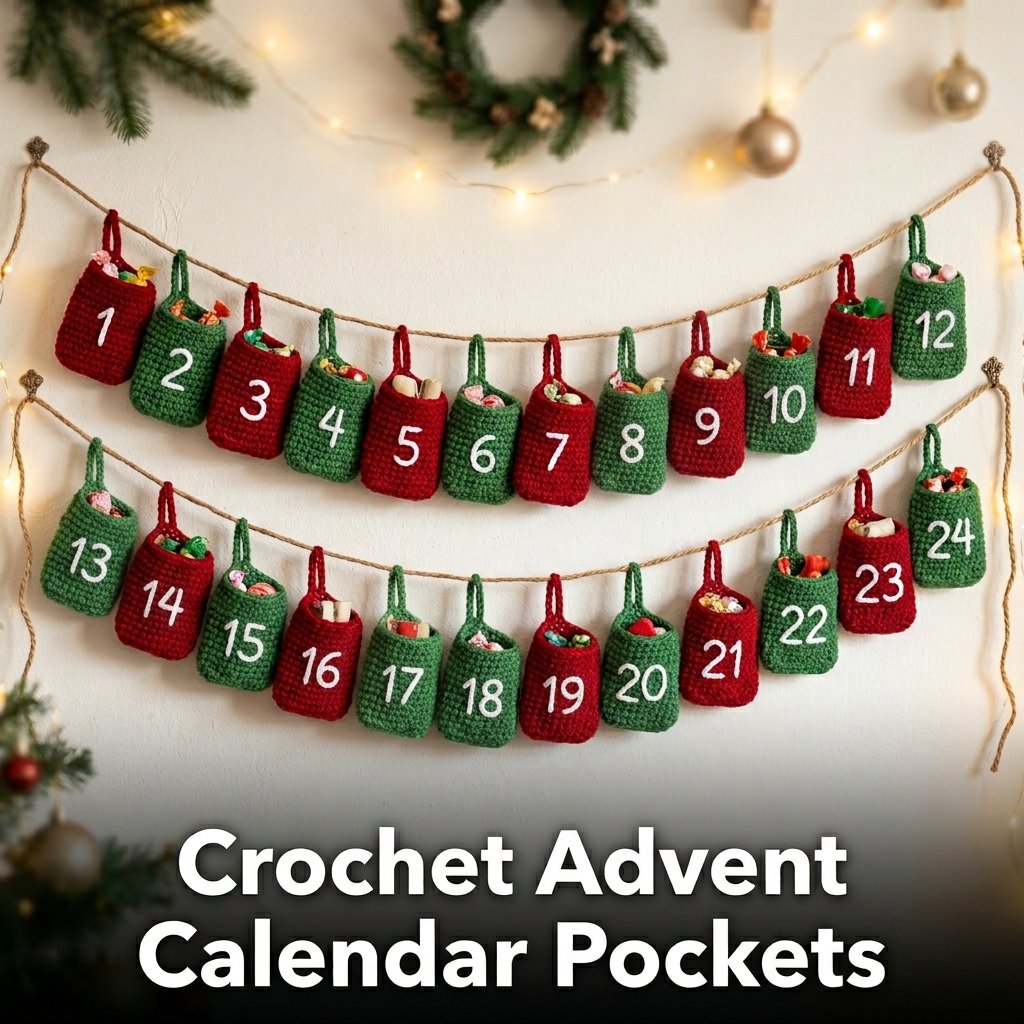
Making Each Advent Calendar Pocket
Chain 16. Work single crochet rows back and forth for 10 rows to produce a small rectangle at 7 x 5 cm. Fold the rectangle in half and slip stitch the two side edges together to form a pocket. Work a round of single crochet around the top open edge for a finished rim. Crochet a chain loop of 8 chains at the top back of each pocket for hanging on the cord. Alternate red and green pockets across the 24-pocket set for a traditional Christmas color pattern.
Numbering and Hanging an Advent Calendar
Embroider numbers 1 to 24 onto each pocket front using white yarn and simple straight stitches forming each numeral. Alternatively, use iron-on number transfers or number stickers sealed with a thin coat of PVA glue for faster numbering across all 24 pockets. Thread all 24 pockets onto a 2-meter length of sturdy cord using their chain loops, spacing them at 7 cm intervals. Hang the cord across a fireplace mantel, along a staircase banister, or on a wall-mounted row of hooks for a stable display that holds all 24 pockets at accessible height throughout December.
FAQ
What are the easiest Christmas crochet patterns for complete beginners?
The easiest Christmas crochet patterns for complete beginners are crochet gift topper stars, crochet snowflake ornaments, and covered Christmas ornament balls. Gift topper stars use only chain stitch, double crochet, and slip stitch across 2 rounds and complete in 15 minutes each. Snowflake ornaments use chain stitch and slip stitch in a 3-round pattern and complete in 30 minutes. Covered ornament balls use only single crochet worked in the round and complete in 45 minutes. All 3 patterns are available free on Ravelry. A beginner who knows chain stitch and single crochet completes all 3 on their first attempt.
Where can I find free Christmas crochet patterns online?
Free Christmas crochet patterns are available on Ravelry, LoveCrafts, and individual crochet blog sites. Ravelry hosts over 5,000 free Christmas-tagged crochet patterns filterable by difficulty, yarn weight, and project type. LoveCrafts publishes brand-sponsored free patterns tested against specific yarn weights. Crochet blog sites including Yarnspirations, RedHeart.com, and AllFreeCrochet publish free holiday patterns with step-by-step photo tutorials. Pinterest links to free patterns hosted on external blog sites, though the pattern file itself lives on the original blog rather than on Pinterest directly. Always download from the original source for the most current pattern version.
What yarn works best for Christmas crochet patterns?
DK weight acrylic yarn works best for most Christmas crochet patterns because it produces consistent stitch definition, is available in every Christmas color combination, and is machine washable. Red Heart Super Saver, Lion Brand Pound of Love, and Paintbox Simply DK are 3 widely available DK acrylic options suited to Christmas ornament, amigurumi, and decoration patterns. Cotton yarn suits snowflake patterns specifically because it blocks flat more rigidly than acrylic. Chunky weight acrylic suits stockings and tree skirts because the larger stitch size reduces project completion time significantly compared to DK at the same pattern dimensions.
How long do Christmas crochet patterns take to complete?
Christmas crochet pattern completion times range from 15 minutes for a gift topper star to 6 hours for a full advent calendar set. Small ornaments and snowflakes take 15 to 45 minutes. Amigurumi figures including Santa, reindeer, and elves take 3 to 5 hours depending on size and detail level. A Christmas stocking takes 2 to 3 hours. A tree skirt takes 5 to 7 hours. A bunting of 12 pennants takes 4 hours. Completion time decreases by 30 to 50 percent after making the same pattern twice as the construction sequence becomes familiar and requires less reference to written instructions between steps.
What Christmas crochet patterns sell best on Etsy?
Five Christmas crochet patterns produce the highest-selling finished items on Etsy: Santa amigurumi at 20 to 40 dollars, reindeer amigurumi at 15 to 30 dollars, crochet Christmas stockings at 18 to 35 dollars, advent calendar sets at 45 to 80 dollars, and crochet Christmas tree toppers at 20 to 35 dollars. Amigurumi figures sell most strongly from October through December 15th. Advent calendars sell most strongly in November. Listings with multiple styled product photos showing the item in a decorated Christmas setting generate significantly more views and sales than listings with single plain-background product photos on Etsy search results pages.