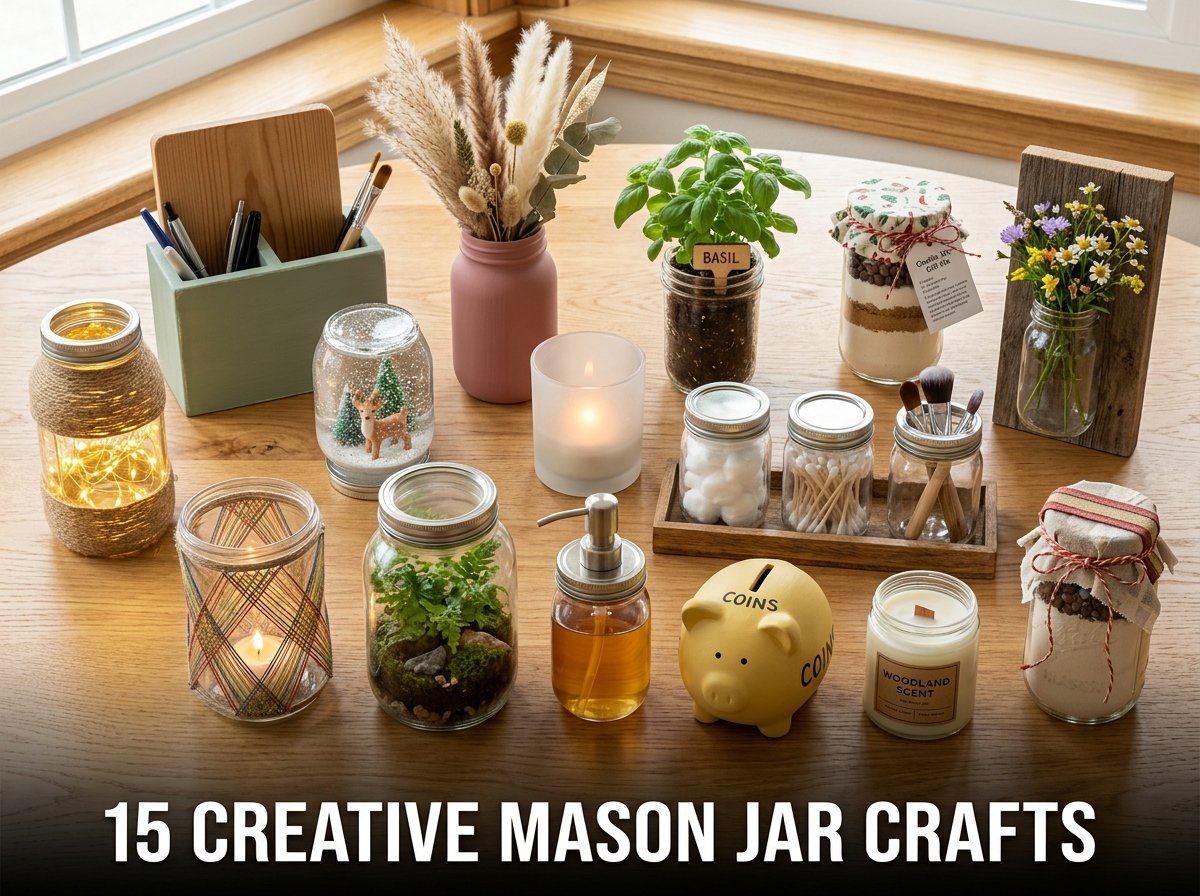
15 Creative Mason Jar Crafts to Get Your DIY Juices Flowing
I pulled six empty mason jars from a kitchen cabinet last spring with no plan other than not throwing them away. Three hours later, two held fairy lights on my bookshelf, one was a painted vase with dried flowers, and the other three were organized on my desk holding pens, scissors, and rubber bands. That afternoon changed how I look at every empty jar I encounter.
If you want creative mason jar crafts, all 15 ideas here use standard wide-mouth or regular mason jars and materials costing under 10 dollars per project. Every project suits beginners working at home without specialist tools.
These crafts cover home decor, gift ideas, storage solutions, and seasonal displays. I chose each one because the steps are short, the materials are easy to source, and the finished result looks intentional rather than improvised.
Mason jars come in three standard sizes: half-pint at 236 ml, pint at 473 ml, and quart at 946 ml. Most decorative projects use pint-size jars. Storage projects use quart-size jars. Gift projects use half-pint jars for compact, low-cost packaging.
Each section here gives the jar size, materials, and one tip that most basic tutorials leave out completely.
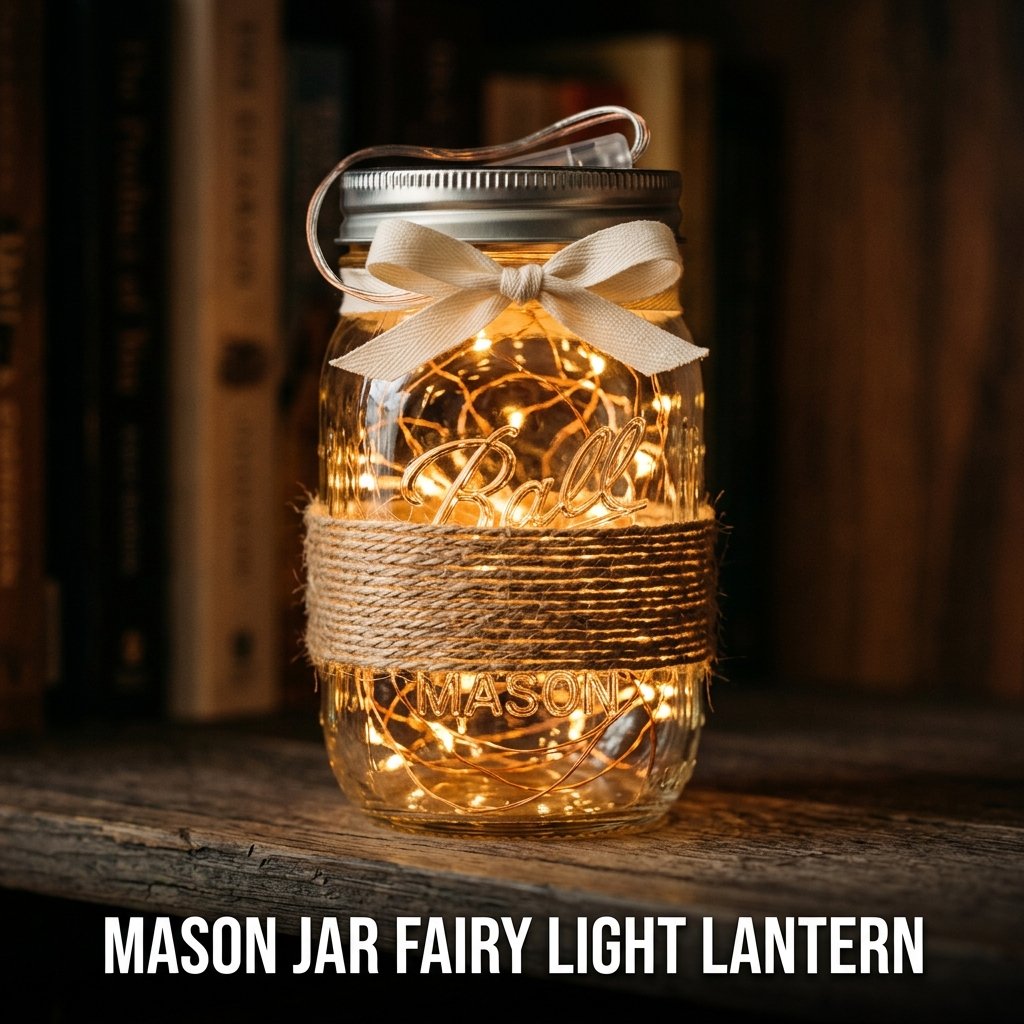
1. Mason Jar Fairy Light Lantern
A mason jar fairy light lantern fills a glass mason jar with LED fairy lights to produce a warm glowing decor piece for shelves, windowsills, and bedside tables. I made 4 of these in 10 minutes using pint-size mason jars and battery-operated copper wire LED lights purchased for 3 dollars each. They have been in use on my bookshelf for 14 months without any bulb failure or battery corrosion inside the jars.
Battery-operated LED lights are the only safe option for mason jar lanterns because wired plug-in lights generate heat that can crack the glass when confined inside a sealed jar.
How to Fill a Mason Jar With Fairy Lights
Remove the lid from a clean, dry pint-size mason jar. Scrunch the LED light strand loosely and feed it into the jar from the bulb end first, leaving the battery pack outside the jar opening. Arrange the lights inside the jar so they fill the full interior volume without pressing against the glass walls. Feed the battery pack cord over the jar rim. Place the lid ring loosely over the cord to hold it in position. The loose ring keeps the cord in place without crimping the wire.
Decorating the Outside of a Fairy Light Jar
Wrap natural jute twine around the jar exterior from the base to the neck in tight horizontal rows, securing the twine end with a small dot of hot glue at the start and finish. Tie a ribbon bow around the neck for a farmhouse aesthetic. Apply chalk paint to the lower half of the jar exterior for a two-tone frosted appearance that diffuses the LED light through the paint layer. The painted lower section produces a soft glow on the surface while the clear upper glass shows the light strands directly.
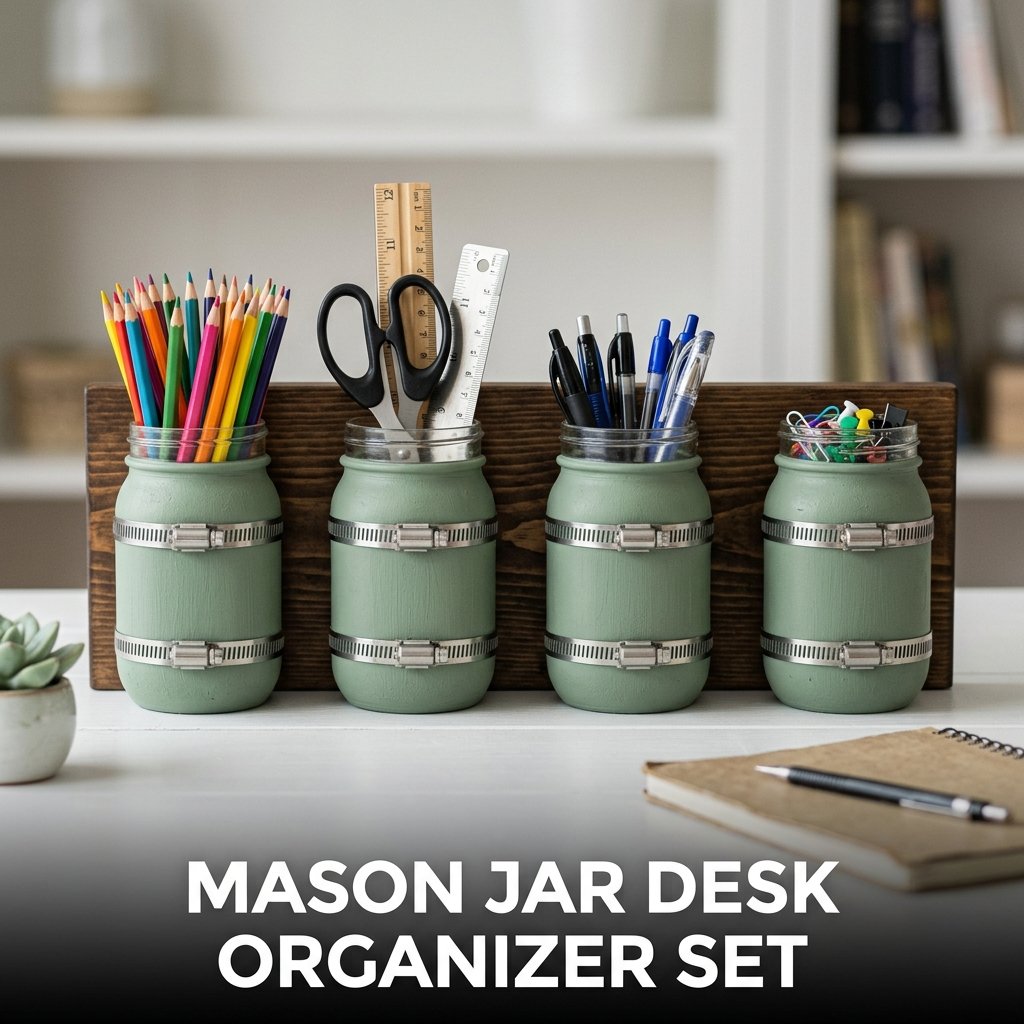
2. Mason Jar Desk Organizer Set
A mason jar desk organizer set groups 3 to 5 pint-size mason jars of the same size on a wooden board or tray to hold pens, scissors, tape, paper clips, and small stationery items in a single organized desktop unit. I built a 4-jar set mounted on a reclaimed pine board for my home office desk. It replaced a collection of 6 separate containers and reduced the visible clutter on my desk surface by half.
Mounting the jars on a board keeps the set as a single movable unit rather than individual jars that scatter across the desk during use.
How to Mount Mason Jars on a Wood Board
Cut a pine board at 40 x 10 cm and sand all surfaces with 180-grit sandpaper. Apply a coat of dark walnut stain and allow 2 hours of drying time. Attach 4 standard hose clamps at equal intervals along the board using 1-inch wood screws through the clamp mounting holes. Slide a pint-size mason jar into each clamp and tighten the clamp screw finger-tight only. Over-tightening hose clamps on glass jars generates stress fractures at the contact point that may cause the jar to crack during daily use.
Painting Mason Jars for a Coordinated Desk Set
Apply chalk paint to all 4 jars in the same color for a coordinated set appearance. White, sage green, and terracotta are the 3 most popular chalk paint colors for desk organizer jar sets based on Pinterest search data. Apply 2 coats with a flat brush, allowing each coat to dry for 30 minutes. Sand lightly between coats with 220-grit paper for a smooth finish. Apply clear wax polish over the dried paint surface and buff with a soft cloth to seal the chalk paint against the moisture from pen barrels and daily handling.
3. Mason Jar Snow Globe
A mason jar snow globe fills a sealed mason jar with water, glycerin, glitter, and a small figurine to produce a decorative shaken snow effect. I made 4 of these as holiday gifts using wide-mouth pint jars and small ceramic figurines from a craft store. Each one cost 6 dollars in materials and the recipients still display them 2 years after receiving them as gifts.
The glycerin in the water mixture slows the fall rate of the glitter after shaking, producing the slow-drifting snow effect that distinguishes a snow globe from a plain glitter jar.
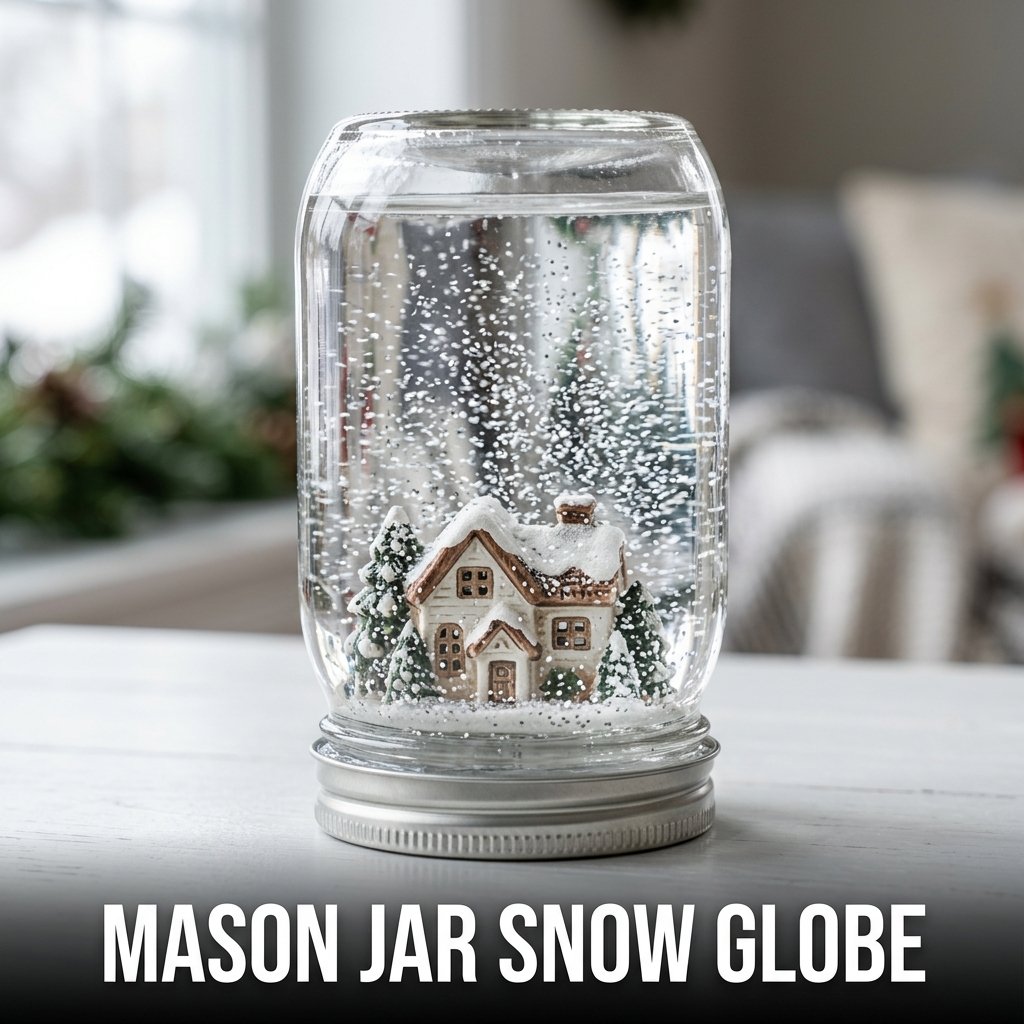
Assembling the Figurine Base Inside the Jar
Apply waterproof epoxy adhesive to the base of the figurine and press it firmly onto the inside of the mason jar lid. Allow the epoxy to cure for the manufacturer’s specified time, typically 24 hours, before proceeding. The figurine must be fully waterproof because it remains submerged in the water mixture permanently. Ceramic, resin, and plastic figurines withstand permanent water submersion. Paper, wood, and air dry clay figurines deteriorate within days in a water-filled jar and are not suitable for snow globe construction.
Mixing the Water and Glycerin Solution
Fill the pint jar with distilled water, leaving 2 cm of space at the top. Add 2 tablespoons of glycerin and stir gently. Add 1 teaspoon of white or silver glitter and stir again. Screw the lid with the attached figurine onto the jar tightly. Apply a bead of waterproof sealant around the lid join from the outside. Wipe away any excess sealant before it cures. The waterproof sealant prevents leaking when the globe is shaken during display use.
4. Painted Mason Jar Vase
A painted mason jar vase uses acrylic or chalk paint applied to the exterior glass surface to produce a decorative flower vase in any color scheme. I painted 3 quart-size jars in matte white, dusty rose, and sage green for a shelf display. The set holds dried pampas grass and eucalyptus stems and has remained on my living room shelf for 18 months as a permanent display piece.
Painted mason jar vases rank among the most searched creative mason jar crafts on Pinterest because the technique requires under 30 minutes, no specialist tools, and produces a finished result that reads as a purchased item rather than a craft project.
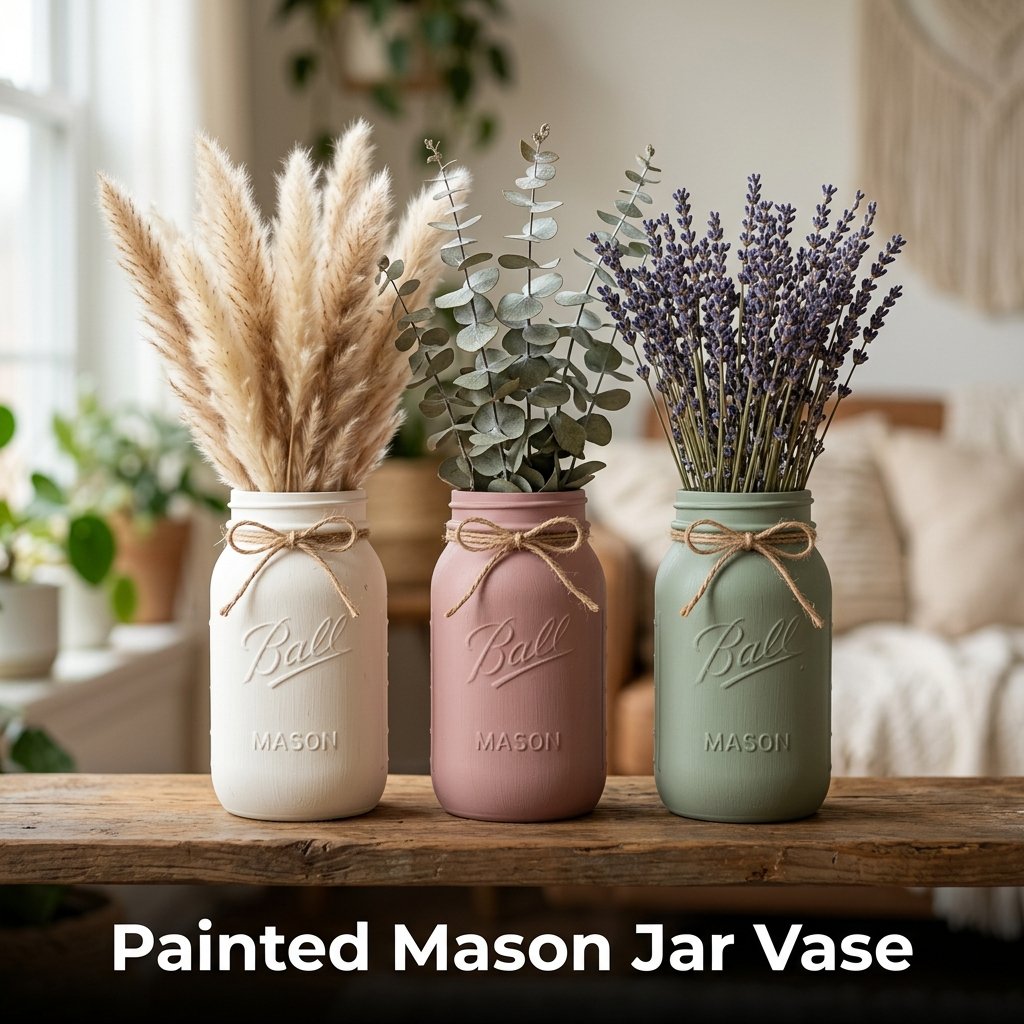
How to Apply Chalk Paint to a Mason Jar Vase
Clean the mason jar with rubbing alcohol and allow it to dry completely before painting. Apply chalk paint with a flat brush using short, overlapping strokes. The first coat may appear patchy because glass is non-porous and does not absorb paint as fabric and wood do. Apply a second coat after 30 minutes of drying time. The second coat covers any visible patchiness from the first application. Sand lightly between the first and second coats with 220-grit paper for an ultra-smooth finish on the glass surface.
Sealing a Painted Mason Jar for Long-Term Use
Apply 2 coats of clear matte or gloss varnish over the fully dried chalk paint surface to protect the paint from chipping during handling. Chalk paint without sealant chips when scraped against surfaces, which occurs regularly when a vase is moved during cleaning. Spray varnish applied from 30 cm distance produces a more even coat than brush-applied varnish on a curved glass surface. Allow each varnish coat to dry for 20 minutes before applying the next coat over the painted jar exterior.
5. Mason Jar Candle Holder
A mason jar candle holder positions a tea light or votive candle inside a decorated glass jar to produce a decorative light source for dining tables, mantels, and outdoor settings. I made a set of 6 for a dinner party table display using half-pint jars wrapped in twine with a small dried flower sprig tucked under the twine at the front of each jar. The set cost 4 dollars total and produced warm light across the full table throughout the evening.
Only use battery-operated LED tea lights inside sealed or partially enclosed mason jar candle holders. Flame-burning candles inside enclosed glass jars consume available oxygen, produce carbon buildup on the interior glass, and present a heat-cracking risk.
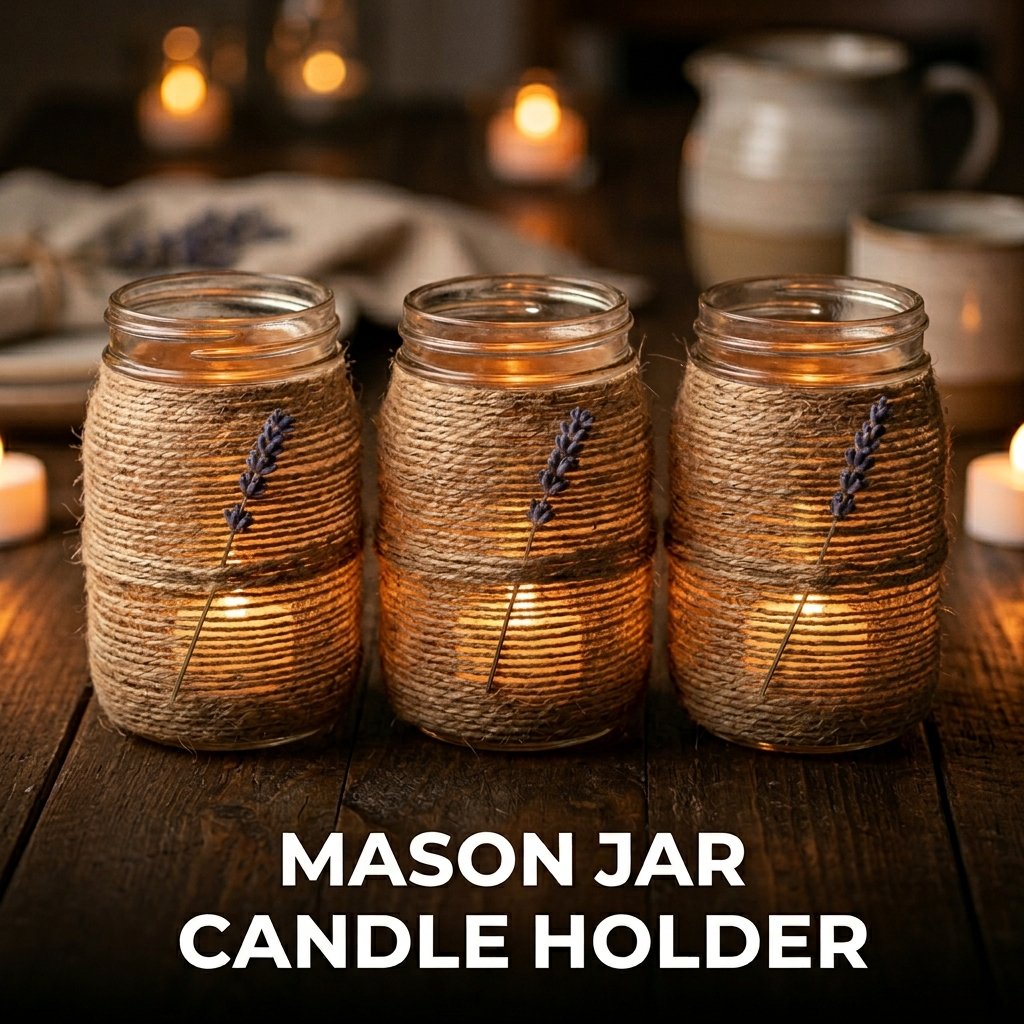
Twine-Wrapped Mason Jar Candle Holder
Apply a thin, even line of craft glue around the base of a clean half-pint mason jar. Press the end of natural jute twine into the glue and hold for 20 seconds. Wrap the twine tightly around the jar in continuous upward rows, applying a thin glue line every 5 rows to secure the twine against the glass. Stop wrapping at the jar neck. Cut the twine and glue the end flat. Allow 30 minutes of drying time before placing a tea light inside the jar.
Frosted Glass Effect for a Candle Holder
Apply frosted glass spray paint to the exterior of a clean mason jar from a distance of 25 cm in light, even passes. Frosted glass spray paint is available at hardware stores and craft stores. 2 light coats produce an even frosted finish that diffuses candle light through the glass surface. Allow each coat to dry for 15 minutes before applying the next. A frosted finish candle holder produces a softer, more diffused light output than a clear glass jar and suits intimate table settings better than a clear glass alternative.
6. Mason Jar Herb Planter
A mason jar herb planter uses a wide-mouth quart mason jar filled with potting soil to grow kitchen herbs including basil, mint, and chives on a windowsill. I planted 4 herb jars on my kitchen windowsill and harvested fresh basil from the first jar within 3 weeks of planting. The jars cost nothing as I reused food storage jars already at home.
Mason jar planters require drainage modification because standard jars have no drainage holes. Without drainage, excess water accumulates at the jar base and causes root rot in most herb varieties within 2 to 4 weeks.
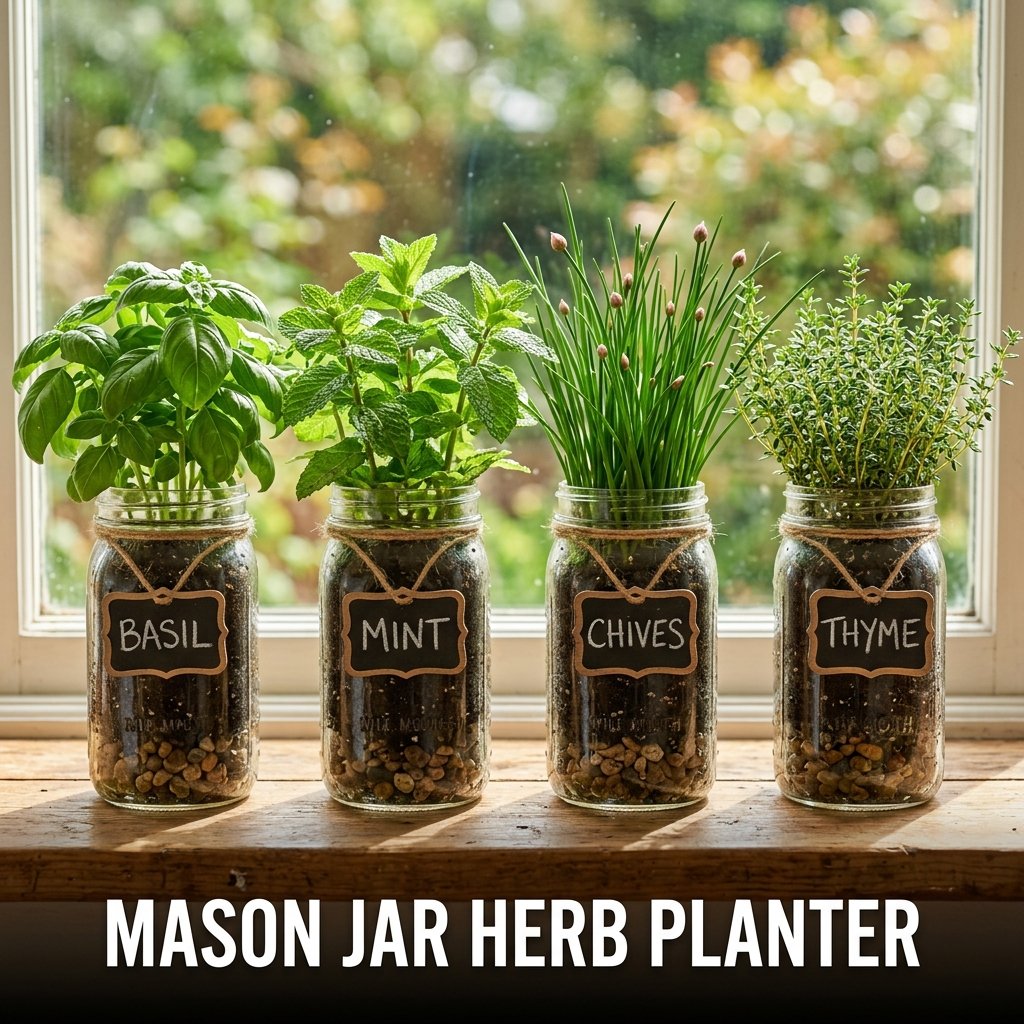
Creating Drainage in a Mason Jar Planter
Add a 3 cm layer of small pebbles or coarse gravel to the base of the jar before adding potting soil. This drainage layer holds excess water below the soil level and away from plant roots. Alternatively, drill a 10 mm drainage hole through the base of the jar using a diamond-tipped drill bit on a slow drill speed with constant water lubrication on the drill point. The diamond bit prevents the glass from cracking during drilling. Standard metal drill bits shatter glass on contact.
Best Herbs for Mason Jar Planters
Basil, mint, chives, parsley, and thyme grow successfully in quart mason jar planters on a windowsill receiving 4 to 6 hours of direct sunlight daily. Mint grows most aggressively and fills the jar within 6 weeks of planting from seed or transplant. Plant mint in a separate jar rather than combining it with other herbs because its root growth crowds and suppresses neighboring plants in a shared container. Basil requires the most sunlight of the 5 herbs listed and produces the highest yield for daily kitchen use.
7. Mason Jar Gift Set
A mason jar gift set fills a decorated wide-mouth mason jar with layered dry ingredients for baking, hot cocoa mix, bath salts, or candy to produce a packaged gift that displays the contents through the glass. I made 12 mason jar cookie mix gifts for a holiday season using quart jars layered with flour, sugar, oats, chocolate chips, and cocoa powder. Each jar cost 4 dollars in ingredients and 1 dollar in ribbon and tag materials. Recipients assembled the cookies by adding 2 eggs and butter to the jar contents.
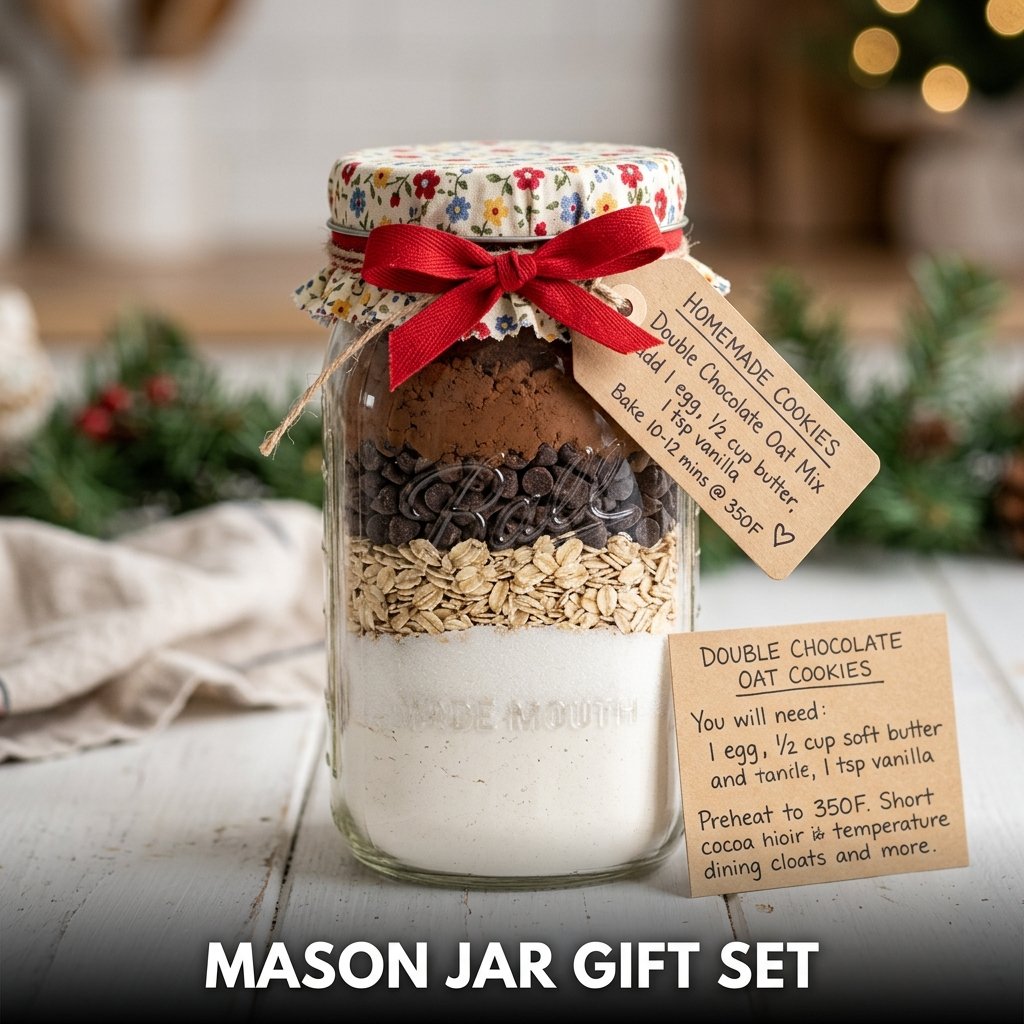
Layering a Cookie Mix in a Mason Jar
Layer dry cookie ingredients in a quart mason jar in visible color-contrasting bands: flour at the base, sugar above it, oats in the middle, chocolate chips above the oats, and cocoa powder at the top. Each layer sits flat and level before the next is added. Press each layer lightly with the back of a spoon to compact it and prevent mixing between layers during transport. The distinct color bands remain visible through the clear glass and form the primary visual appeal of the gift presentation.
Decorating and Labeling a Mason Jar Gift
Cut a circle of fabric at 15 cm diameter from a cotton print fabric. Place the fabric circle over the lid before screwing the lid ring down to hold it in position. Tie a ribbon bow around the neck of the jar over the lid ring. Attach a handwritten recipe card or printed instruction tag to the ribbon listing the additional ingredients the recipient needs to complete the recipe. The handwritten recipe card increases the personal quality of the gift and provides all necessary instructions in a format the recipient keeps after using the jar contents.
8. Mason Jar Bathroom Organizer
A mason jar bathroom organizer groups 3 half-pint or pint mason jars on a small tray or mounted on a board to hold cotton balls, cotton swabs, hair ties, and small bathroom items. I mounted 3 pint jars on a 30 x 8 cm pine board beside my bathroom mirror to replace a collection of loose plastic containers. The set took 20 minutes to assemble and reduced the visual clutter on my bathroom counter immediately.
Bathroom organizer jars require a waterproof paint sealant on any painted exterior surface because bathroom humidity causes unsealed chalk paint to soften and peel within 3 to 6 months of installation.
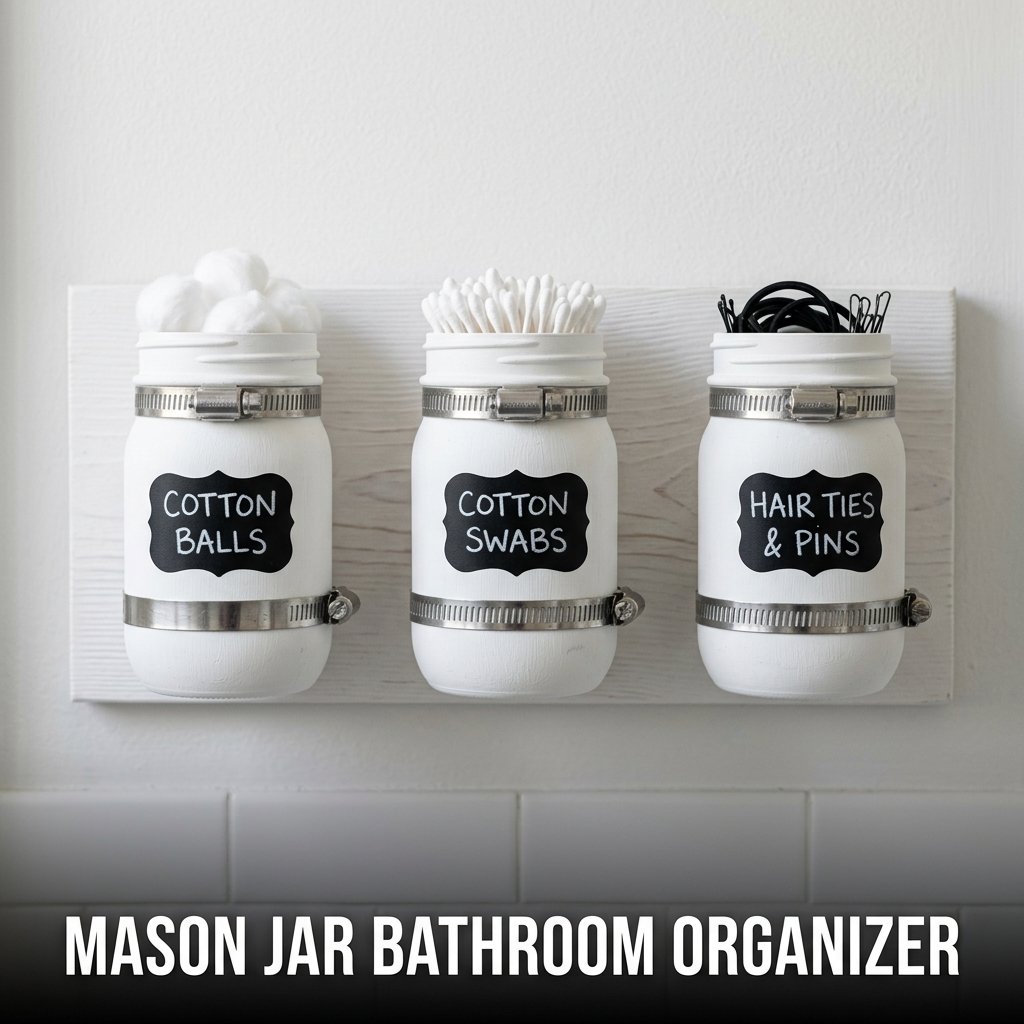
Mounting a Bathroom Organizer Set
Use the same hose clamp and wood board mounting method described in the desk organizer section. Apply an extra bead of exterior-grade wood sealant to the board surface before attaching the clamps because bathroom humidity penetrates unsealed wood faster than in lower-humidity rooms. Install the mounted board on the wall using two 2-inch screws driven into wall anchors at the board’s top and bottom mounting holes. Level the board with a spirit level before driving the final screws to prevent the jar set from sitting at a visible tilt.
Labels for a Bathroom Mason Jar Organizer
Apply printed or handwritten adhesive labels to the front of each jar for a cohesive, organized appearance. Use a label maker with clear tape for a minimal modern aesthetic. Write labels in black marker on white rectangular adhesive labels for a farmhouse style. Use blackboard adhesive labels with chalk for a changeable label system that suits jars whose contents change regularly. All 3 label options cost under 5 dollars per set and produce a finished bathroom organizer that reads as a purchased product rather than a repurposed jar set.
9. Mason Jar String Art Lantern
A mason jar string art lantern wraps colored thread or embroidery floss in a geometric pattern around a pint mason jar exterior to produce a decorative textile-covered lantern for shelf and table display. I made 3 of these using blue and white embroidery floss on clear pint jars. The thread pattern covered 80% of the jar exterior and the finished jars glowed through the thread gaps when LED tea lights were placed inside. Total material cost per jar was 2 dollars.
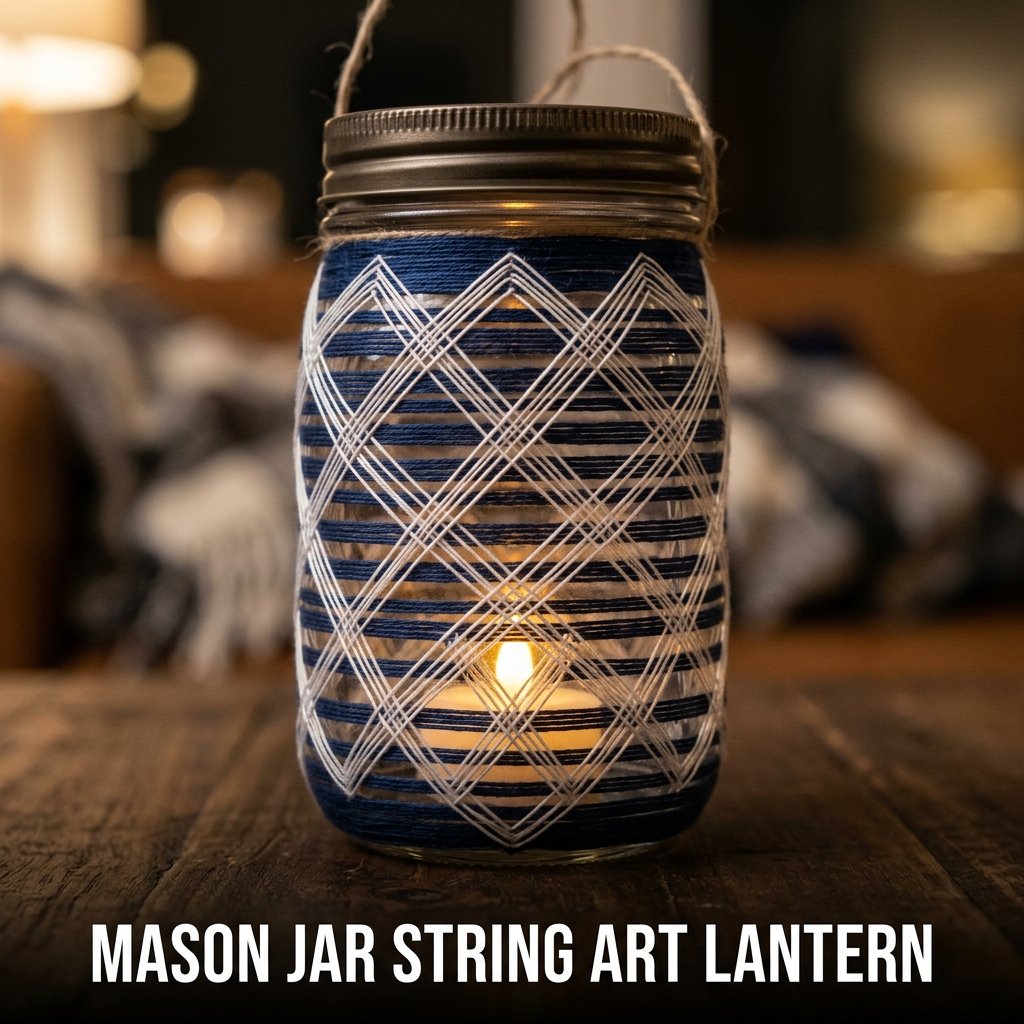
Wrapping Thread in a Geometric Pattern
Apply a thin line of craft glue vertically down the jar at the starting point. Press the thread end into the glue and allow 2 minutes of tacking time. Wrap the thread horizontally around the jar in tight rows from the base to the neck. Change direction by wrapping diagonally across the horizontal rows at a 45-degree angle, then crossing back in the opposite direction to produce a diamond grid pattern. Secure the thread end with a small dot of glue at the neck. The completed geometric thread pattern covers the full jar circumference in a repeating diamond structure.
Color Combinations for a Thread-Wrapped Jar
Two-color combinations produce the most visually clear geometric pattern on a thread-wrapped mason jar. White thread on a clear jar produces a minimal, modern result. Terracotta and cream produce a boho aesthetic suited to earthy interior styles. Navy and white produce a nautical result. Wrap the first color in horizontal rows and the second color in diagonal crossings to keep the two colors distinct within the pattern rather than mixing them into an indistinct combined texture across the jar surface.
10. Mason Jar Terrarium
A mason jar terrarium uses a wide-mouth quart mason jar to create a small enclosed garden of moss, small plants, and decorative stones. I built one using a quart jar with a loose lid, a layer of gravel, activated charcoal, potting soil, and 3 small fern plants. The terrarium has required no watering in 4 months because the jar lid traps moisture in a self-sustaining cycle inside the enclosed glass environment.
Wide-mouth jars are required for terrarium construction because standard-mouth jars do not allow sufficient hand access for placing and positioning plants and decorative elements inside the jar.
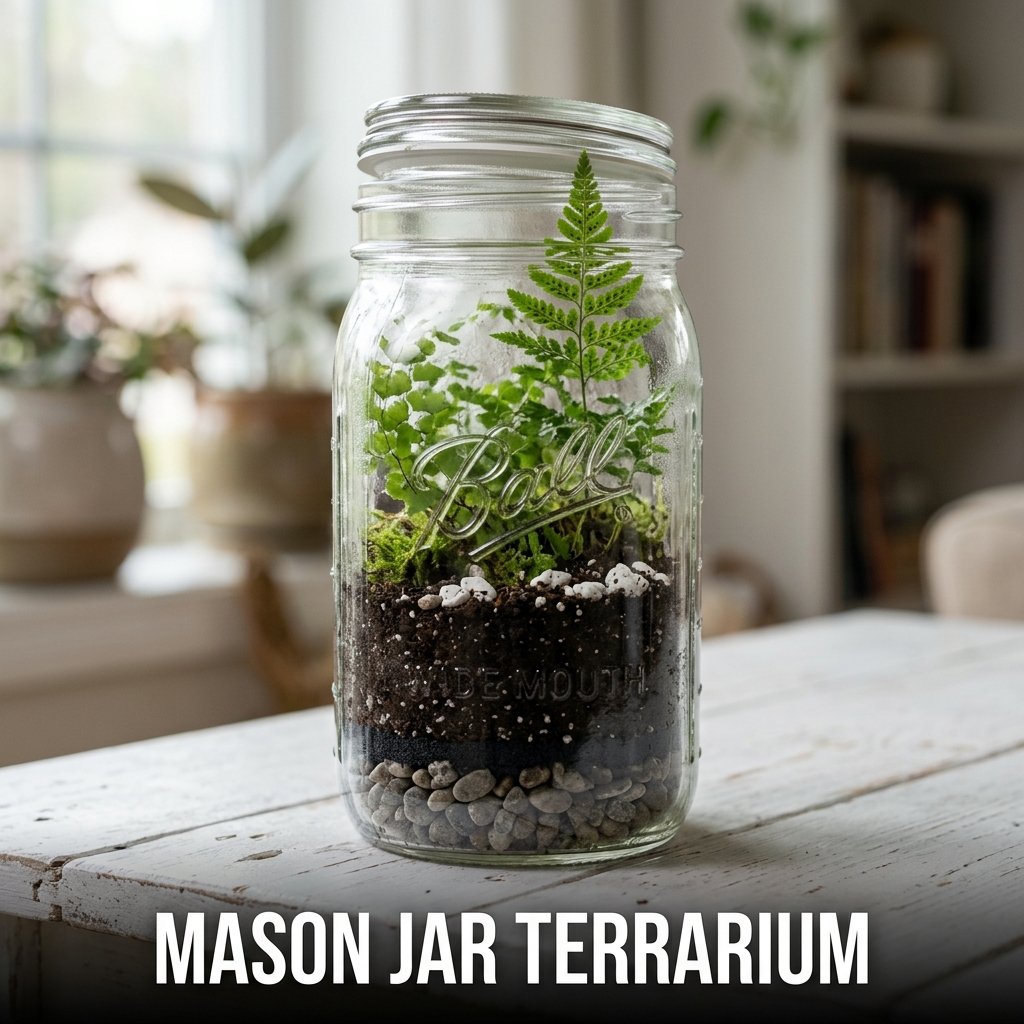
Layering the Terrarium Base Materials
Add a 2 cm layer of small gravel to the jar base for drainage. Add a 1 cm layer of activated charcoal over the gravel to prevent bacterial growth in the closed environment. Add a 4 cm layer of potting soil over the charcoal. The total base layer height of 7 cm leaves sufficient vertical space for plant roots and above-soil plant growth in a standard quart jar. Use a long-handled spoon or chopstick to position each layer accurately inside the narrow jar opening without disturbing lower layers.
Choosing Plants for a Mason Jar Terrarium
Small ferns, moss, and miniature peperomia plants suit closed mason jar terrariums because all 3 species tolerate high humidity, low light conditions, and limited root space. Cacti and succulents require a dry, open-lid terrarium because their low water needs are incompatible with the high humidity that builds inside a closed jar. A closed terrarium placed in indirect light produces sufficient plant growth without any additional watering for 3 to 6 months before the plants outgrow the available soil volume.
11. Mason Jar Soap Dispenser
A mason jar soap dispenser converts a wide-mouth pint mason jar into a liquid soap pump dispenser using a metal pump lid insert that replaces the standard mason jar lid. I converted 3 pint jars into soap dispensers for my kitchen and 2 bathrooms using pump lid kits purchased for 2 dollars each online. The pumps fit standard wide-mouth mason jar lid rings and work with any liquid hand soap or dish soap without modification.
Mason jar soap dispensers sell on Etsy at 12 to 22 dollars each, making them one of the most consistently profitable simple creative mason jar crafts for handmade sellers.
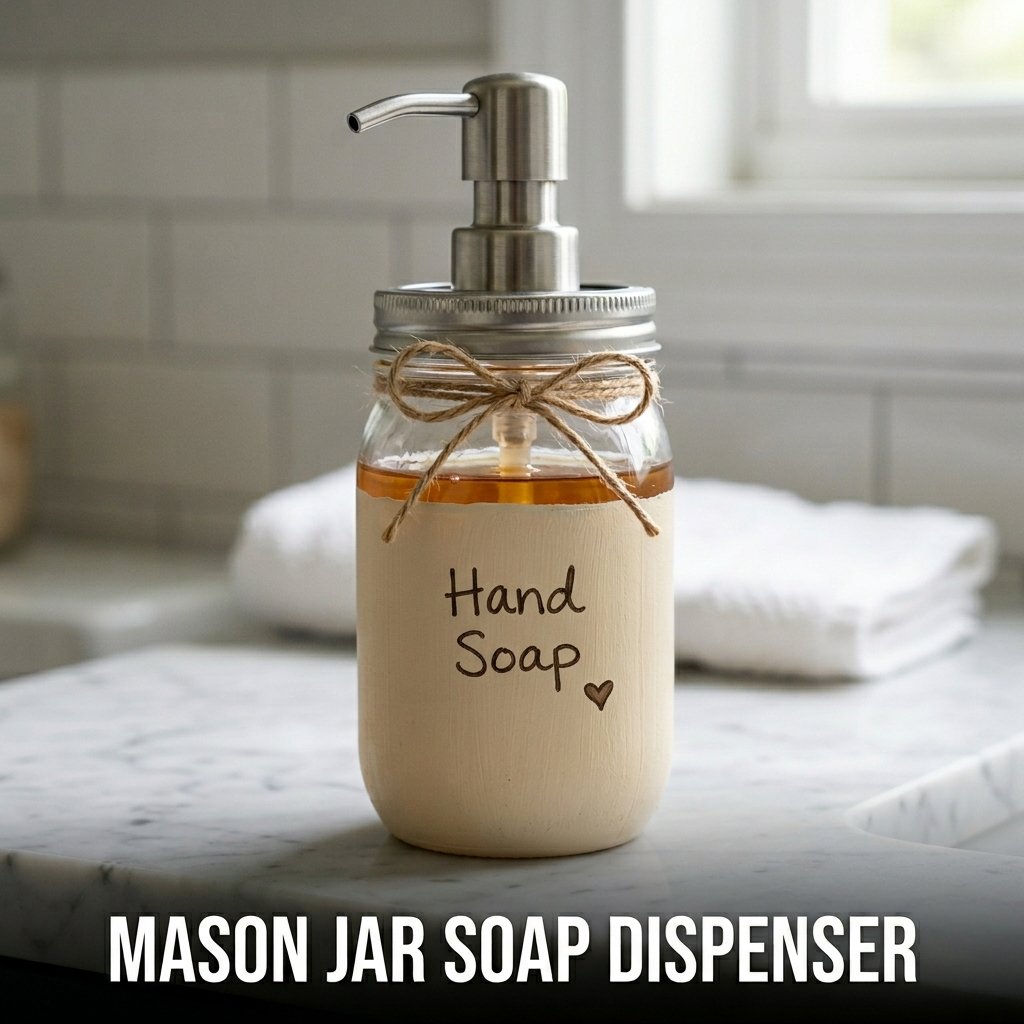
Installing a Pump Lid on a Mason Jar
Remove the standard mason jar lid and replace it with a metal pump lid insert sized for wide-mouth jars. Fill the jar with liquid hand soap, leaving 3 cm of space at the top. Thread the pump dip tube down through the pump lid opening so the tube base reaches within 1 cm of the jar base. Screw the pump lid onto the jar ring firmly. Test the pump by pressing it 3 to 4 times to prime the tube before the first use. A primed pump delivers soap on the first press without air gaps in the delivery tube.
Decorating a Mason Jar Soap Dispenser
Apply chalk paint to the lower two-thirds of the jar exterior for a decorative finish that conceals the soap color inside the jar. Leave the upper section unpainted to show the soap level through the clear glass, which indicates when a refill is needed. Wrap twine around the jar neck and tie a small bow for a farmhouse finish. Apply a label to the front with the soap type written in marker. These 3 details produce a finished dispenser that coordinates with a decorated bathroom or kitchen aesthetic.
12. Mason Jar Piggy Bank
A mason jar piggy bank uses a wide-mouth pint mason jar with a coin slot cut into the lid to produce a glass savings jar that displays accumulated coins and notes through the clear glass. I made one for a child in my family by cutting a coin slot in the metal lid using a sharp knife and rubber mallet. The glass jar allows the child to see the growing contents, which increases saving motivation compared to an opaque container.

Cutting a Coin Slot in a Mason Jar Lid
Mark a 3 x 0.5 cm rectangle on the metal mason jar lid using a permanent marker. Place the lid on a wooden cutting board. Score the marked rectangle repeatedly with a sharp craft knife, pressing deeper with each pass until the slot cuts through the metal. File the cut edges with a small metal file to remove any sharp burrs that could cut fingers during coin insertion. Test with a standard coin to confirm the slot width allows easy coin insertion without requiring force.
Decorating a Mason Jar Piggy Bank
Apply chalk paint or acrylic paint to the jar exterior in the child’s preferred color. Add the child’s name using letter stickers or painted letters on the front of the jar. Apply a coat of clear varnish over all painted surfaces and sticker surfaces to prevent peeling during handling. The transparent glass allows the accumulated savings to remain fully visible at all times, which provides ongoing visual feedback on savings progress that opaque piggy banks do not provide.
13. Mason Jar Candle Making
Mason jar candle making uses pint or half-pint mason jars as the candle vessel by pouring melted soy wax with fragrance oil and a centered wick directly into the jar. I made my first batch of 6 soy candles in pint mason jars over one afternoon. Each jar used 200 grams of soy wax flakes, 20 ml of fragrance oil, and one pre-waxed cotton wick. The finished candles burned cleanly for 40 to 45 hours each.
Mason jar soy candles sell on Etsy at 12 to 25 dollars each, making them one of the highest-selling creative mason jar crafts for handmade product sellers.
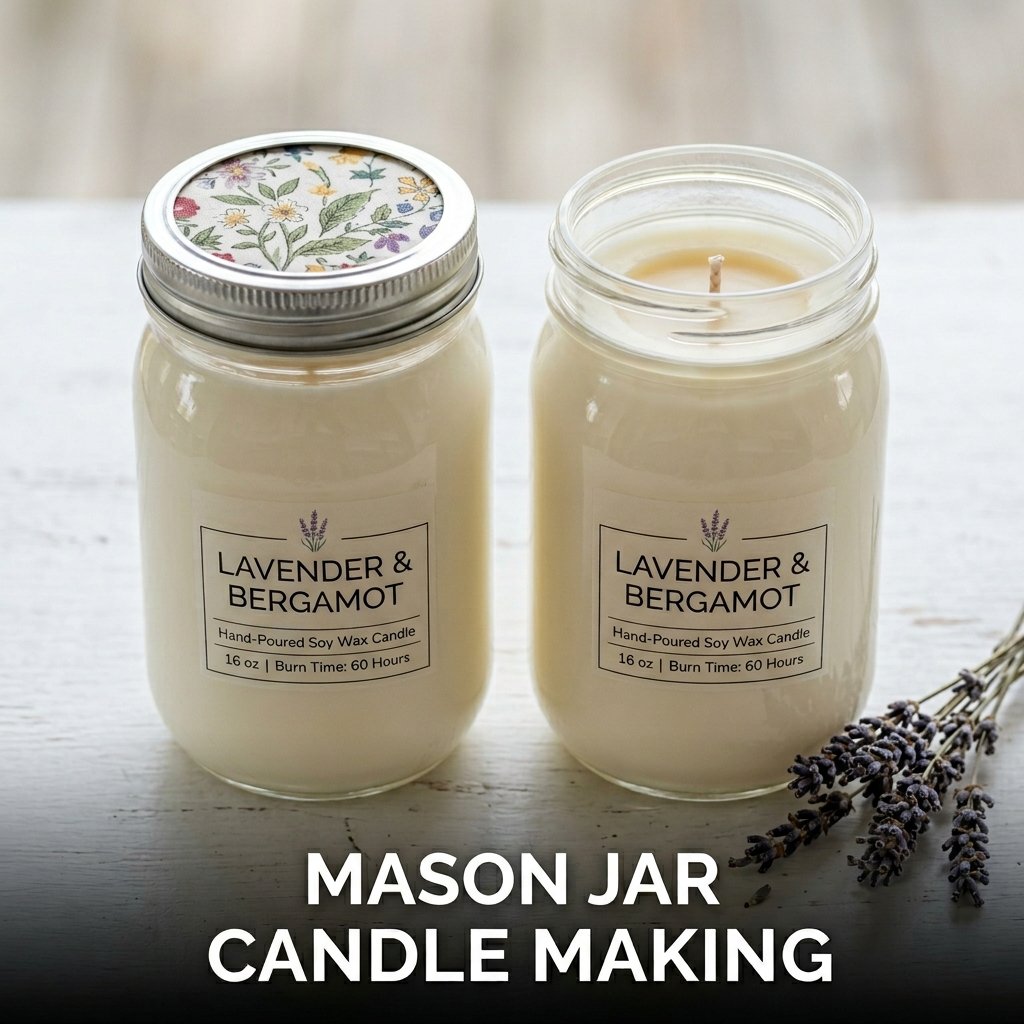
Melting and Pouring Soy Wax Into a Mason Jar
Melt soy wax flakes in a double boiler at 80 degrees Celsius. Add fragrance oil at 10% of the total wax weight when the wax reaches 75 degrees Celsius and stir for 2 minutes. Secure the pre-waxed wick at the center of the jar opening using a wick centering tool or 2 pencils laid parallel across the jar rim with the wick threaded between them. Pour the wax into the jar at 65 degrees Celsius. Pouring at temperatures above 70 degrees causes the finished candle surface to crack as it cools.
Finishing and Labeling a Mason Jar Candle
Allow the poured candle to cure at room temperature for 48 hours before trimming the wick. Trim the wick to 6 mm above the wax surface using scissors or a wick trimmer. Cut a circle of decorative fabric at 12 cm diameter and place it over the lid before screwing the ring down. Apply a label to the front of the jar listing the fragrance name, burn time, and safety instructions. Safety labels on handmade candles are a legal requirement for candles sold commercially in most markets including the UK, US, and EU.
14. Mason Jar Wall Vase
A mason jar wall vase mounts a half-pint or pint mason jar horizontally on a wall using a hose clamp and a wood mounting block to produce a wall-hung flower vase or herb planter. I installed a row of 5 half-pint jars on a reclaimed wood plank in my kitchen. Each jar holds a small bunch of fresh herbs. The row mounts at eye level beside the kitchen window and keeps fresh herbs within reach of the cooking area at all times.

Mounting a Mason Jar on a Wall Block
Cut individual wood blocks at 8 x 8 x 3 cm from pine. Attach one hose clamp to each block using a 1-inch screw through the clamp mounting hole. Slide a half-pint mason jar horizontally into the clamp with the jar opening facing outward and upward at a slight angle. Tighten the clamp finger-tight. Mount each block to the wall using 2 screws driven into wall anchors. Space blocks at 12 cm intervals along a horizontal line marked with a spirit level for an evenly spaced wall display.
Plants and Flowers for a Wall Mason Jar Vase
Small herb cuttings including rosemary, thyme, and mint root successfully in water-filled wall jars placed in indirect light. Cut 10 cm stem sections and place them in the jar filled to 60% capacity with fresh water. Change the water every 3 days to prevent bacterial growth that clouds the glass and inhibits root development. Fresh-cut flowers including small roses, lavender, and wildflower stems display for 5 to 7 days in a water-filled wall jar before requiring replacement. A wall vase display produces a functional and decorative kitchen feature simultaneously.
15. Mason Jar Gift Wrapping
A mason jar gift wrapping presentation uses a decorated wide-mouth quart mason jar as a gift container for small items including jewelry, candles, bath products, chocolates, and stationery. I used decorated quart jars to package 8 birthday gifts in one year instead of standard gift bags. Every recipient commented on the jar packaging specifically, and 6 of the 8 recipients kept and reused the jar after removing the gift contents.
Mason jar gift wrapping costs 3 to 6 dollars per jar in decoration materials and eliminates the ongoing cost of gift bags and tissue paper for multiple gift occasions throughout the year.
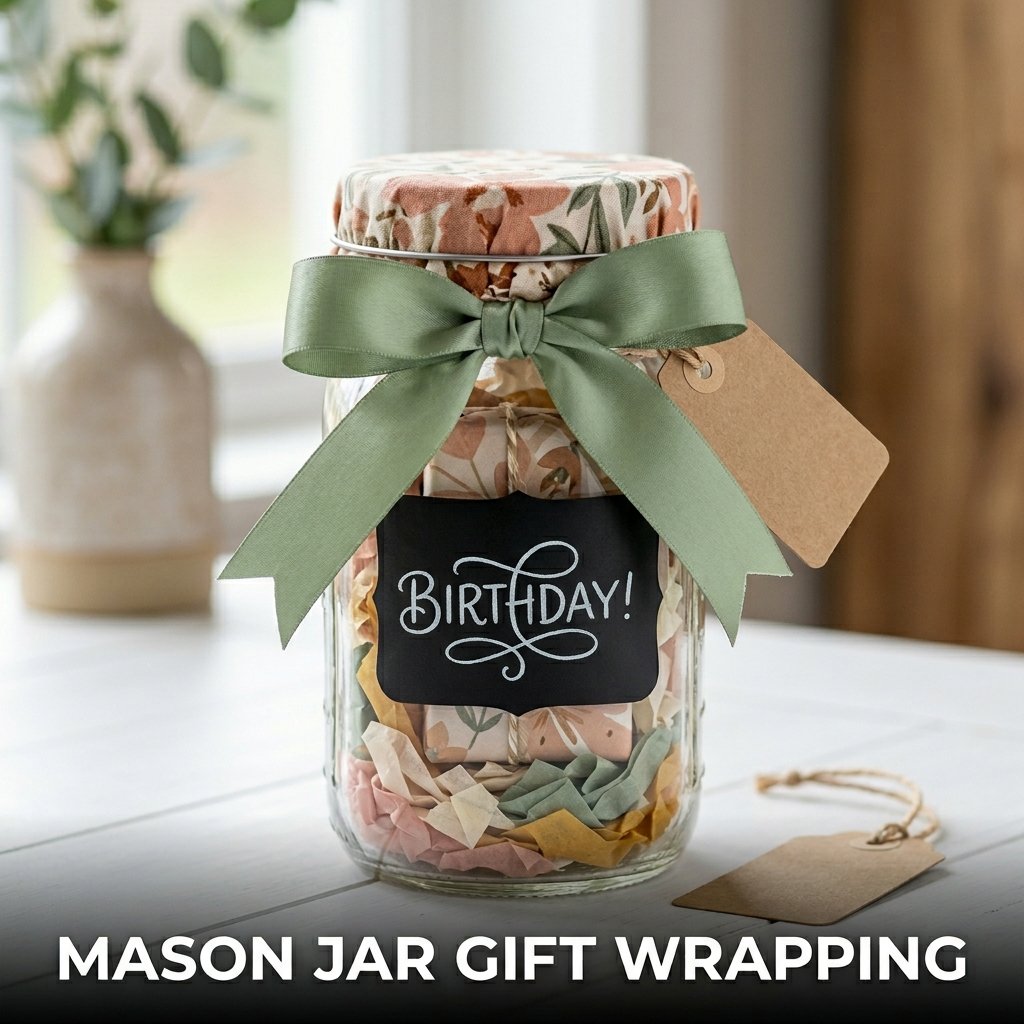
Filling and Presenting a Mason Jar Gift
Place the gift item at the center of the jar. Fill the remaining space with shredded tissue paper, colored paper shreds, or natural cotton fiber to cushion the item and fill the visible glass space attractively. Cut a 15 cm fabric circle from coordinating cotton print fabric. Position it over the jar lid and secure with the lid ring. Tie a ribbon bow around the jar neck over the ring. Attach a gift tag to the ribbon with the recipient’s name. The fabric lid and ribbon bow complete the gift presentation without requiring any additional wrapping paper.
Personalizing a Mason Jar Gift Container
Apply a chalk paint label area to the front of the jar by taping off a rectangle, painting 2 coats of black or dark chalk paint inside the taped area, and removing the tape after drying. Write the recipient’s name or a short message on the chalk paint label area using a white chalk marker. The chalk marker writes cleanly on chalk paint surfaces and produces a permanent finished label that does not smear during handling. This personalization step adds 15 minutes to the gift preparation and increases the perceived thoughtfulness of the finished gift presentation.
FAQ
What are the easiest creative mason jar crafts for beginners?
The easiest creative mason jar crafts for beginners are fairy light lanterns, painted vases, and twine-wrapped candle holders. Fairy light lanterns require only stuffing LED lights into a jar with no adhesive or painting. Painted vases require only 2 coats of chalk paint applied with a flat brush. Twine-wrapped candle holders require only wrapping twine around the jar with craft glue. All 3 projects finish in under 20 minutes and cost under 5 dollars each in materials. None of the 3 projects requires any tools beyond a brush and scissors.
What creative mason jar crafts sell well on Etsy?
Five creative mason jar crafts sell consistently on Etsy: soy wax candles at 12 to 25 dollars, soap dispensers at 12 to 22 dollars, snow globes at 15 to 30 dollars, monogrammed gift sets at 18 to 35 dollars, and painted vase sets of 3 at 25 to 45 dollars per set. Candles and soap dispensers generate the highest repeat purchase rate because they are consumable products that buyers reorder when the contents run out. Snow globes and gift sets sell most strongly in the November and December holiday season based on Etsy seasonal sales data for handmade home decor products.
What type of paint works best on mason jars?
Chalk paint works best on mason jars because it adheres directly to glass without primer, dries in 30 minutes, and produces a matte finish in a wide range of colors. Acrylic craft paint also adheres to glass but requires a glass-specific primer applied first for lasting adhesion. Spray paint produces the most even finish on curved glass surfaces but requires outdoor application and a longer drying time of 1 to 2 hours between coats. All 3 paint types require a clear sealant topcoat applied after painting to prevent chipping during handling and cleaning.
How do I make a mason jar waterproof for outdoor use?
To make a mason jar waterproof for outdoor use, apply 3 coats of exterior-grade clear polyurethane varnish to all painted exterior surfaces. Allow each coat to dry for 2 hours before applying the next. Sand lightly with 220-grit paper between coats. Use only exterior-grade chalk paint rated for outdoor use as the base coat under the polyurethane. Standard indoor chalk paint softens and peels within 2 to 4 weeks of outdoor humidity and rain exposure even when sealed with interior-grade varnish. Clear glass mason jars without paint require no additional waterproofing treatment for outdoor use.
Can I use any mason jar for crafts or do I need a specific type?
Standard wide-mouth and regular-mouth glass mason jars both work for crafts. Wide-mouth jars suit terrariums, soap dispensers, and gift filling because the larger opening allows hand access during assembly. Regular-mouth jars suit candle making, vase decoration, and fairy light lanterns because the smaller opening is sufficient for these construction methods. Ball and Kerr are the two most widely available mason jar brands in the US and both work identically for all craft applications. Recycled food storage jars with similar dimensions to mason jars produce identical results at zero material cost for painted, wrapped, and lit decorative projects.