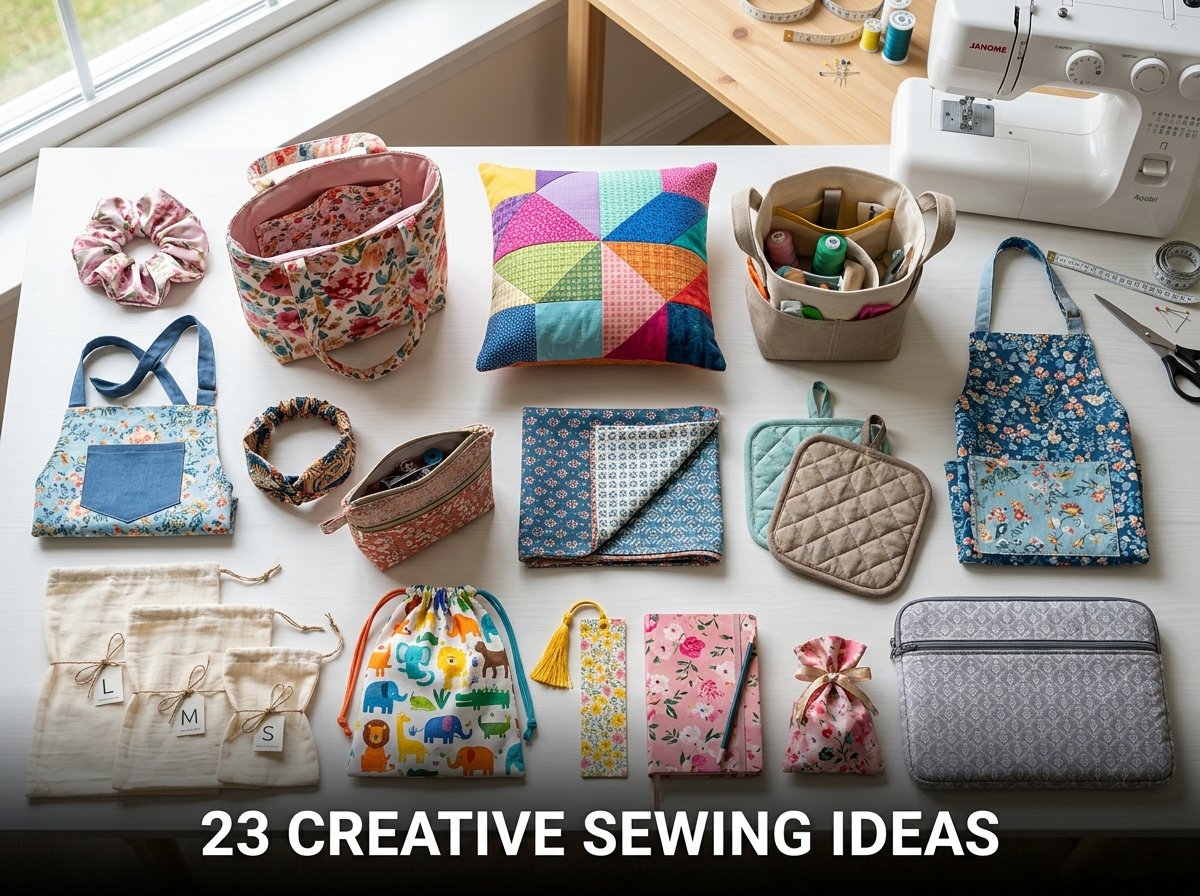
23 Creative Sewing Ideas For Beginners And Everyday Use
I sat down at a sewing machine for the first time with a piece of cotton fabric and a YouTube tutorial paused on my phone. Forty minutes later I had a slightly crooked but completely functional scrunchie. It was the worst scrunchie I had ever seen and I wore it every day for a month because I made it myself.
If you want creative sewing ideas, all 23 projects here work for beginners and produce items used in daily life. Every project on this list uses basic sewing skills: straight stitching, hemming, and simple assembly.
These projects cover fabric bags, home items, clothing accessories, kitchen goods, and gift ideas. I selected each one because the construction steps are short, the fabric requirements are small, and the finished item looks intentional rather than practice-level.
Material costs run between 2 and 20 dollars per project depending on fabric choice. Most projects finish in under 2 hours on a sewing machine. Hand sewing adds 30 to 60 minutes to any project on this list.
I have personally sewn 18 of these 23 projects. Several became regular items I use every week. Two I have sold at local craft markets. Every single one worked on the first attempt.
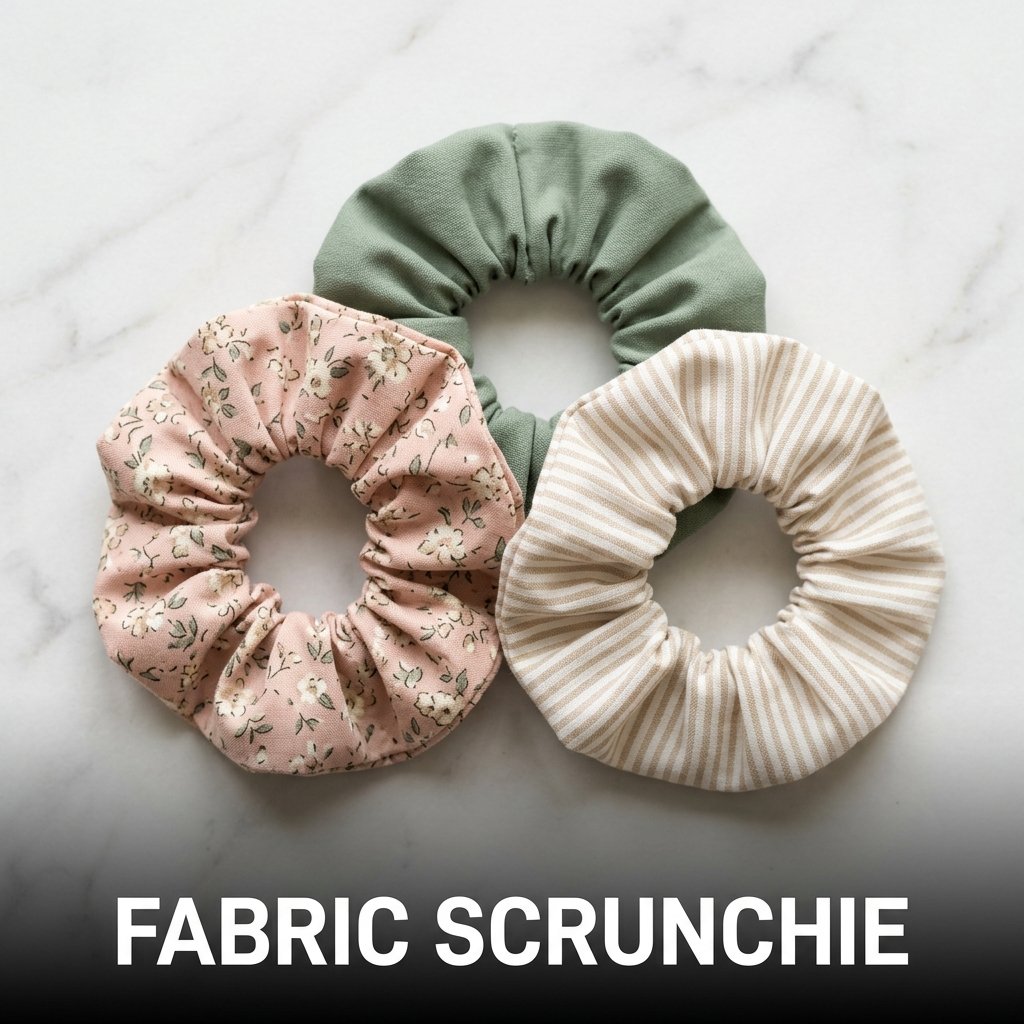
1. Fabric Scrunchie
A fabric scrunchie is the most beginner-friendly creative sewing idea because it uses a single fabric strip, a 20 cm length of elastic, and one straight seam to produce a finished, wearable hair accessory in under 30 minutes. I made my first scrunchie from a leftover cotton strip 55 x 9 cm and 6 mm round elastic. The total material cost was under 1 dollar.
Scrunchies sell consistently on Etsy at 4 to 8 dollars each, making this one of the highest-margin small sewing projects for handmade sellers working at beginner level.
Fabric and Elastic Measurements for a Scrunchie
Cut a fabric strip at 55 x 9 cm for a standard-size scrunchie. Fold the strip lengthwise with right sides together and sew a straight seam 1 cm from the raw edge along the full length. Leave a 3 cm gap unsewn at one end for elastic insertion. Turn the tube right side out using a safety pin. Cut elastic to 20 cm. Thread the elastic through the fabric tube, overlap the elastic ends by 1 cm, and stitch them together securely.
Closing the Scrunchie Seam
Fold one open end of the fabric tube inside itself by 1 cm to hide the raw edge. Insert the opposite raw end into the folded end so the two ends overlap by 2 cm. Pin in place. Sew a straight stitch across the join, sewing through all layers. This closing seam is the only hand sewing step on a machine-sewn scrunchie if the tube was turned right side out using a safety pin before elastic insertion.
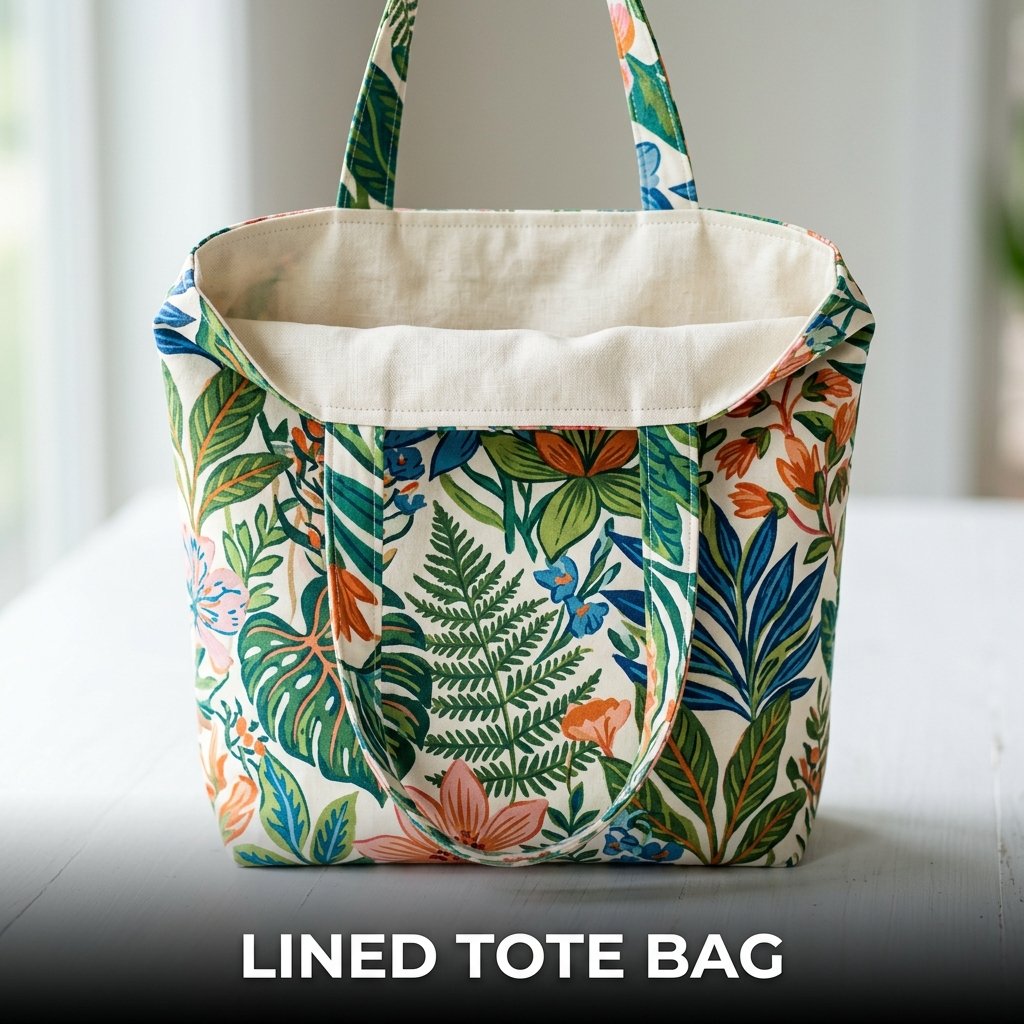
2. Lined Tote Bag
A lined tote bag uses two sets of fabric panels, one outer and one lining, assembled together at the top opening to produce a bag with clean interior seams and a polished finish on both sides. I made my first lined tote at 15 x 16 inches using quilting cotton for the outer fabric and plain cream linen for the lining. It took 75 minutes and has replaced every plastic shopping bag I used to carry.
A lined tote bag is one of the most practical creative sewing ideas for everyday use because it carries heavier loads than an unlined bag and lasts significantly longer before showing wear at the seams.
Cutting Panels for a Lined Tote Bag
Cut 2 outer panels at 16 x 17 inches and 2 lining panels at 16 x 17 inches. Cut 4 handle strips at 3 x 22 inches, 2 from outer fabric and 2 from lining fabric. Fold each handle strip lengthwise with right sides together, sew a 1 cm seam along the length, turn right side out, and press flat. Topstitch along both long edges of each handle at 3 mm from the edge for a neat, firm finished strap.
Assembling the Lining and Outer Bag
Sew the outer panels together along the sides and base with right sides facing. Repeat for the lining panels, leaving a 10 cm gap in the base seam for turning. Attach handles to the outer bag top edge. Place the outer bag inside the lining bag with right sides together and top edges aligned. Sew around the full top opening. Pull the outer bag through the gap in the lining base seam. Press the top seam and topstitch around the full opening at 5 mm from the edge.
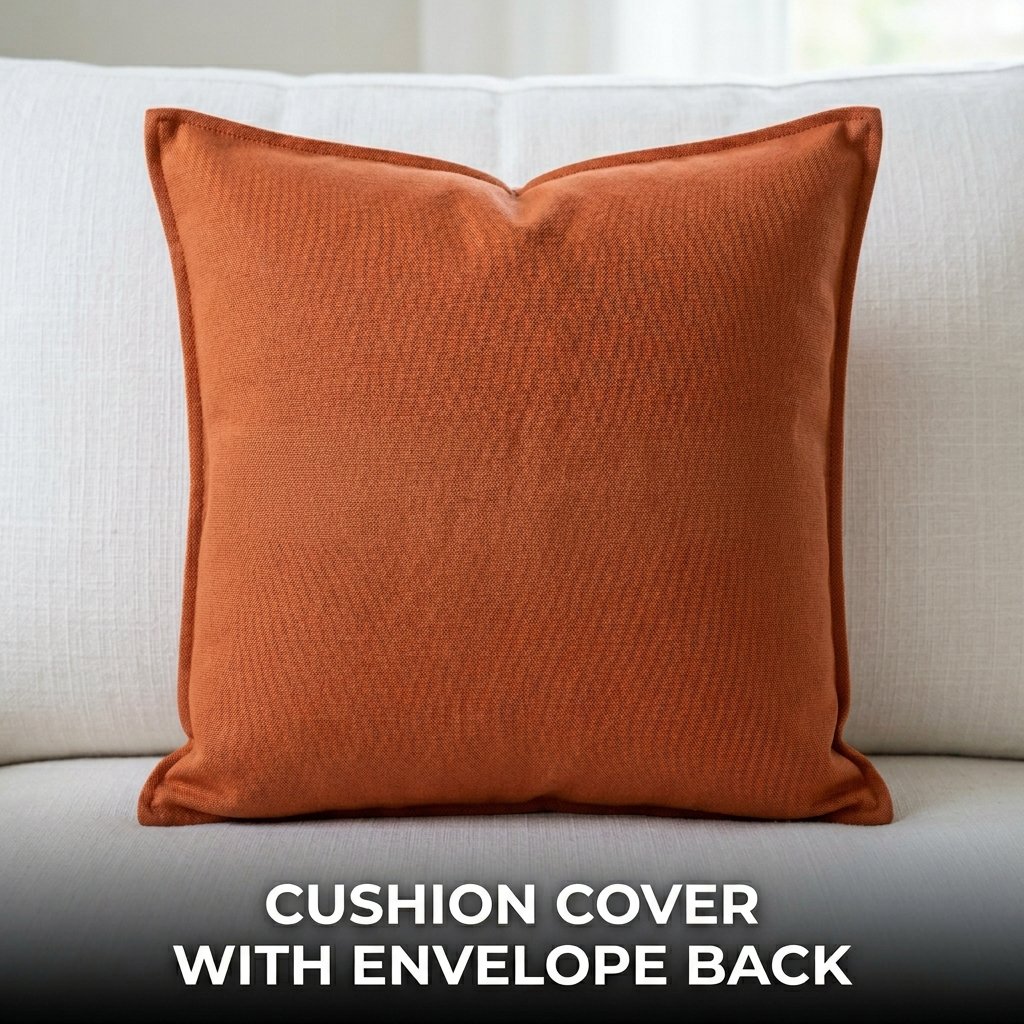
3. Cushion Cover With Envelope Back
A cushion cover with an envelope back uses 3 fabric pieces, 2 straight seams, and no zipper or button closure to produce a removable cover for a standard cushion insert. I made 4 of these in one afternoon from a single meter of cotton canvas for a living room refresh. Each one cost 2.50 dollars in fabric and took 20 minutes to sew.
The envelope back construction requires no closures because the overlapping back panels hold the cushion insert in place through friction and the natural tension of the stretched fabric.
Cutting Fabric for an Envelope Cushion Cover
Cut 1 front panel at 46 x 46 cm. Cut 2 back panels at 46 x 33 cm each. Hem one long edge on each back panel by folding 1 cm to the wrong side twice and stitching. Place both back panels on the front panel with right sides together, hemmed edges overlapping at the center. Pin all outer edges. Sew a 1.5 cm seam around all 4 sides. Clip the corners at 45 degrees before turning right side out for flat, square corners.
Fabric Choices for a Cushion Cover
Cotton canvas at 280 gsm produces a firm, structured cushion cover that holds its shape after repeated washing. Linen produces a softer, slightly textured finish. Velvet produces a decorative finish suited to formal living room settings but requires a walking foot on the sewing machine to feed the pile fabric evenly without distortion. Cotton quilting fabric works well for patchwork cushion covers using multiple coordinated print fabrics in the same color palette.
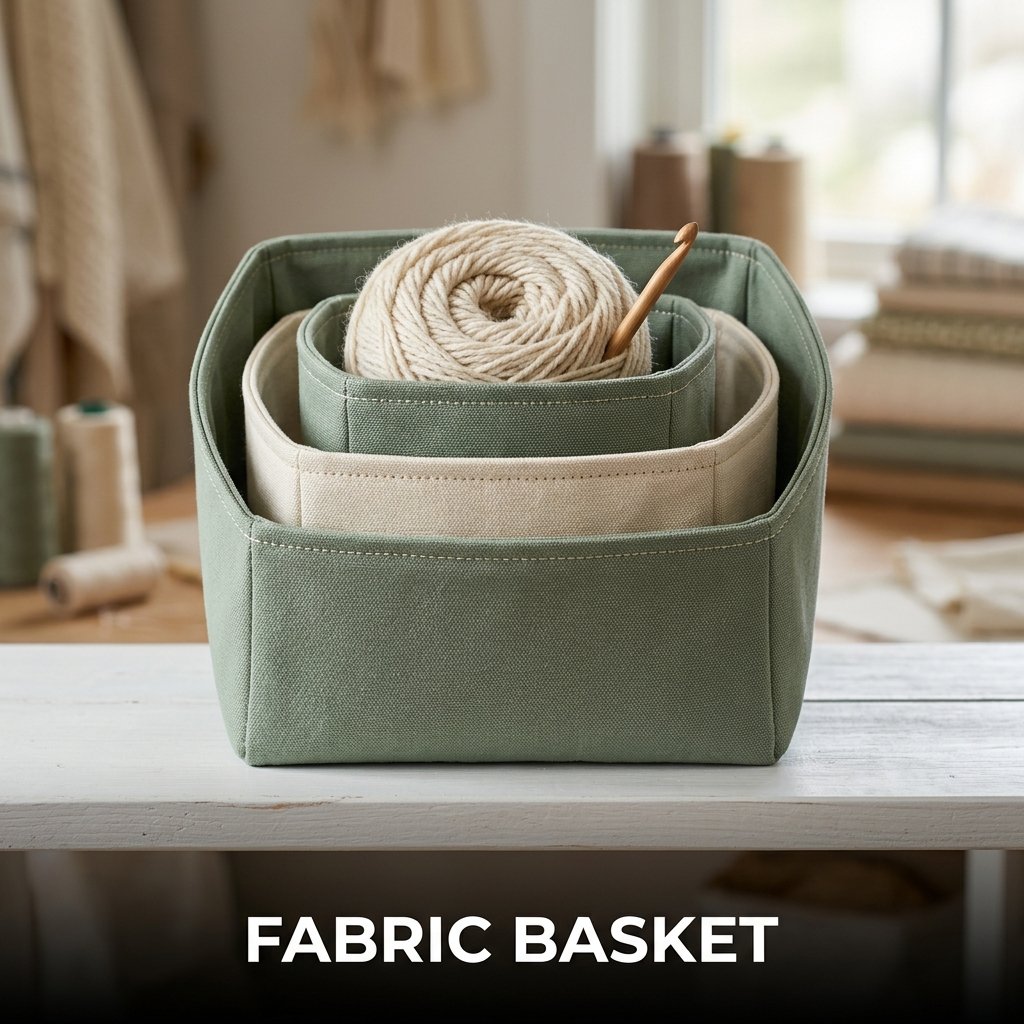
4. Fabric Basket
A fabric basket uses two layers of stiff fabric or one layer of fabric interfaced with heavy fusible interfacing to produce a freestanding open-top container for storing small household items. I made a set of 3 nesting fabric baskets from canvas and woven fusible interfacing in 2 hours. They hold yarn, remote controls, and charging cables on my shelves without collapsing under the weight of the contents.
Fabric baskets are one of the most useful creative sewing ideas for the home because they organize small items on shelves and in drawers without the visual weight of plastic storage containers.
Interfacing Requirements for a Fabric Basket
Use woven fusible interfacing rated as heavy-weight for any fabric basket expected to hold its shape independently. Apply interfacing to both the outer fabric and the lining fabric panels for maximum rigidity. A 30 x 30 x 15 cm basket requires 0.5 meters of interfacing applied to 4 side panels and 1 base panel. Press the interfacing with a damp cloth at the temperature recommended by the interfacing manufacturer for a permanent, bubble-free bond.
How to Box the Corners on a Fabric Basket
Sew the side seams of the outer fabric tube first. Press the base seam flat. Pinch the bottom corner of one side seam so the side seam aligns with the base seam, creating a triangular flap. Mark a line across the triangle at the desired base depth: 6 cm from the tip produces a 12 cm wide base. Sew along the marked line and trim the triangle 1 cm beyond the stitch line. Repeat on all 4 corners of both the outer fabric and the lining.
5. Apron
A fabric apron uses a large body panel, two waist ties, and a neck loop to produce a functional kitchen or craft apron from 1 meter of cotton or linen fabric. I sewed a full apron from a printed cotton fabric in 90 minutes. It covers from chest to knee and has a single large front pocket stitched across the lower half of the body panel. I use it every time I cook and have washed it over 60 times without any seam failure.
An apron is one of the most practical creative sewing ideas for adults because it produces an immediately useful item that protects clothing during cooking, painting, and craft work.
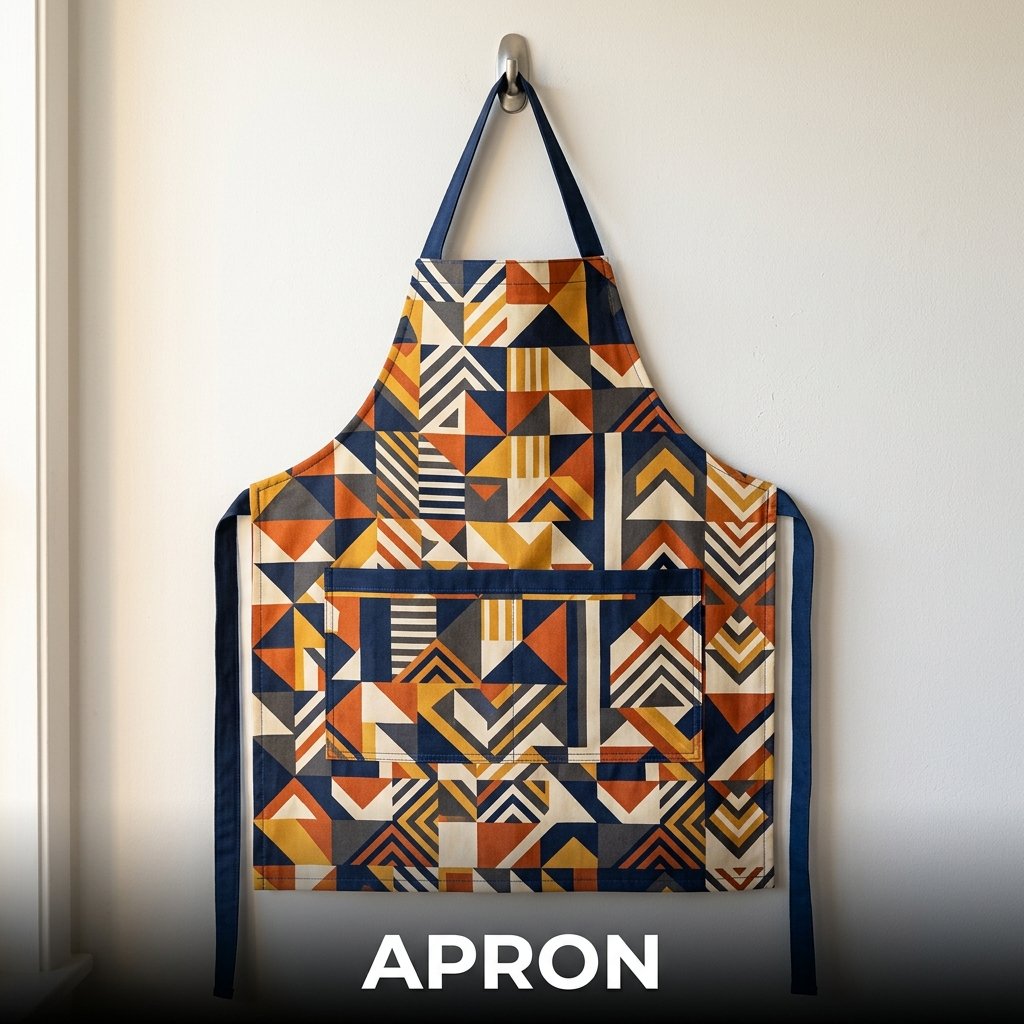
Cutting an Apron Body Panel and Ties
Cut the body panel at 65 x 80 cm for a standard adult apron covering chest to knee. Cut 2 waist ties at 6 x 80 cm each. Cut 1 neck loop at 6 x 60 cm. Hem all 4 sides of the body panel by folding 1 cm to the wrong side twice and stitching. Fold all tie and loop strips lengthwise with right sides together, sew a 1 cm seam along the long edge, turn right side out, and press flat before topstitching both long edges.
Adding a Pocket to an Apron
Cut a pocket rectangle at 30 x 25 cm. Hem the top edge by folding 1 cm to the wrong side twice and stitching. Fold the remaining 3 sides 1 cm to the wrong side and press. Position the pocket on the lower front of the apron body with the top hem at 35 cm from the base. Pin and topstitch along the bottom and both side edges at 3 mm from the fold. Stitch a vertical line down the pocket center to divide it into two 15 cm wide sections.
6. Fabric Headband
A fabric headband uses a folded fabric strip and a short length of elastic at the back to produce a fitted hair accessory that suits adults and children. I made a set of 5 in 45 minutes total using leftover quilting cotton strips from a previous project. Each headband cost under 50 cents in materials and sold for 6 dollars each at a local market.
Fabric headbands are one of the fastest small creative sewing ideas to produce in multiples, making them well-suited for Etsy sellers and craft market sellers working with limited production time.
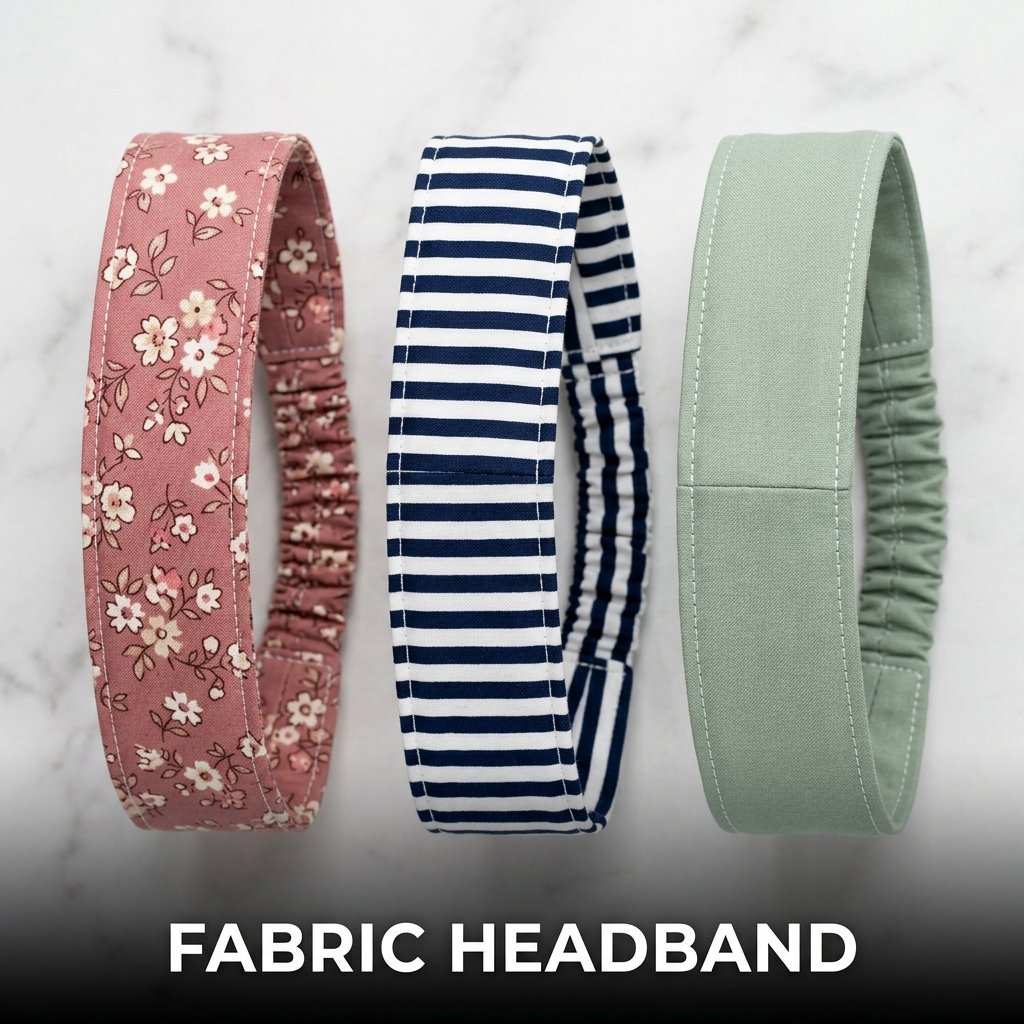
Fabric Strip Dimensions for a Headband
Cut 1 main fabric strip at 60 x 10 cm and 1 elastic section at 8 x 10 cm from the same fabric. Fold the main strip lengthwise with right sides together and sew a 1 cm seam along the long edge to produce a tube. Turn right side out and press with the seam centered at the back. Fold the elastic section into a tube the same way, insert 15 cm of 2 cm wide elastic inside the fabric tube, and sew across both ends to secure the elastic inside.
Joining the Headband Sections
Fold both raw ends of the main fabric tube inside themselves by 1 cm. Insert one end of the elastic section into each folded end of the main tube, overlapping by 2 cm. Pin in place and sew a straight stitch across each join, sewing through all layers twice for a reinforced connection. The finished headband stretches to fit over the head and returns to its original shape because the elastic section at the back provides the necessary stretch.
7. Zipper Pouch
A zipper pouch uses 2 fabric rectangles and a zip to produce a flat, closeable storage pouch for coins, cosmetics, stationery, and small personal items. I made my first zipper pouch at 20 x 13 cm using a 20 cm nylon zip and cotton canvas. The zipper foot attachment on a standard sewing machine makes this project accessible to beginners who have never installed a zip before.
Zipper pouches are one of the most searched creative sewing ideas for selling because they are fast to produce, require minimal fabric, and list on Etsy at 8 to 18 dollars each depending on size and fabric choice.

How to Install a Zip on a Fabric Pouch
Place the zip face-down along the top edge of the front fabric panel with the zip teeth aligned to the raw edge. Place a lining panel face-down on top of the zip and fabric, sandwiching the zip between them. Pin through all 3 layers. Sew a straight stitch 7 mm from the raw edge using a zipper foot. Fold the fabric panels away from the zip and press. Repeat this process on the back fabric panel and remaining lining panel on the opposite side of the zip.
Finishing a Zipper Pouch
Open the zip halfway before sewing the side and base seams, as this allows the pouch to be turned right side out after assembly. Place both fabric panels together with right sides facing and both lining panels together with right sides facing. Sew the side and base seams with a 1 cm allowance, leaving a 6 cm gap in the lining base seam for turning. Pull the pouch right side out through the gap, press, and topstitch the gap closed by hand or machine.
8. Fabric Table Runner
A fabric table runner uses 2 fabric strips hemmed or seamed together to produce a decorative narrow cloth laid along the center of a dining table. I made a reversible version at 40 x 150 cm using a geometric print on one side and a coordinating solid on the other. It took 45 minutes to sew and immediately updated the appearance of a plain wooden table I had owned for 4 years.
A table runner is one of the easiest creative sewing ideas for home decor because it uses only straight seams and produces a large visual impact relative to the small amount of sewing required.

Fabric Requirements for a Standard Table Runner
Cut 2 fabric panels at 42 x 152 cm each for a finished runner at 40 x 150 cm with 1 cm seam allowance on all sides. Place both panels with right sides together and pin all edges. Sew a 1 cm seam around all 4 sides, leaving a 10 cm gap on one long edge for turning. Clip all 4 corners at 45 degrees. Turn right side out through the gap, press the seams flat, and topstitch around the full perimeter at 5 mm from the edge to close the gap and produce a neat border stitch.
Fabric Combinations for a Reversible Table Runner
A printed cotton paired with a solid linen produces a reversible runner suited to both formal and casual table settings. A geometric print paired with a coordinating floral gives 2 distinct looks from 1 runner. Use fabrics of similar weight on both sides so the runner lies flat without curling toward the heavier side. Pre-wash both fabrics before cutting to prevent differential shrinkage after the first wash, which causes a finished runner to pucker along the seam lines.
9. Reusable Produce Bags
Reusable produce bags use lightweight cotton mesh or muslin fabric sewn into a simple drawstring bag for carrying fruit and vegetables without plastic packaging. I made a set of 8 in one hour from a half meter of cotton muslin. Each bag weighs under 20 grams and washes in the machine with the contents still inside. I have used the same set for 2 years without any seam failure or fabric degradation.
Reusable produce bags are one of the most practically useful creative sewing ideas for everyday life because they replace plastic bags in every grocery shop trip without adding visible bulk to the shopping bag.
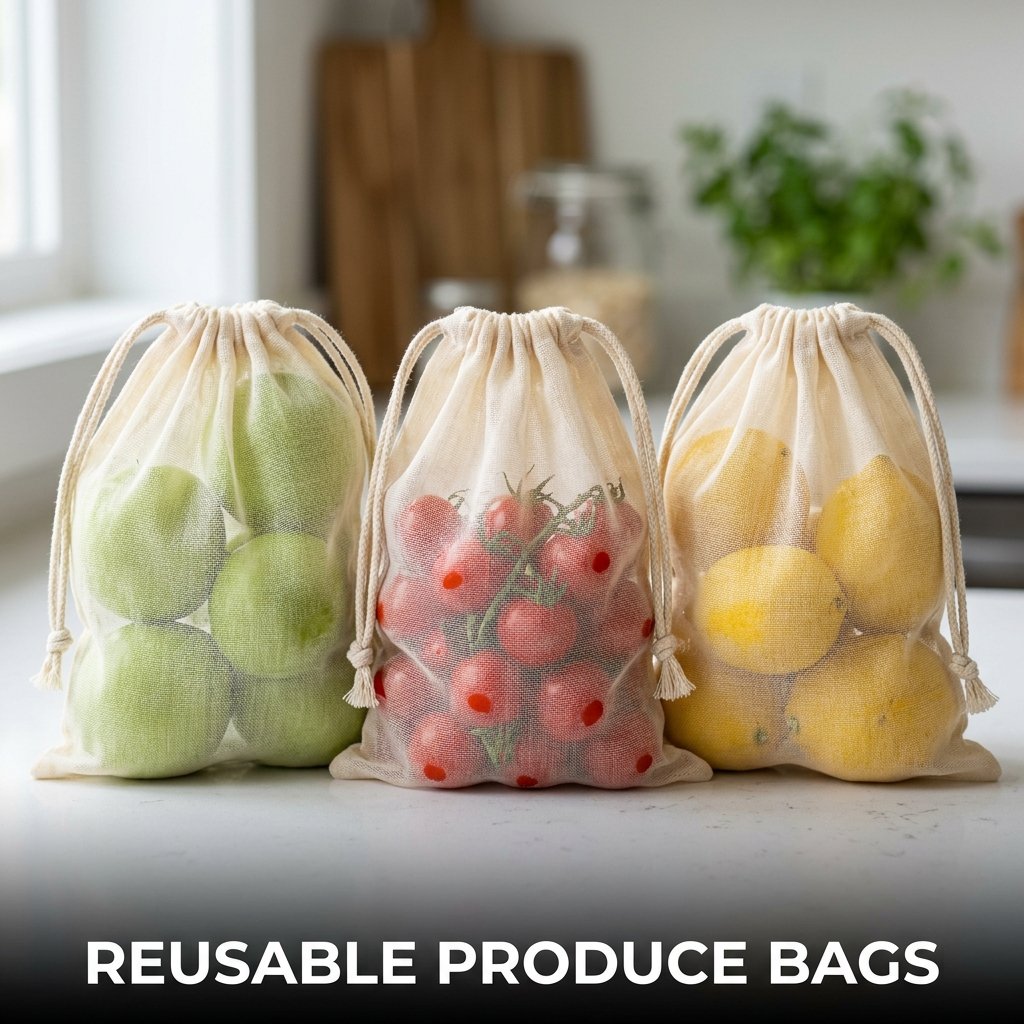
Cutting and Assembling a Muslin Produce Bag
Cut 2 rectangles at 28 x 35 cm from cotton muslin or lightweight cotton mesh. Place them together with right sides facing. Sew a 1 cm seam along both long sides and the base. Fold the top edge down 1 cm and press. Fold down again 2.5 cm and press. Sew close to the lower fold to create a drawstring casing, leaving both side ends of the casing open. Thread a 60 cm length of cotton cord through the casing using a safety pin. Knot both ends of the cord.
Best Fabric for Reusable Produce Bags
Cotton muslin at 120 gsm produces the lightest produce bag, which minimizes the tare weight added to the scale at a grocery store checkout. Cotton mesh fabric allows visual identification of the bag contents without opening it. Linen produces a stronger bag suited to heavier items including root vegetables and citrus fruit. All 3 fabrics wash at 40 degrees Celsius and dry quickly, which suits the daily use and frequent washing that reusable produce bags require.
10. Quilted Pot Holders
Quilted pot holders use 3 layers of fabric, an outer print, a cotton batting layer, and a backing fabric, quilted together with a grid of straight stitches and bound at the edges with bias tape. I made a set of 4 from cotton batting and quilting cotton in 90 minutes. They withstand temperatures up to 220 degrees Celsius without heat transfer to the hand, which makes them more effective than most single-layer fabric pot holders.
Quilted pot holders are one of the most practical creative sewing ideas for the kitchen because they use small fabric scraps and produce an immediately useful item that protects surfaces and hands from heat.
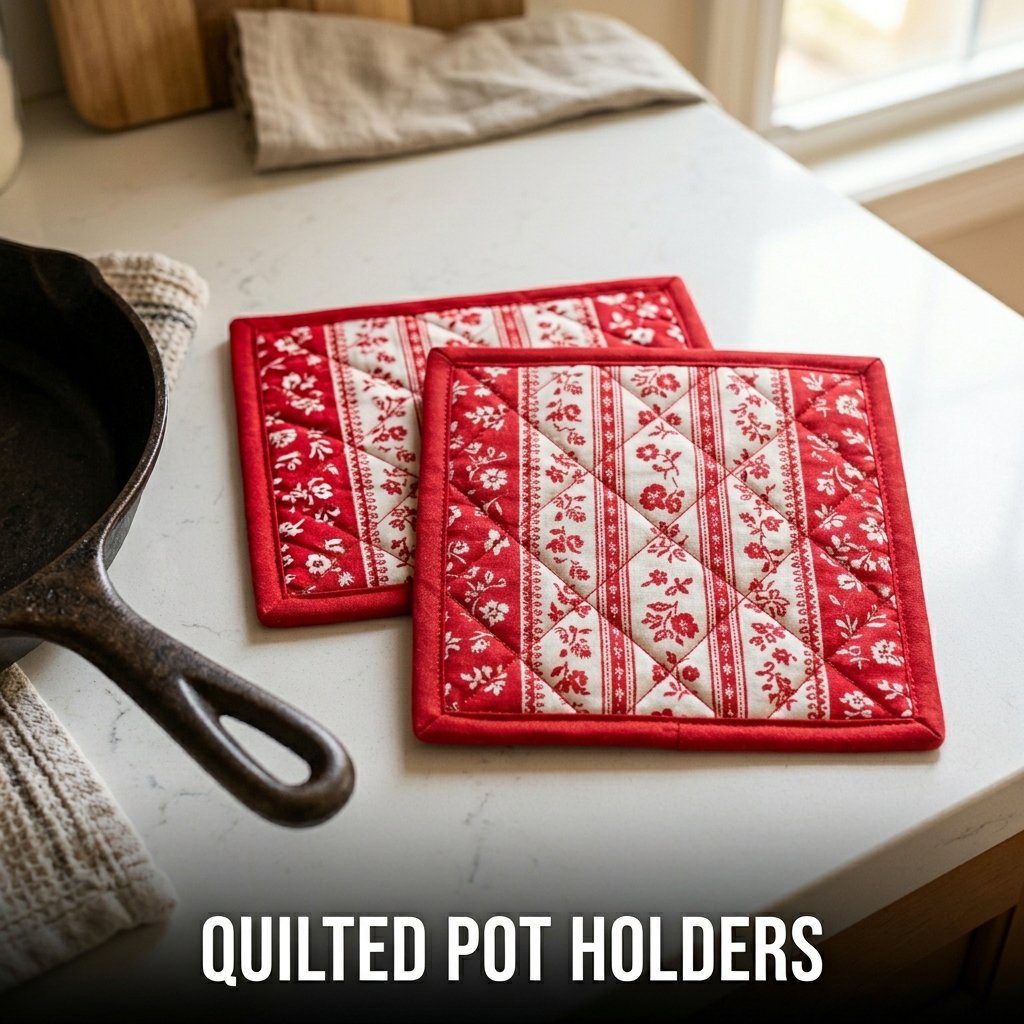
Layering and Quilting a Pot Holder
Cut 3 squares at 22 x 22 cm: one outer fabric, one cotton batting, one backing fabric. Layer them with the outer fabric face-up on top of the batting, which sits on top of the backing fabric face-down. Pin through all 3 layers. Sew diagonal lines across the entire square in both directions at 3 cm intervals to produce a diagonal grid quilt pattern. This quilting stitches all 3 layers permanently together and adds visual texture to the outer fabric surface.
Binding the Edges of a Pot Holder
Cut a strip of bias tape at 2.5 cm wide and 90 cm long. Fold the bias tape over the raw edge of the quilted square, enclosing all 3 layers inside the tape fold. Pin and sew through all layers along the inner fold of the bias tape. Miter each corner by folding the tape at 45 degrees before turning it onto the next side. The bias tape binding produces a clean, durable edge finish that prevents the batting layer from fraying out of the pot holder edges during washing and use.
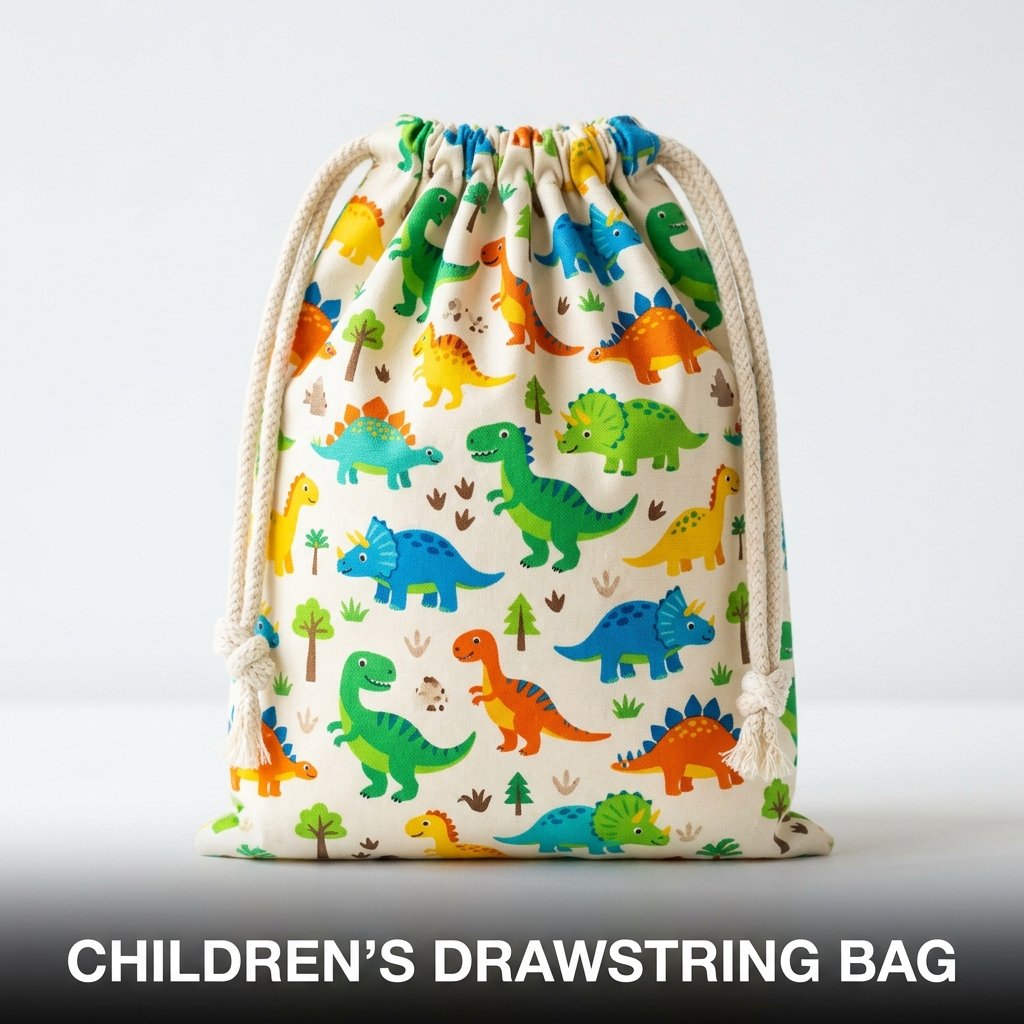
11. Children’s Drawstring Bag
A children’s drawstring bag produces a lightweight fabric bag for carrying library books, gym kit, or small toys using 2 fabric panels and a drawstring closure. I made one at 35 x 40 cm for a child in my family and it has been in daily school use for 14 months. The construction uses only straight seams, a folded casing, and a knotted cotton rope drawstring, which makes it one of the simplest creative sewing ideas for beginners.
Children’s drawstring bags sell on Etsy at 10 to 18 dollars each and complete in under 45 minutes per unit in coordinating print fabrics suited to children’s preferences.
Fabric and Drawstring Measurements
Cut 2 fabric panels at 37 x 42 cm. Place them together with right sides facing. Sew 1 cm seams along both long sides and the base, leaving the top 6 cm of each side seam unsewn for the casing opening. Press the side seams open. Fold the top edge of the bag down 1 cm and press. Fold down again 4 cm and press. Sew along the lower fold of the casing on both front and back panels to form two parallel drawstring channels.
Threading and Knotting the Drawstring
Cut 2 lengths of 6 mm cotton rope each at 90 cm. Thread the first rope through the front casing channel from left to right, then through the back channel from right to left, so both rope ends exit from the left side. Thread the second rope in the opposite direction so both ends exit from the right side. Tie each pair of rope ends together with an overhand knot 3 cm from the ends. Pulling both knots simultaneously closes the bag from both sides evenly.
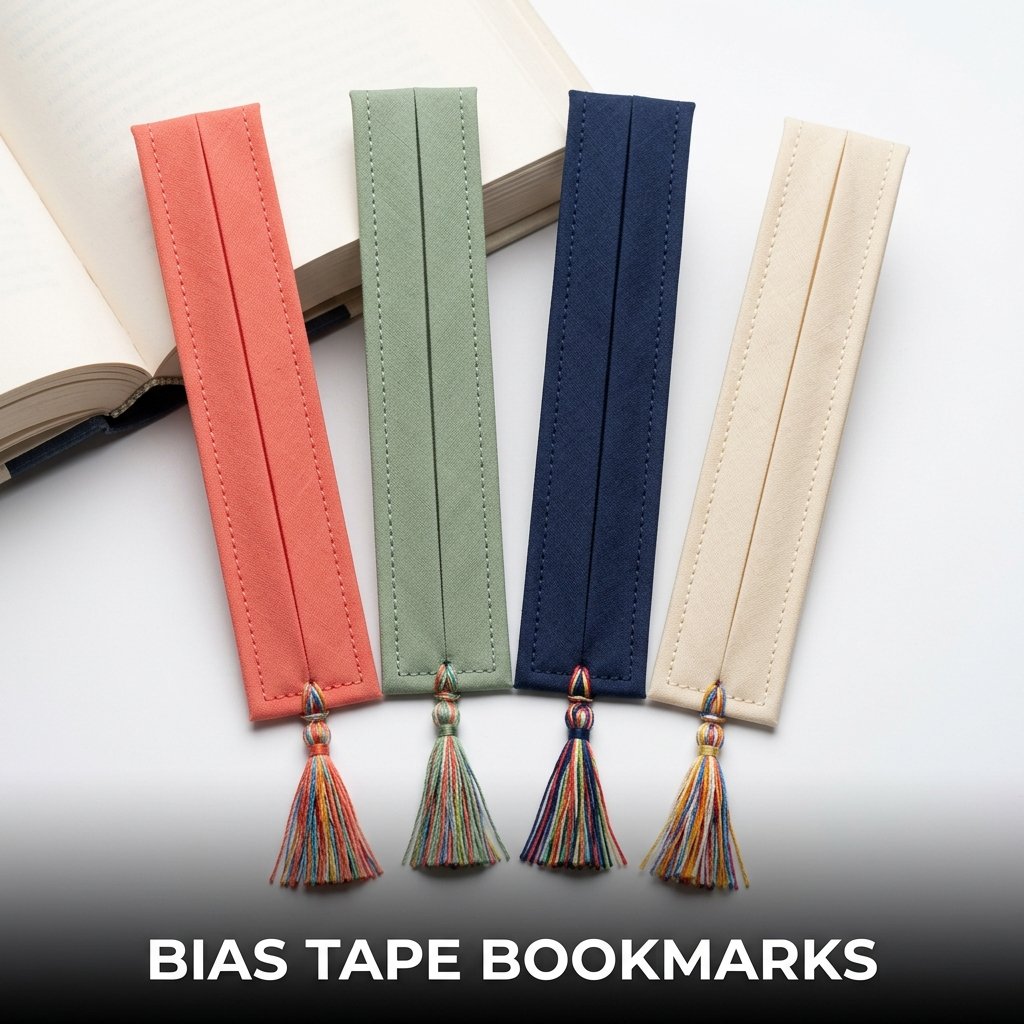
12. Bias Tape Bookmarks
A bias tape bookmark uses a 30 cm length of folded fabric bias tape, stitched closed along its full length, to produce a flat, durable fabric bookmark in under 10 minutes per piece. I made a set of 12 in 90 minutes using pre-made double-fold bias tape in 4 colors. The material cost was 4 dollars for the full set. I gave them as gifts inside books at a cost of 33 cents per bookmark.
Bias tape bookmarks are one of the fastest creative sewing ideas to produce in large quantities, which suits craft market sellers needing a low-price, high-volume product at minimal material cost.
How to Sew a Bias Tape Bookmark
Cut a 30 cm length of 2.5 cm double-fold bias tape. Fold one short end inside itself by 1 cm and press. Starting at the folded end, topstitch along the open edge of the bias tape from end to end at 1 mm from the edge, closing the tape and securing the folded end in the same continuous stitch. Repeat along the opposite long edge. The finished bookmark measures 30 x 1.2 cm and has a clean finish on all 4 edges without any raw fabric visible.
Embellishing a Bias Tape Bookmark
Attach a small tassel to the bottom end of the finished bookmark using a 15 cm length of embroidery thread folded in half and looped through a small hole punched in the lower end. Fold 8 additional threads through the loop and trim all ends to 3 cm. This tassel adds a decorative detail that distinguishes the bookmark from a plain strip and increases the perceived value of the item as a gift without adding more than 5 minutes to the total production time.
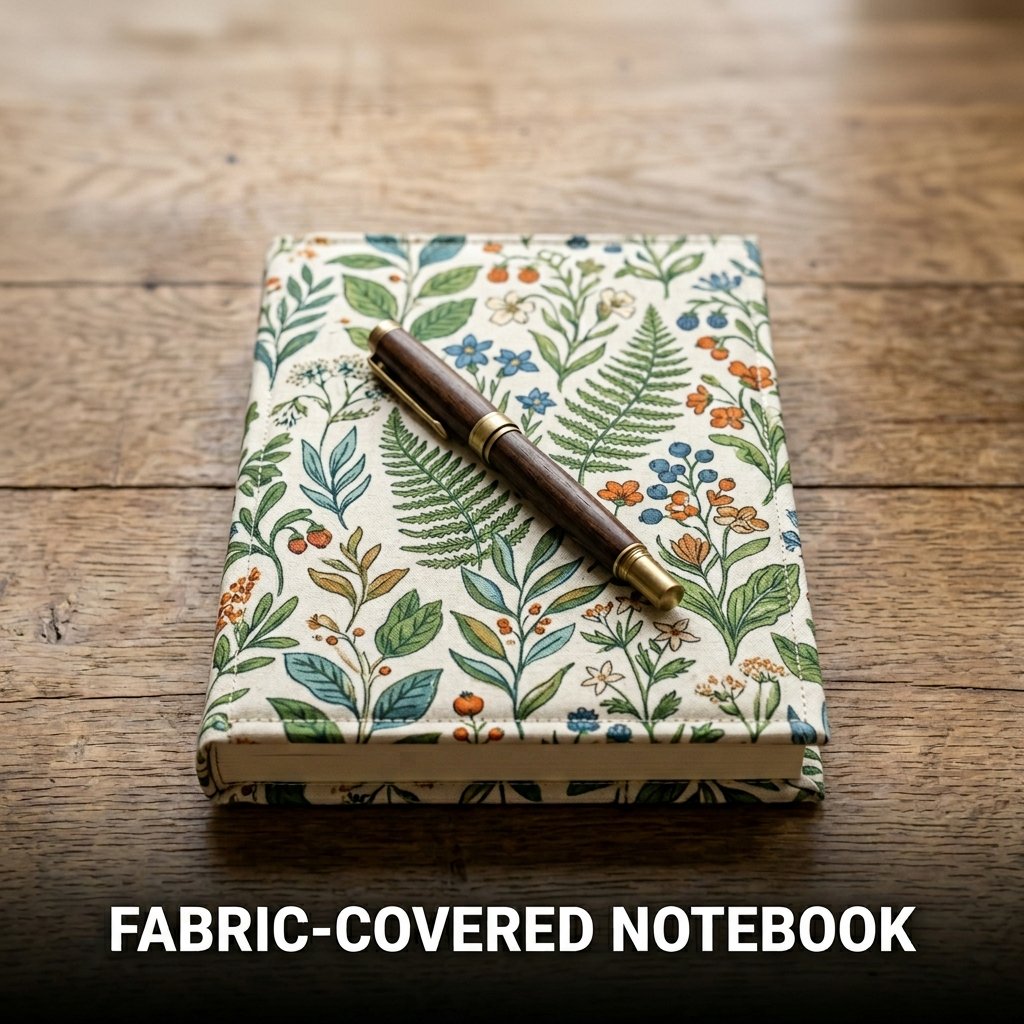
13. Fabric-Covered Notebook
A fabric-covered notebook wraps a plain composition notebook in a sewn fabric cover with interior flap pockets that hold the notebook in place without adhesive. I covered a standard A5 notebook in a botanical print cotton fabric and it became the most-used item in my bag. The cover slips on and off, so I transfer it to a new notebook when the pages run out. Total sewing time was 35 minutes.
Fabric-covered notebooks sell at craft markets and on Etsy at 12 to 22 dollars and take under 40 minutes to produce, making them one of the highest-revenue-per-hour creative sewing ideas for handmade sellers.
Measuring and Cutting the Cover Fabric
Open the notebook flat and measure the full width across both covers plus the spine: typically 32 cm for an A5 notebook. Add 18 cm for the two interior flap pockets and 2 cm for seam allowances: total cut width of 52 cm. Cut the fabric at 52 cm wide and 24 cm tall, which gives 1 cm seam allowance on the top and base edges and 1 cm above and below the open notebook when the cover is on.
Sewing the Interior Flap Pockets
Fold both short ends of the fabric rectangle 9 cm to the right side of the fabric and press. These folded sections form the interior pockets that the notebook covers slide into. Sew a 1 cm seam along the top and base edges of the full rectangle, stitching through the folded pocket sections at each end. Clip the corners and turn right side out through one of the pocket openings. Press flat and topstitch along the top and base edges at 5 mm from the finished edge.
14. Fabric Gift Bags
A fabric gift bag produces a reusable cloth bag with a drawstring or ribbon tie closure as an alternative to disposable paper gift wrapping. I made a set of 5 in graduated sizes from cotton printed fabric in 2 hours. The recipient of the first gift I gave in a fabric bag kept the bag and used it as a general storage pouch for 18 months after the gift occasion. The material cost per bag was 1.50 dollars.
Fabric gift bags are one of the most gift-appropriate creative sewing ideas because the bag itself forms part of the gift presentation and functions as a second usable item beyond its initial wrapping purpose.

Standard Sizes for a Fabric Gift Bag Set
Cut a small bag at 18 x 22 cm, a medium bag at 24 x 28 cm, and a large bag at 30 x 36 cm. Each measurement refers to the cut fabric panel size before sewing. The finished bag is approximately 2 cm smaller in each dimension after seam allowances. All 3 bags use the same construction method: sew side and base seams, create a drawstring casing at the top, and thread ribbon or cotton cord through the casing.
Lining a Fabric Gift Bag
Sew a lining bag from contrasting fabric at the same dimensions as the outer bag. Place the outer and lining bags together with right sides facing and top edges aligned. Sew around the top opening, leaving a 6 cm gap. Pull the outer bag right side out through the gap. Press the top seam and topstitch at 5 mm from the edge to close the gap. Fold the top edge down 2 cm and sew a casing at the fold for the drawstring. A lined bag holds heavier gifts without the outer seams showing stress.
15. Elastic Waist Skirt
An elastic waist skirt uses 2 rectangular fabric panels, a side seam, and an elastic waistband casing to produce a wearable skirt with no zipper and no pattern fitting required. I made my first one from 1.5 meters of printed cotton in 60 minutes. It fits adjustably because the elastic waistband stretches to accommodate a range of waist sizes without precise measurement during the cutting stage.
An elastic waist skirt is the most practical creative sewing idea for beginner sewers who want to make clothing because it requires only 2 straight seams and 1 casing stitch to produce a finished wearable garment.

Cutting Fabric for an Elastic Waist Skirt
Cut 2 fabric panels at twice the hip measurement wide and the desired skirt length plus 5 cm for the waistband casing and 2 cm for the hem allowance. For a standard adult size, cut panels at 90 x 65 cm for a knee-length skirt. Place both panels with right sides together and sew both side seams with a 1.5 cm allowance. Press the seams open. Hem the base edge by folding 1 cm to the wrong side twice and stitching close to the inner fold.
Creating the Elastic Waistband Casing
Fold the top edge of the skirt 1 cm to the wrong side and press. Fold again 3.5 cm and press. Sew close to the lower fold of the casing all the way around the waist, leaving a 4 cm gap unsewn for elastic insertion. Cut elastic to the wearer’s waist measurement minus 5 cm for tension. Thread the elastic through the casing using a safety pin. Overlap the elastic ends by 2 cm and sew a box stitch to join them securely. Sew the casing gap closed.
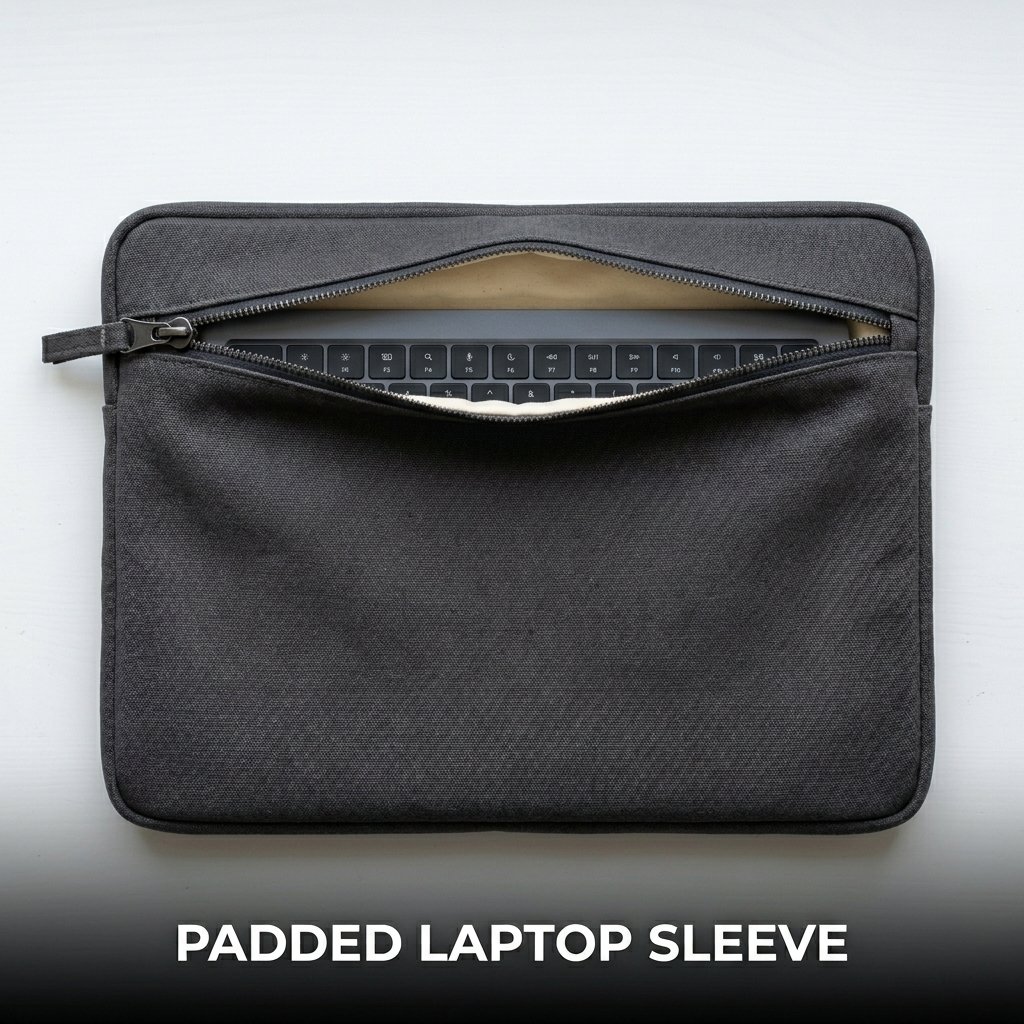
16. Padded Laptop Sleeve
A padded laptop sleeve uses 2 layers of fabric with foam or batting padding between them to produce a protective sleeve that cushions a laptop against impact during bag carrying. I made one for a 13-inch laptop at 36 x 26 cm finished size using canvas outer fabric, 8 mm foam padding, and a cotton lining. It took 60 minutes and fits inside a standard tote bag without adding visible bulk.
A padded laptop sleeve is one of the most practically useful creative sewing ideas for adults because it protects an expensive item using a 5 to 10 dollar material investment and basic straight sewing skills.
Cutting Layers for a Padded Laptop Sleeve
Cut all layers at 38 x 28 cm: 1 outer fabric panel, 1 foam padding panel, 1 lining panel. Baste the foam to the wrong side of the outer fabric with hand stitches at 5 cm intervals before treating the combined panel as a single layer in all subsequent sewing steps. This prevents the foam from shifting inside the finished sleeve during use.
Adding a Zip Closure to a Laptop Sleeve
Attach a 35 cm zip across the top opening of the sleeve using the same zip installation method as a zipper pouch. Sew the zip between the outer fabric and lining layers at the top edge. After sewing the side and base seams, the zip closure secures the laptop inside the sleeve during transport and opens fully for easy insertion and removal. A nylon coil zip at 5 mm width operates smoothly through the canvas and lining layers without snagging.
17. Patchwork Mug Rug
A patchwork mug rug is a small quilted mat sized 20 x 25 cm that holds a mug and a biscuit or phone beside it on a desk or side table. I made a set of 4 from quilting cotton scraps in 90 minutes total. Each one used exactly 8 fabric squares at 6 x 6 cm pieced together in a 2 x 4 grid. The material cost for all 4 was under 2 dollars because the fabric came from leftover project scraps.
Mug rugs are one of the most scrap-efficient creative sewing ideas because they use the smallest fabric pieces from any project stash and produce a finished, giftable item from material that would otherwise go unused.
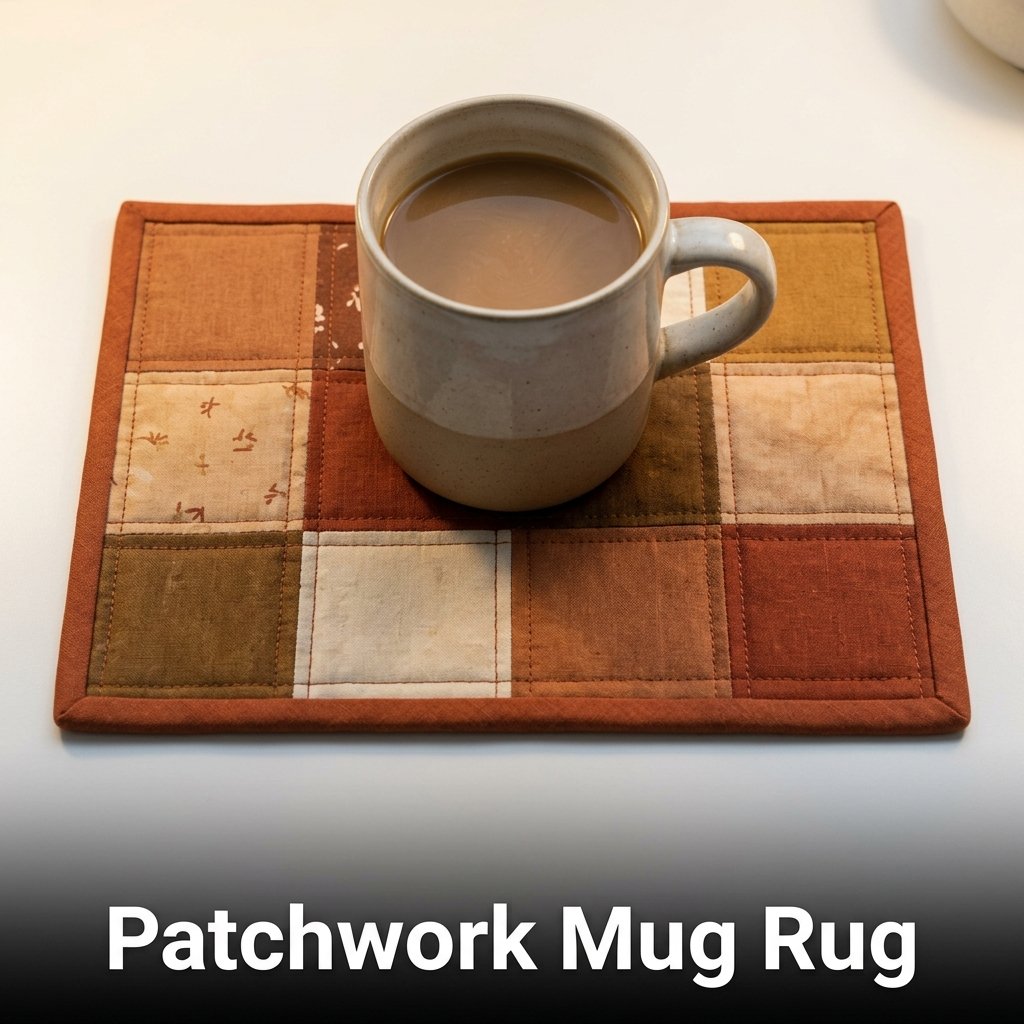
Piecing the Patchwork Top for a Mug Rug
Cut 8 squares at 6 x 6 cm from coordinating fabrics. Arrange them in a 2 x 4 grid. Sew each row of 4 squares together with a 0.75 cm seam allowance. Press all seams in the same direction. Join the 2 rows together with a 0.75 cm seam and press the join open. The finished patchwork top measures approximately 20.5 x 11 cm before trimming to the batting size. Add a plain fabric strip at 20.5 x 14 cm below the patchwork top to reach the full 20 x 25 cm mug rug dimensions.
Quilting and Finishing a Mug Rug
Layer the patchwork top over cotton batting and a backing square, all cut at 22 x 27 cm. Quilt through all 3 layers using straight lines stitched 2 cm apart across the full surface. Trim all layers to 20 x 25 cm after quilting. Bind all 4 edges with 2.5 cm bias tape folded over the raw edge and stitched through all layers. The bias tape binding produces a clean finished edge that prevents the batting from fraying out during washing and daily use on a desk surface.
18. Fabric Coasters
Fabric coasters use 2 fabric squares and a batting layer sewn together and bound at the edges to produce washable drink coasters for a table or desk. I made a set of 6 at 10 x 10 cm finished size using quilting cotton and cotton batting scraps. They wash at 40 degrees and stack flat for storage in a drawer. The full set took 45 minutes to sew and cost 1.50 dollars in new materials.
Fabric coasters are one of the most popular small creative sewing ideas for craft market sellers because they produce in multiples quickly, require minimal materials, and sell consistently at 8 to 15 dollars per set of 4.
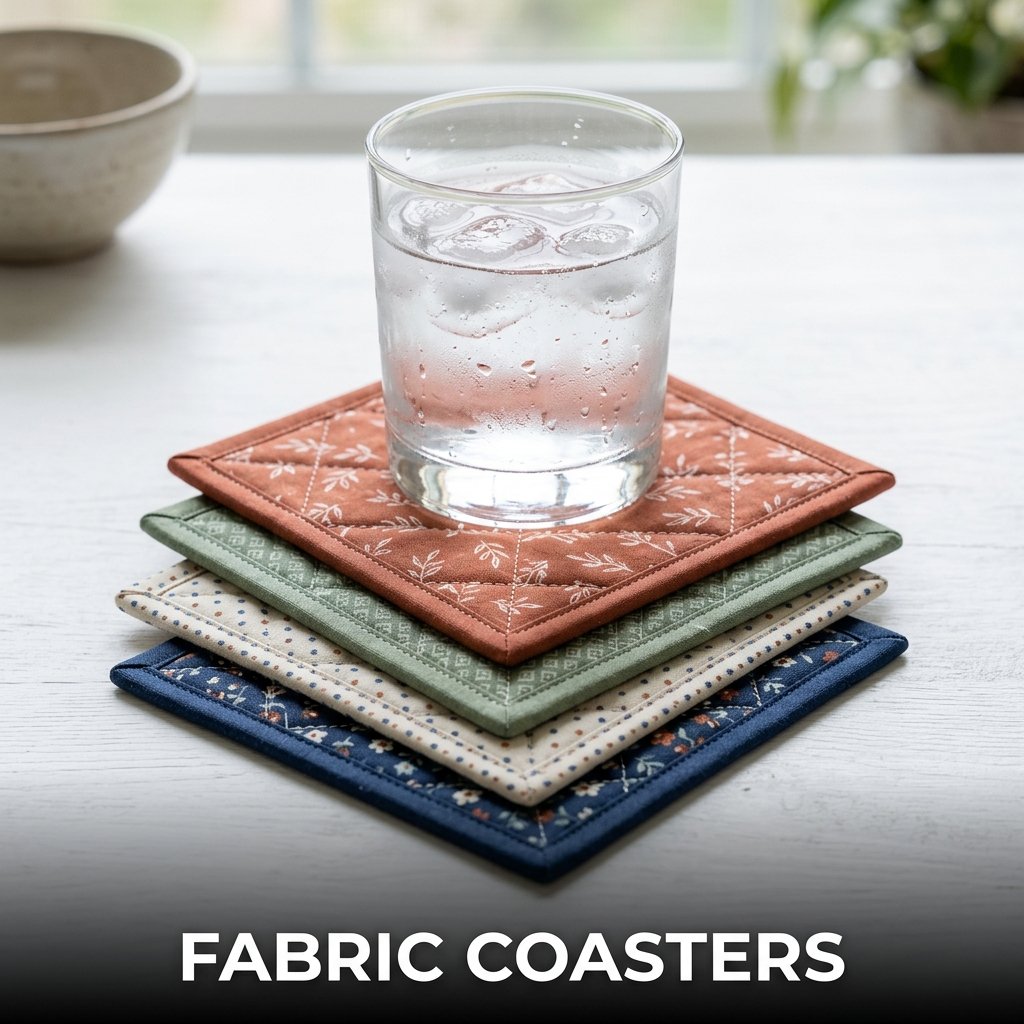
Cutting and Layering Fabric Coasters
Cut 2 squares at 12 x 12 cm from contrasting fabrics and 1 square at 12 x 12 cm from cotton batting. Layer the batting between both fabric squares with the right sides of the fabric facing outward. Pin through all 3 layers. Sew a straight stitch 2.5 cm from each edge around the full perimeter to quilt all layers together. Bind the raw edges with pre-made bias tape folded over all 4 sides and stitched close to the inner fold of the tape.
Quilting Design Options for Fabric Coasters
A diagonal grid stitched at 2 cm intervals across the full coaster surface produces a classic quilted look. Concentric squares stitched 1 cm apart from the outer edge inward produce a modern geometric result. A single cross stitch from corner to corner produces the fastest quilting option at 2 stitch lines per coaster. All 3 options use only straight stitching and suit beginner sewers working with a standard straight-stitch sewing machine without any specialist presser feet.
19. Beeswax Wrap Pouch
A beeswax wrap pouch sews a small fabric pouch and treats it with a beeswax and pine resin coating to produce a reusable food wrap alternative for storing sandwiches and small snacks. I made 4 pouches at 20 x 15 cm from cotton muslin and treated them with a beeswax and pine resin mix. The finished pouches seal by pressing warm hands against the folded top edge, which softens the wax and creates a temporary bond.
Beeswax wrap pouches are one of the most practical creative sewing ideas for everyday food storage because they replace single-use plastic bags for packed lunches and refrigerator food storage.
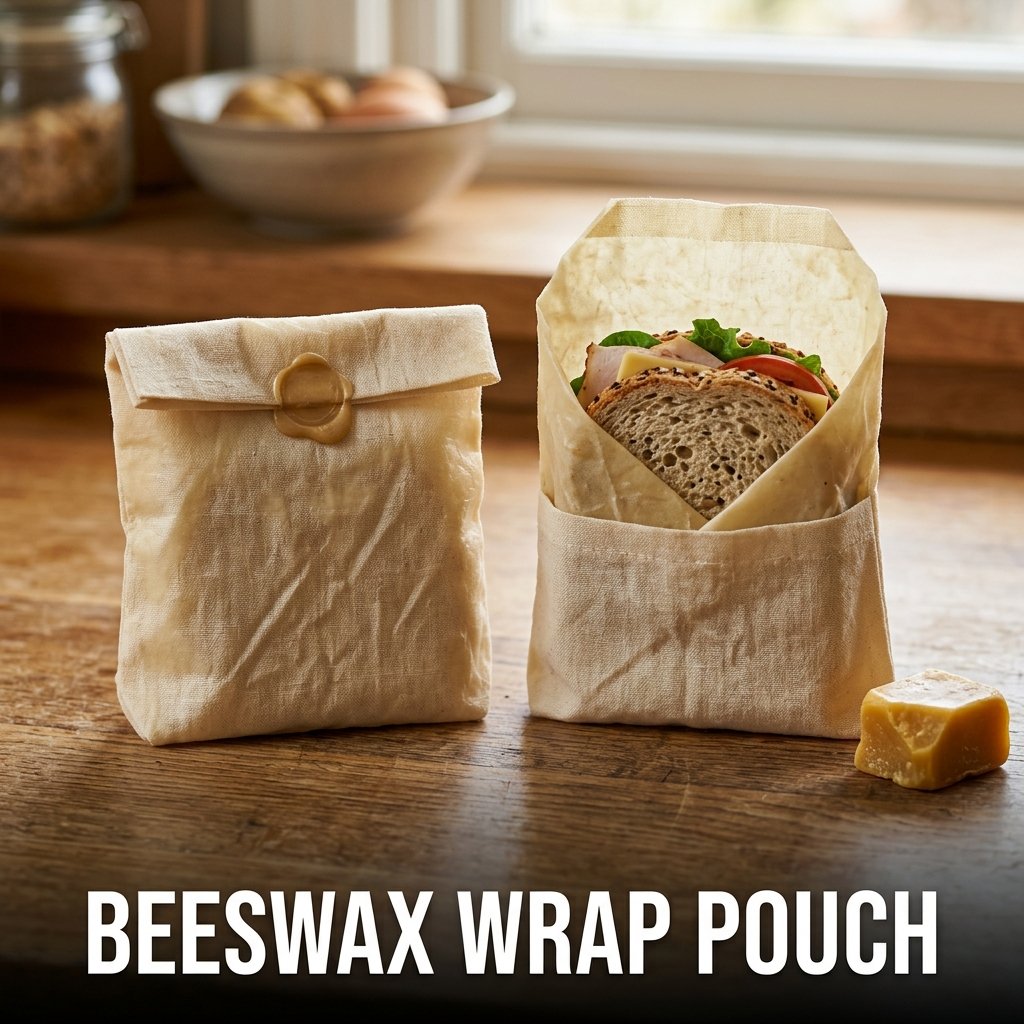
Sewing the Pouch Base
Cut 2 cotton muslin rectangles at 22 x 17 cm. Sew 3 sides with a 1 cm seam allowance, leaving one short end open. Trim corners, turn right side out, and press flat. The open end remains unhemmed because the beeswax coating seals and stiffens the raw edge during the wax treatment step. Use 100% cotton fabric only for a beeswax pouch because synthetic fibers do not absorb the wax coating and produce an uneven, peeling surface after the first use.
Applying the Beeswax Coating
Melt beeswax pellets with pine resin at a 4:1 ratio in a double boiler. Lay the sewn cotton pouch flat on a baking tray lined with parchment paper. Brush the melted wax mixture over both surfaces of the fabric using a pastry brush. Place the tray in an oven at 60 degrees Celsius for 3 minutes to allow the wax to penetrate the fabric weave. Remove and allow to cool flat. The cooled fabric stiffens and becomes the finished wax-coated pouch.
20. Fabric Pencil Roll
A fabric pencil roll holds 12 to 20 pencils or pens in individual fabric loops and rolls into a compact bundle secured with a tie. I made one at 40 x 25 cm unrolled from canvas and cotton lining fabric for a friend who draws. It holds 16 pencils and rolls into a 8 cm diameter bundle. The total material cost was 3 dollars and the sewing time was 50 minutes.
Fabric pencil rolls are one of the most giftable creative sewing ideas for artists and students because they organize drawing supplies in a portable format that suits field sketching, travel, and classroom use.
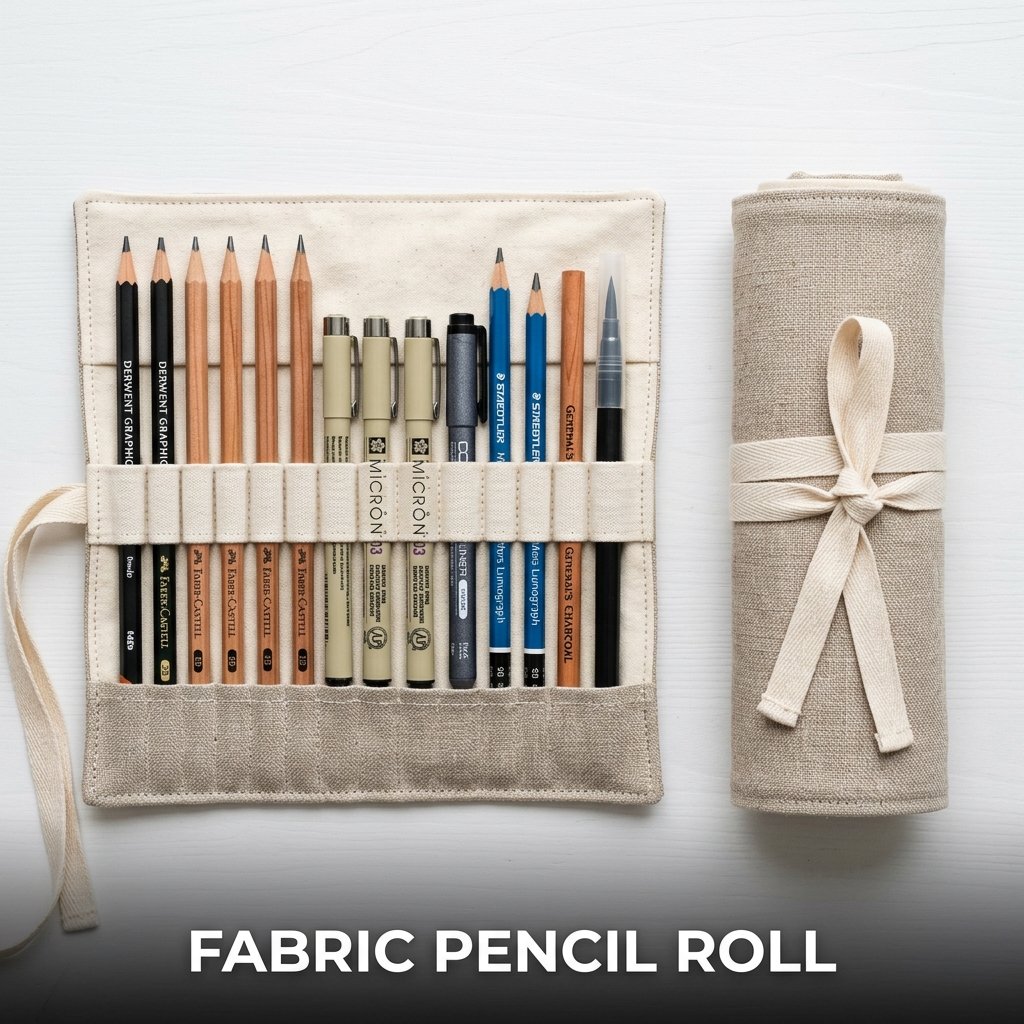
Cutting the Pencil Roll Panels
Cut 1 outer fabric panel at 42 x 27 cm and 1 lining panel at 42 x 27 cm. Place both panels together with right sides facing, sew a 1 cm seam around 3 sides, leaving one short end open. Turn right side out and press flat. Topstitch around the full perimeter at 5 mm from the edge, closing the open end in the same continuous topstitch. This produces a clean double-layer panel ready for the pencil loop section.
Sewing the Pencil Loops
Cut a strip of fabric at 42 x 12 cm for the loop section. Fold it in half lengthwise, wrong sides together, and press. Place the folded strip along the lower edge of the lining side of the finished panel, raw edges aligned. Sew a straight stitch 1 cm from the raw edge through all layers to attach the loop strip base. Mark vertical lines at 2.5 cm intervals across the loop strip. Sew a straight stitch at each marked line to create individual pencil pockets across the full width of the roll.
21. Embroidered Hoop Art
Embroidered hoop art stitches a simple design onto plain cotton fabric stretched in a wooden embroidery hoop and displayed in the hoop as a finished wall decoration. I stitched a small floral cluster on cream linen fabric in a 15 cm hoop in 2 hours using 3 basic stitches: stem stitch, satin stitch, and French knots. The finished piece hangs on my wall and cost 4 dollars total in materials.
Embroidered hoop art is one of the most visually appealing creative sewing ideas for home decor because the wooden hoop frames the finished embroidery as a display piece without requiring a separate frame purchase.
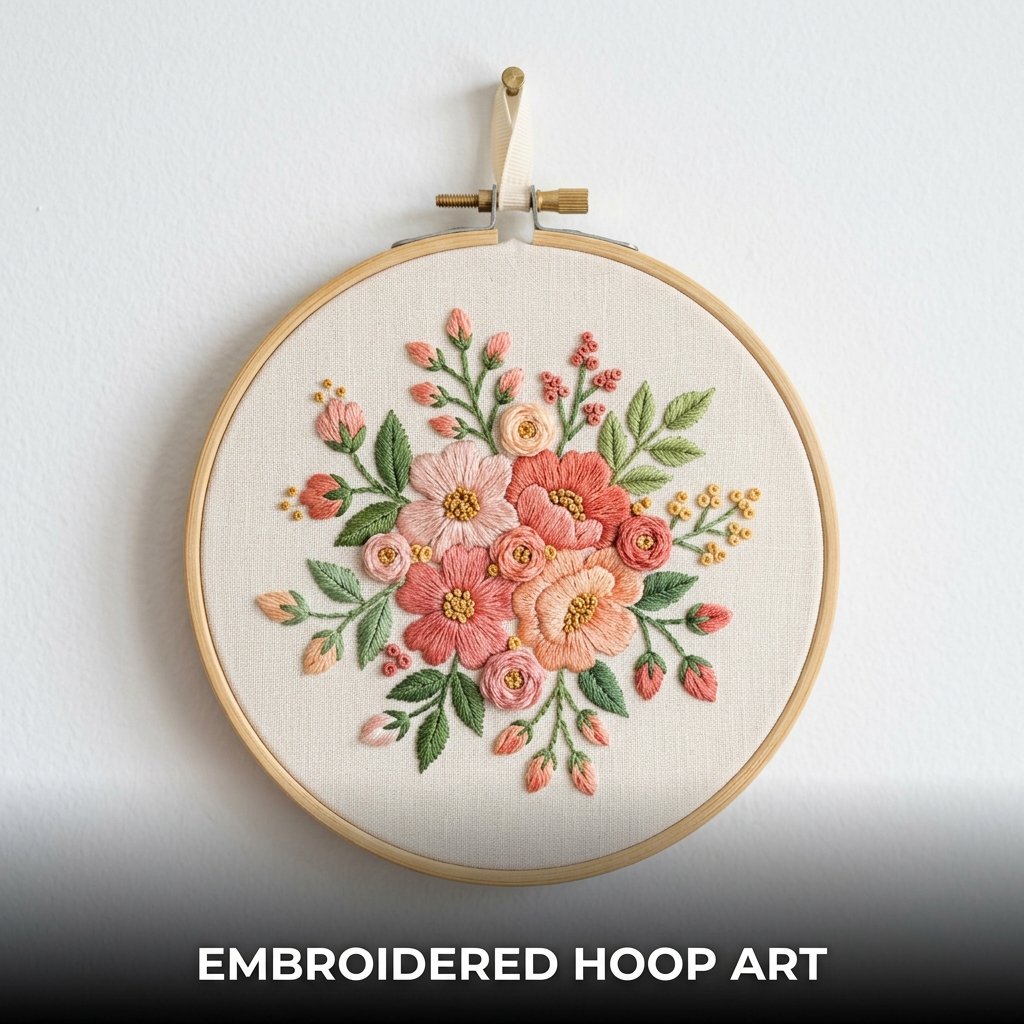
Basic Stitches for Beginner Hoop Embroidery
Three stitches cover every basic embroidery hoop design: stem stitch for outlines and curves, satin stitch for filling solid shapes with smooth color coverage, and French knots for adding texture at flower centers and as scattered dot patterns. All 3 stitches appear in free video tutorials on YouTube under their exact names. A beginner learns all 3 stitches in under 30 minutes of practice on scrap fabric before beginning the final design on the display fabric.
Finishing and Displaying an Embroidery Hoop
Trim the excess fabric around the hoop leaving 2 cm of fabric beyond the hoop edge. Apply a thin line of fabric glue around the inner hoop edge on the back. Press the excess fabric against the glued hoop edge and allow it to dry for 30 minutes. This adhesive finish produces a clean back edge visible when the hoop hangs on the wall. Attach a loop of ribbon or twine to the top of the outer hoop for hanging without any additional hardware.
22. Reversible Bucket Hat
A reversible bucket hat uses 6 panels and a brim piece in 2 coordinating fabrics to produce a wearable, reversible sun hat that offers 2 different looks in a single sewn item. I made one for a child in my family using a floral cotton on one side and a solid navy on the other. The total sewing time was 2 hours. The hat has been worn on both sides regularly since I made it 8 months ago.
A reversible bucket hat is one of the most advanced creative sewing ideas on this list but remains achievable for a beginner who has completed 3 to 5 previous sewing projects because all seams are straight and the construction follows a clear sequential assembly order.
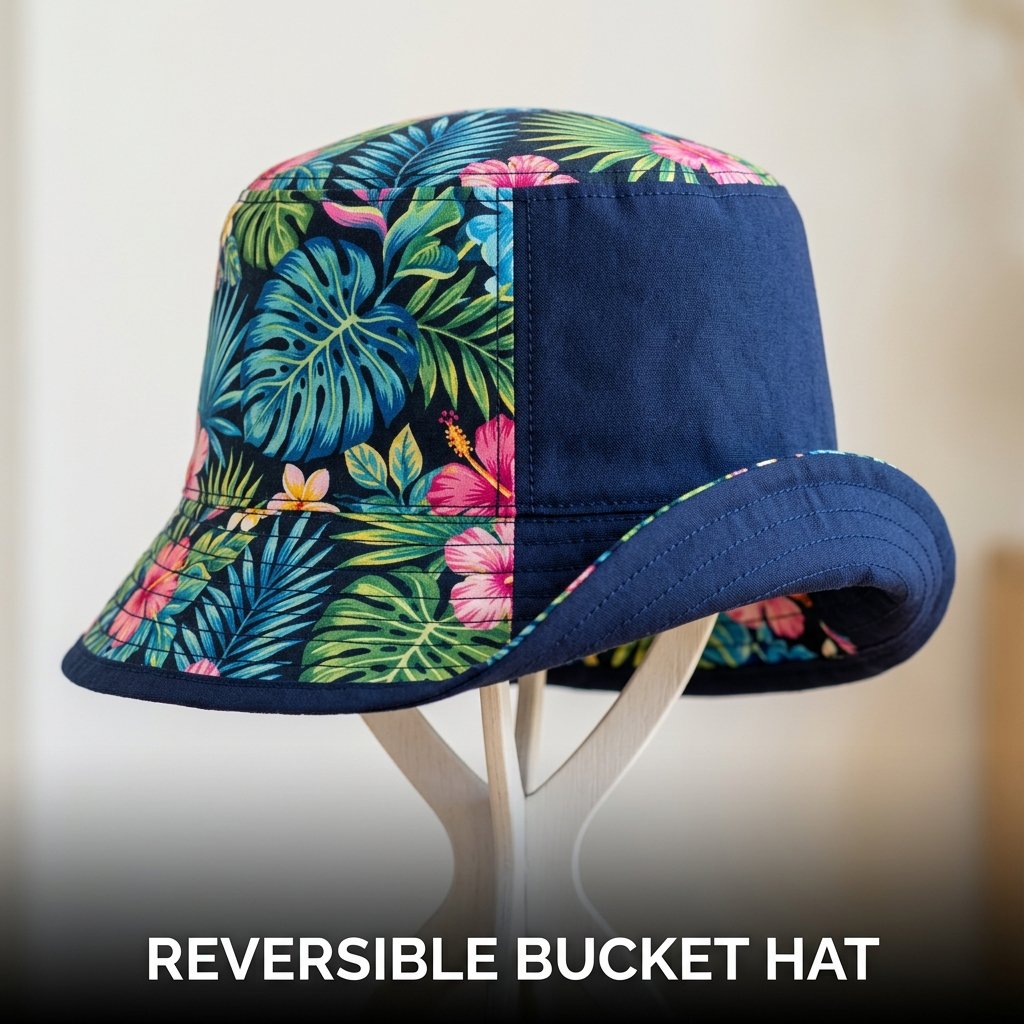
Cutting Panels for a Reversible Bucket Hat
Cut 6 crown panels per fabric, 12 panels total, using a paper template shaped as a rounded wedge 18 cm tall and 13 cm wide at the base. Cut 2 brim rings per fabric from a paper template: an outer ring 36 cm in diameter and an inner ring 22 cm in diameter, producing a brim 7 cm wide. Pre-shrink all fabric by washing and drying before cutting to prevent the finished hat from shrinking out of shape on first wear.
Assembling the Crown and Brim
Sew all 6 outer crown panels together along their long edges with 1 cm seam allowances to produce a domed outer crown. Repeat for the inner crown. Sew the 2 outer brim rings together along the outer curved edge, turn right side out, and press. Attach the brim to the outer crown at the base edge. Place the inner crown inside the outer crown with right sides together and sew around the base opening. Pull right side out through the brim gap and press the base seam flat.
23. Fabric Book Sleeve
A fabric book sleeve produces a padded protective cover for a paperback or hardback book during bag carrying, preventing spine damage and cover scuffing. I made one at 22 x 30 cm finished size from a quilted outer fabric and a smooth cotton lining. It fits a standard paperback with 1 cm of clearance on all sides for easy insertion. Total sewing time was 40 minutes and the material cost was 3 dollars.
Fabric book sleeves are one of the most popular small creative sewing ideas on Pinterest and Etsy for readers who carry books daily in bags alongside other items that scratch book covers.
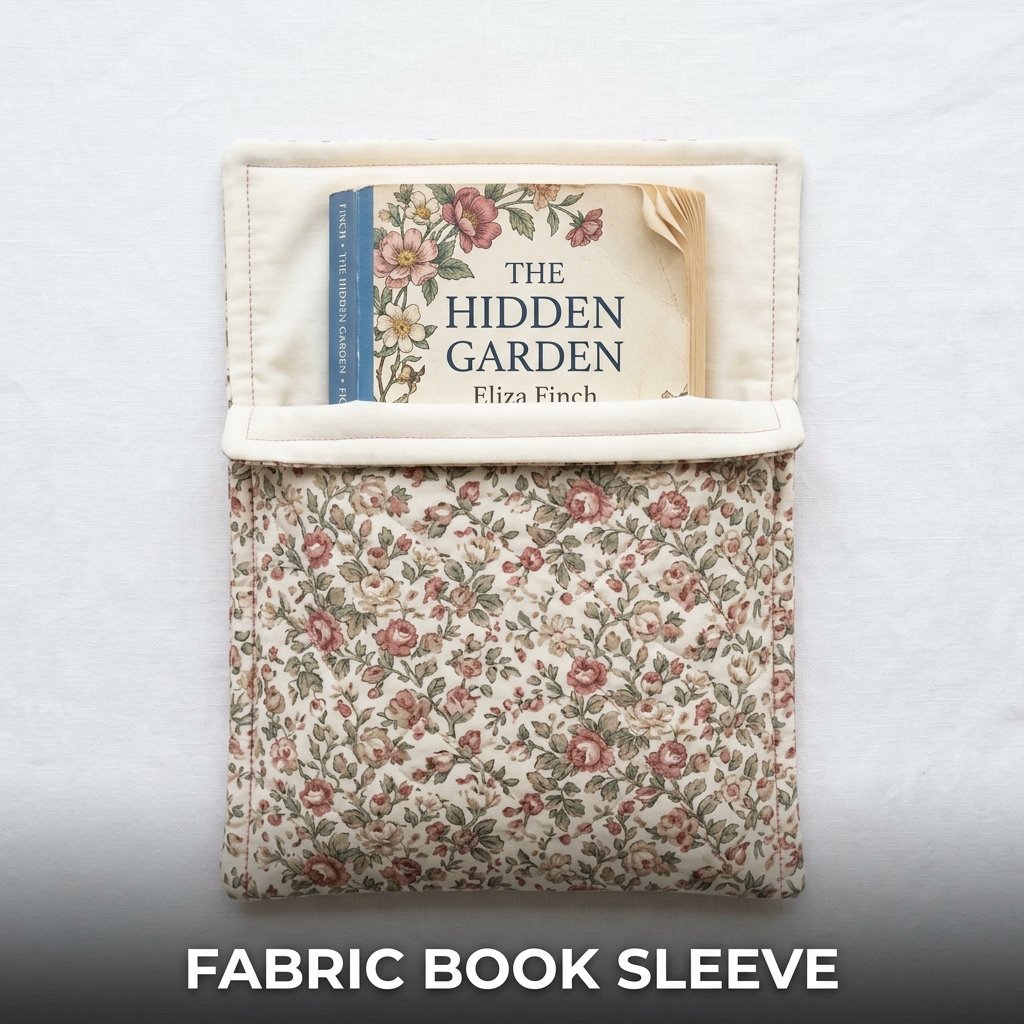
Cutting and Padding a Book Sleeve
Cut 1 outer fabric panel at 46 x 24 cm and 1 lining panel at 46 x 24 cm. Cut 1 cotton batting panel at 46 x 24 cm. Baste the batting to the wrong side of the outer fabric before treating both as a single layer. Place the outer and lining panels together with right sides facing. Sew a 1 cm seam along both short ends. Turn right side out and press. The short seamed ends form the two open pockets that the front and back book covers slide into.
Closing the Book Sleeve Side Seams
Fold the sewn rectangle so both short seamed ends align at the center, creating a flat double-pocket structure 22 cm wide and 24 cm tall. Pin along both long raw edges. Sew a 1 cm seam along both long sides through all layers. Trim the corners and press the seams. The finished sleeve has 2 open pockets, one at each end, that the front and back covers of the book slide into simultaneously, holding the book securely inside the fabric sleeve during transport.
FAQ
What are the easiest creative sewing ideas for complete beginners?
The easiest creative sewing ideas for complete beginners are fabric scrunchies, bias tape bookmarks, and fabric coasters. All 3 projects use under 30 cm of fabric, require only straight stitching, and finish in under 30 minutes on a sewing machine. Scrunchies use 1 fabric strip and 20 cm of elastic. Bookmarks use pre-folded bias tape stitched closed along the length. Coasters use 2 fabric squares and a batting layer sewn together and bound. A beginner who has threaded a sewing machine and sewn a straight line completes all 3 projects successfully on the first attempt without any prior sewing experience.
What creative sewing ideas can I sell on Etsy?
Six creative sewing ideas sell consistently on Etsy: fabric scrunchies at 4 to 8 dollars each, zipper pouches at 8 to 18 dollars, lined tote bags at 15 to 28 dollars, fabric gift bags at 8 to 15 dollars each, fabric coaster sets at 8 to 15 dollars per set of 4, and fabric-covered notebooks at 12 to 22 dollars. All 6 products use under half a meter of fabric per unit, complete in under 2 hours per item, and list at prices that return a positive margin over material and labor cost at a standard handmade pricing formula of materials multiplied by 3 plus hourly labor rate.
What fabric works best for beginner creative sewing ideas?
Cotton quilting fabric at 140 gsm works best for beginner creative sewing projects because it cuts cleanly, holds a pressed crease, feeds evenly through a sewing machine without specialist presser feet, and is available at most fabric stores in hundreds of prints and solid colors. Cotton canvas at 280 gsm suits projects requiring more structure, including tote bags, fabric baskets, and laptop sleeves. Linen suits table runners and cushion covers. Beginners avoid slippery fabrics including silk and satin and stretchy fabrics including jersey and spandex until they have completed 5 to 10 straight-seam projects on stable woven fabric.
How long do creative sewing ideas take to complete?
Most beginner creative sewing ideas take between 20 minutes and 2 hours to complete on a sewing machine. Scrunchies, bookmarks, and coasters take 15 to 30 minutes. Zipper pouches, cushion covers, and tote bags take 45 to 90 minutes. Padded laptop sleeves, elastic waist skirts, and fabric basket sets take 60 to 120 minutes. Embroidered hoop art and reversible bucket hats take 2 to 3 hours. Completion time decreases by 30 to 50 percent after the second or third repetition of the same project because the construction sequence becomes familiar and requires less time referencing instructions between steps.
What tools do I need to start creative sewing ideas at home?
Seven tools cover every project on this list: a sewing machine with a standard straight stitch, fabric scissors, a measuring tape, pins, a seam ripper, an iron with a pressing surface, and hand sewing needles and thread. A rotary cutter and self-healing cutting mat improve cutting accuracy for patchwork and quilted projects but are not required for straight-panel projects. A zipper foot presser attachment is needed for zipper pouch and laptop sleeve projects and comes standard with most entry-level home sewing machines. Total tool cost for a beginner starting from scratch runs between 80 and 150 dollars for a reliable entry-level machine plus basic supplies.