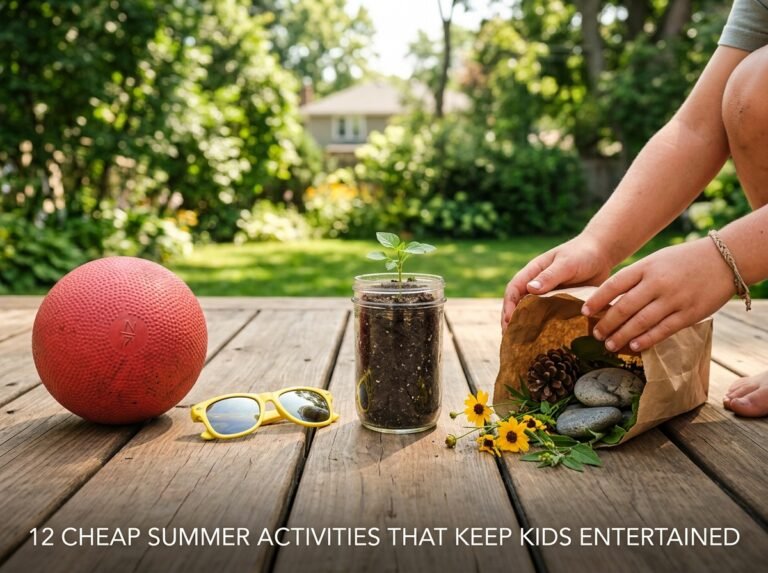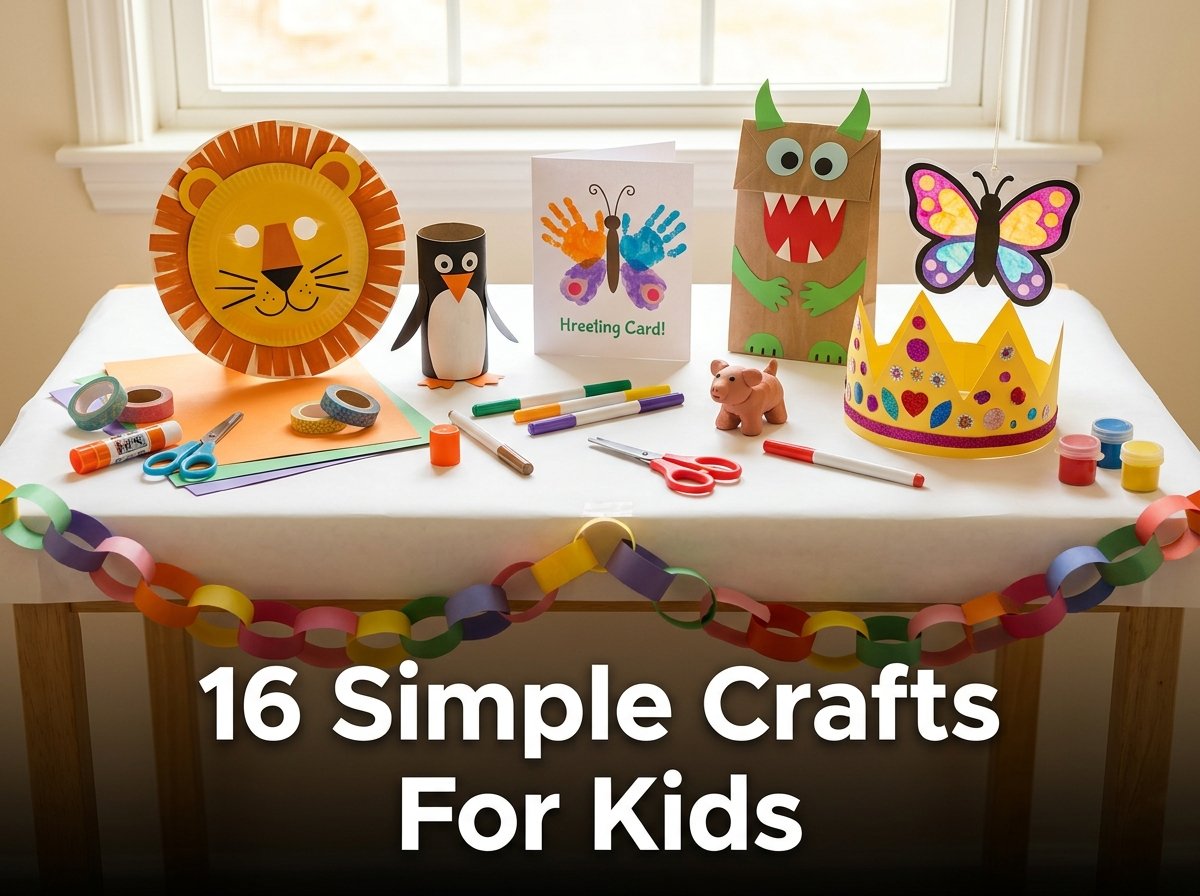
16 Simple Crafts For Kids
I put a sheet of colored paper, a glue stick, and a pair of safety scissors in front of my 5-year-old niece one rainy afternoon and stepped back. She spent 40 minutes cutting, folding, and sticking without asking for help once. The result was an unidentifiable creature she named “Barry.” Barry lived on the refrigerator for three months.
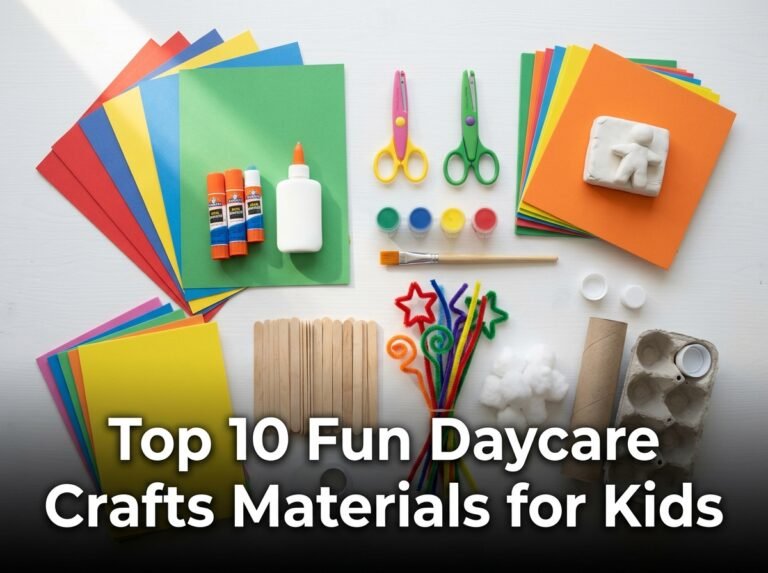
If you want simple crafts for kids, all 16 projects here use materials already found in most homes: colored paper, cardboard, glue, markers, and paint. Every project suits children aged 3 and above, and most finish in under 30 minutes.
These crafts cover paper animals, cardboard constructions, recycled bottle art, handmade cards, clay figures, and wall decorations. I selected each one because the steps stay short, the materials cost under 3 dollars per project, and the finished result looks like something a child chose to make rather than something an adult completed for them.
Several crafts here suit preschoolers aged 3 to 5 with light adult guidance. Others suit children aged 6 to 12 working independently at home or at school. Each section states the correct age range and supervision level clearly.
Every material listed here is non-toxic and child-safe.
1. Paper Plate Animal Faces
A paper plate animal face uses a standard white paper plate as the animal’s head, with paper cutouts, markers, and craft foam details added to produce a recognizable animal character. I made these with a group of 6 children aged 4 to 7 at a birthday party craft station. Every child finished their animal in under 20 minutes and wore the finished plate as a mask by adding two eye holes and an elastic band across the back.
Paper plate animal faces suit children aged 3 and above. Children aged 3 to 4 need adult help cutting paper parts. Children aged 5 and above complete the full project independently.
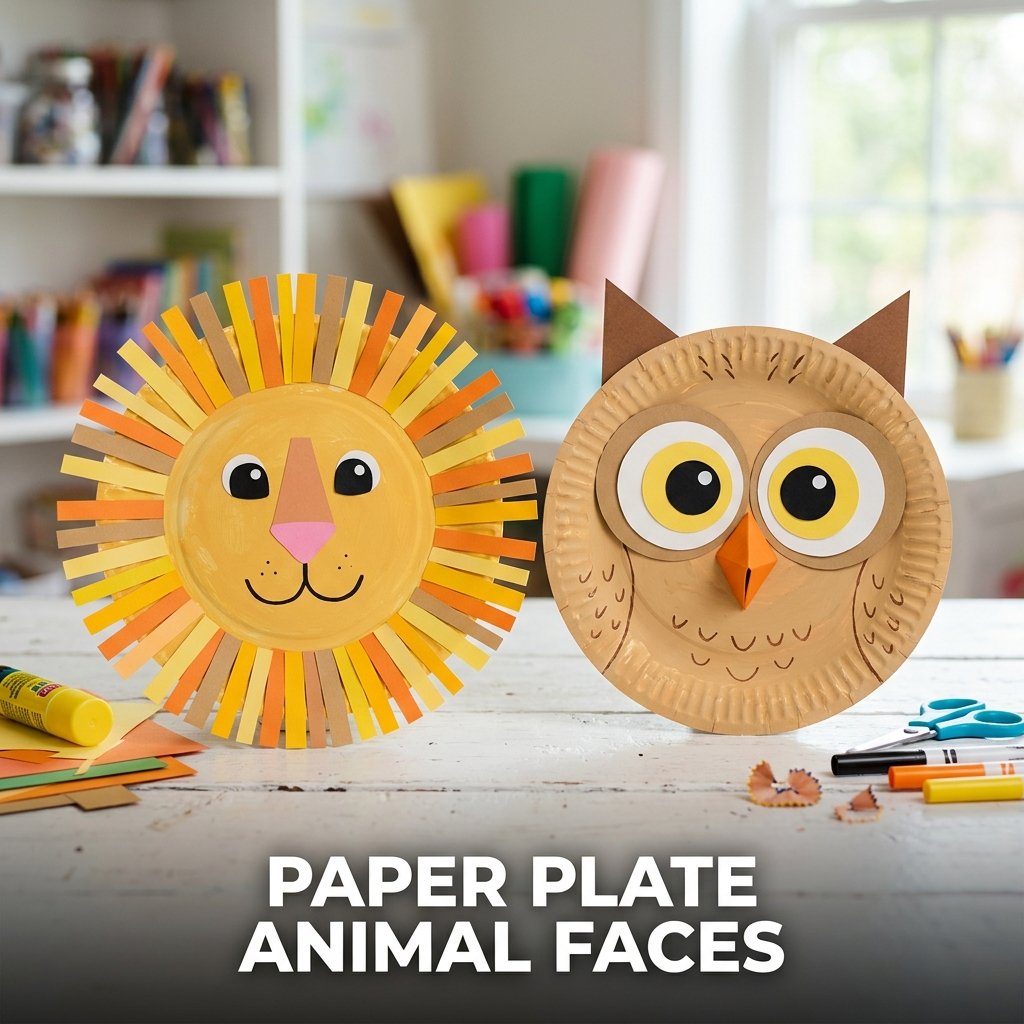
Making a Paper Plate Lion Face
Draw a pencil circle on yellow cardstock at 22 cm diameter. Cut the circle into strips at 2 cm wide each. Glue the strips around the outer edge of the paper plate, overlapping them slightly, to create the lion’s mane. Draw 2 black oval eyes and a black triangle nose on the plate center using a black marker. Draw a curved smile below the nose. Color the ear circles at 4 cm diameter in yellow and glue them to the back top edge of the plate so they extend above the mane.
Making a Paper Plate Owl Face
Cut 2 large circle eyes at 6 cm diameter from white cardstock. Cut 2 smaller circles at 4 cm diameter from yellow cardstock and glue them centered over the white circles. Draw a black dot pupil in the center of each yellow circle. Cut an orange diamond shape at 3 cm for the beak and fold it in half to create a 3-dimensional beak. Glue the beak between the two eyes. Cut brown triangle ear tufts at 4 cm tall and glue them to the top back edge of the plate. Color the plate brown or grey before assembling all parts.
2. Cardboard Tube Animals
Cardboard tube animals convert toilet paper rolls into standing animal figures using paint, paper cutouts, and basic craft supplies. I made a set of 5 with children aged 4 to 8 during an indoor activity session. Each child chose a different animal and finished their figure in under 25 minutes. The finished animals stood in a row on the classroom windowsill and became a permanent classroom decoration for the remainder of the term.
Cardboard tube crafts suit children aged 4 and above. Pre-cut all paper parts for children aged 3 to 4. Children aged 5 and above cut their own parts with safety scissors.
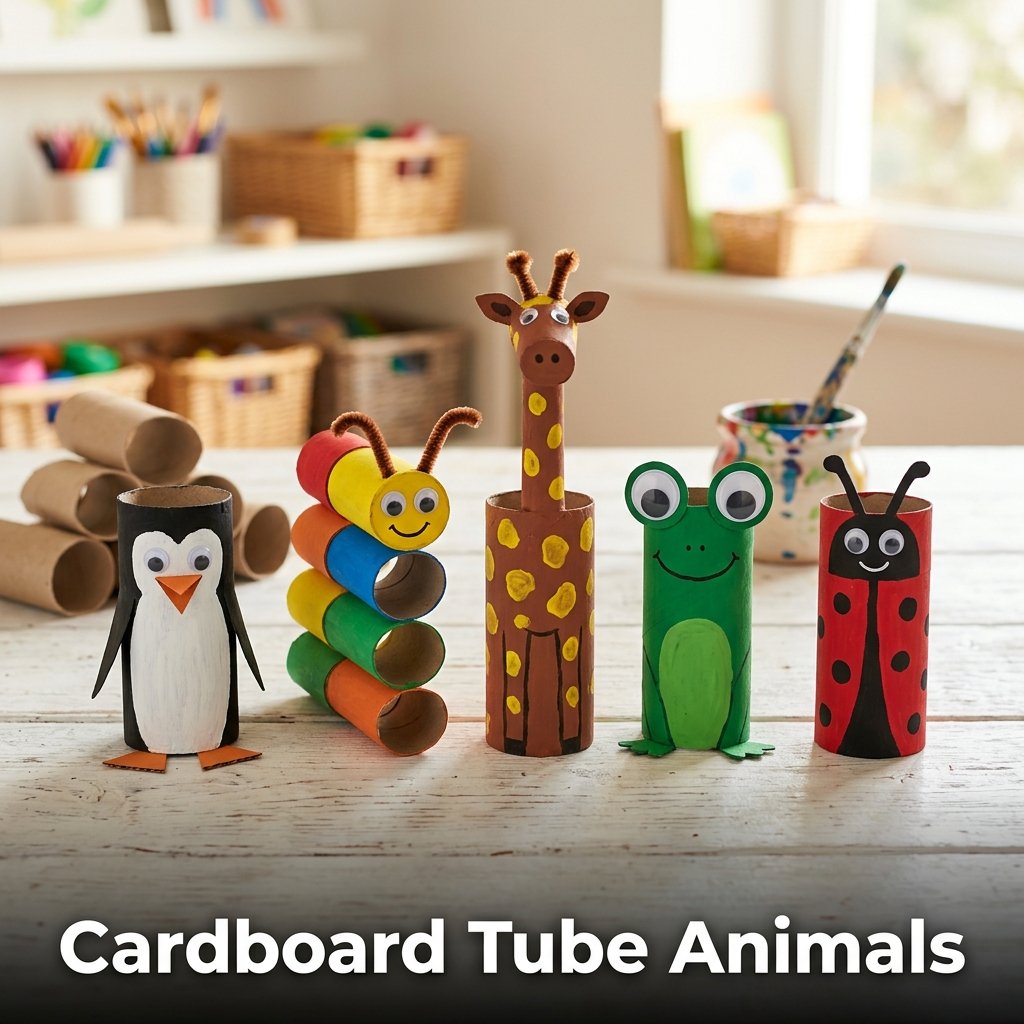
Making a Cardboard Tube Penguin
Paint the full outer surface of a toilet paper roll with black washable paint. Allow 10 minutes of drying time. Paint a white oval on the front surface covering the lower two-thirds of the tube for the belly. Cut 2 small orange triangle feet from cardstock at 2 cm base and 1.5 cm height. Fold a small tab at the base of each triangle and glue the tabs inside the bottom edge of the tube so the feet extend forward. Glue 2 small googly eyes above the belly oval and an orange triangle beak between the eyes to complete the penguin figure.
Making a Cardboard Tube Caterpillar
Stack 5 toilet paper rolls side by side in a row on a flat surface. Glue all 5 rolls together along their touching side edges. Allow 10 minutes of drying time. Paint each roll a different color using washable paint. Allow 20 minutes of drying time. Draw a face on the front roll using a black marker: 2 circle eyes, a dot nose, and a curved smile. Glue 2 pipe cleaner antennae to the inside top of the front roll, bending each one into a curve. The finished caterpillar stands upright on the 5-roll base without any additional support.
3. Handprint Greeting Cards
A handprint greeting card uses paint applied to a child’s hand and pressed onto folded cardstock to produce a personalized printed card as a gift for a family member. I made these with a group of toddlers aged 2 to 4 at a playgroup session. Each child produced a card in under 10 minutes. Parents consistently keep handprint cards as keepsakes and display them long after the occasion the card was made for has passed.
Handprint cards suit children aged 2 and above. Children aged 2 to 3 need full adult support applying the paint and pressing the hand. Children aged 4 and above complete the painting step independently.
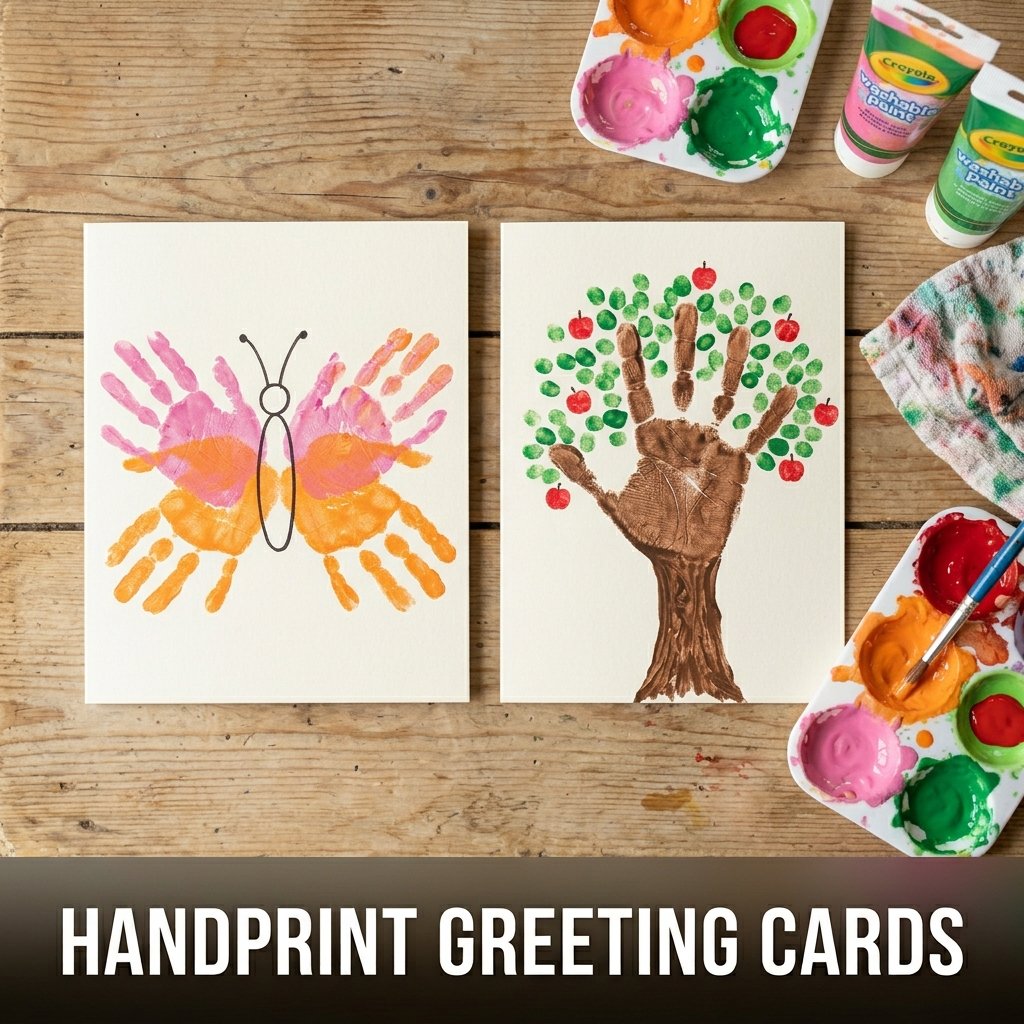
Making a Handprint Butterfly Card
Fold a piece of white cardstock at 20 x 28 cm in half to produce a card at 20 x 14 cm. Paint one hand with two colors: the palm and thumb in one color and the fingers in a second contrasting color. Press the hand sideways onto the card front with fingers spread wide. Lift straight up without smearing. Repeat with the other hand pressed from the opposite side so both handprints meet at the wrist, forming butterfly wings. Draw a small oval body between the two wrist prints using a black marker. Add antenna lines above the body to complete the butterfly figure.
Making a Handprint Tree Card
Paint the palm and lower fingers of one hand with brown paint. Press the hand onto the card front, palm-down with fingers pointing upward as tree branches. Lift straight up. Allow 5 minutes of drying time. Dip one fingertip into green paint and press fingerprint dots across all the brown finger branches to represent leaves. Add red fingerprint dots among the green dots for apples or berries. Write a short greeting inside the card. The total decoration time after the base handprint dries takes under 10 minutes for children aged 4 and above.
4. Paper Bag Puppets
A paper bag puppet uses a standard paper lunch bag as the puppet base, with paper cutouts and markers added to produce a hand puppet that children operate during imaginative play. I made a set of 6 different character puppets with children aged 5 to 9 during a school holiday activity session. After finishing the puppets, the children immediately organized a short puppet show without any prompting from me. The whole session took 45 minutes from start to show.
Paper bag puppets suit children aged 4 and above. Children aged 4 to 5 need adult help attaching paper parts. Children aged 6 and above complete the full project without assistance.
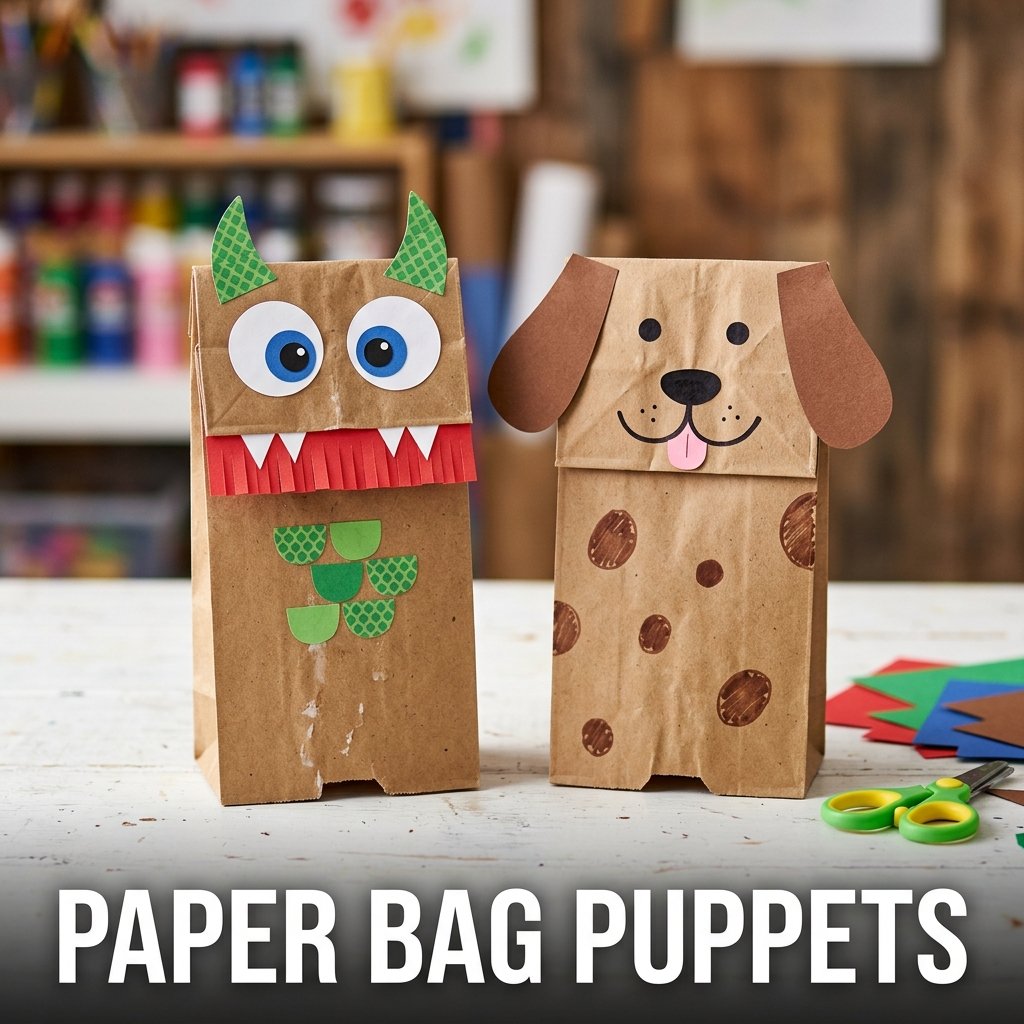
Making a Paper Bag Monster Puppet
Draw 2 large circle eyes on white cardstock and 2 smaller colored circles for the irises. Cut both sets of circles and glue the iris circles centered on the eye circles. Glue the assembled eyes to the flat base of the upturned paper bag, where the fold sits. Cut a wide rectangle of red cardstock at 8 x 4 cm for the mouth. Fringe the bottom edge of the rectangle with small cuts at 1 cm intervals to produce teeth. Glue the mouth below the eyes. Add colored paper horn shapes glued to the top sides of the bag to complete the monster character.
Making a Paper Bag Dog Puppet
Draw and cut 2 floppy ear shapes from brown cardstock at 6 x 4 cm each, rounded at the bottom. Glue one ear to each side of the paper bag body, positioned at the upper third of the bag. Draw a large black nose oval at the base of the bag fold. Add 2 dot eyes above the nose and a curved smile below it using a black marker. Cut a small pink tongue at 3 x 2 cm and glue it hanging below the smile. Add brown marker spots to the bag body for a spotted dog pattern. Insert the hand inside the bag to operate the finished puppet.
5. Salt Dough Shapes
Salt dough shapes use a simple 3-ingredient dough baked until hard and painted to produce lightweight, durable craft pieces for decoration, gift tags, and keepsake ornaments. I made these with a school group aged 5 to 10. The mixing and shaping session took 30 minutes, the baking took 2 hours in a low oven, and the painting session took 30 minutes the following day. Every child produced 3 to 5 painted shapes that they took home as gifts for parents.
Salt dough crafts suit children aged 4 and above for the shaping step. Adult supervision is required during all oven baking steps regardless of child age.
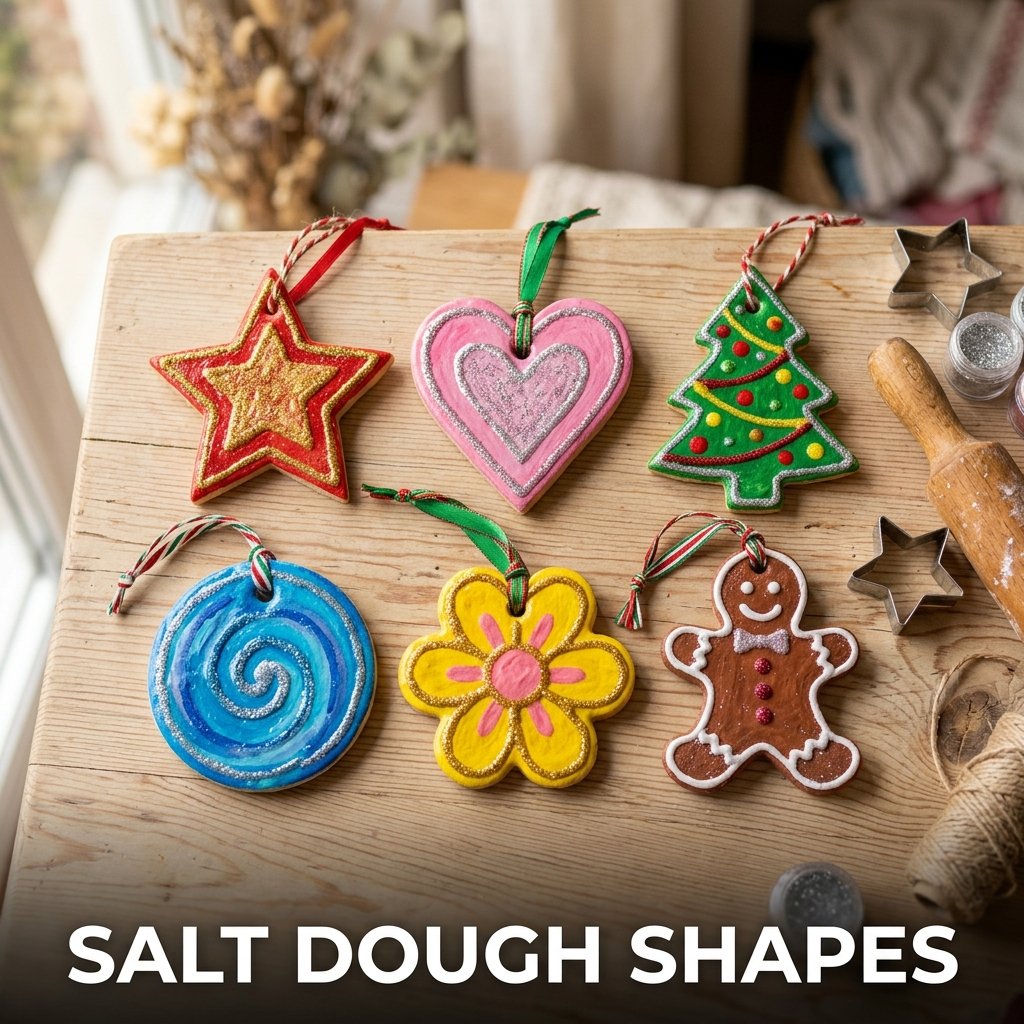
Making the Salt Dough
Mix 2 cups of plain flour with 1 cup of table salt in a large bowl. Add 1 cup of cold water gradually, stirring after each addition, until a firm non-sticky dough forms. Knead the dough on a floured surface for 3 minutes until smooth. Roll to 6 mm thickness using a rolling pin. Cut shapes using cookie cutters or freehand with a blunt knife. Pierce a 5 mm hole at the top of each shape with a toothpick for hanging. Bake at 120 degrees Celsius for 2 hours until fully hard throughout.
Painting Finished Salt Dough Shapes
Apply white acrylic paint as a base coat to all cooled shapes and allow 20 minutes of drying time before adding color. The white base coat produces brighter color results than applying color directly to the plain baked dough surface. Apply 2 coats of acrylic craft paint in the desired design. Add glitter glue to raised areas or borders after the color coats dry. Apply 2 coats of clear PVA glue over the fully decorated surface to seal the paint and protect the shape from moisture damage during handling and display.
6. Recycled Bottle Vase
A recycled bottle vase covers a clean plastic or glass bottle with colored tissue paper and PVA glue to produce a lightweight decorative vase for dried flowers or artificial stems. I made these with children aged 5 to 9 using empty water bottles and tissue paper torn from gift bags. Each child finished their vase in under 30 minutes and filled it with paper flowers they made in the same session. The total material cost per vase was zero because all materials came from recycled household items.
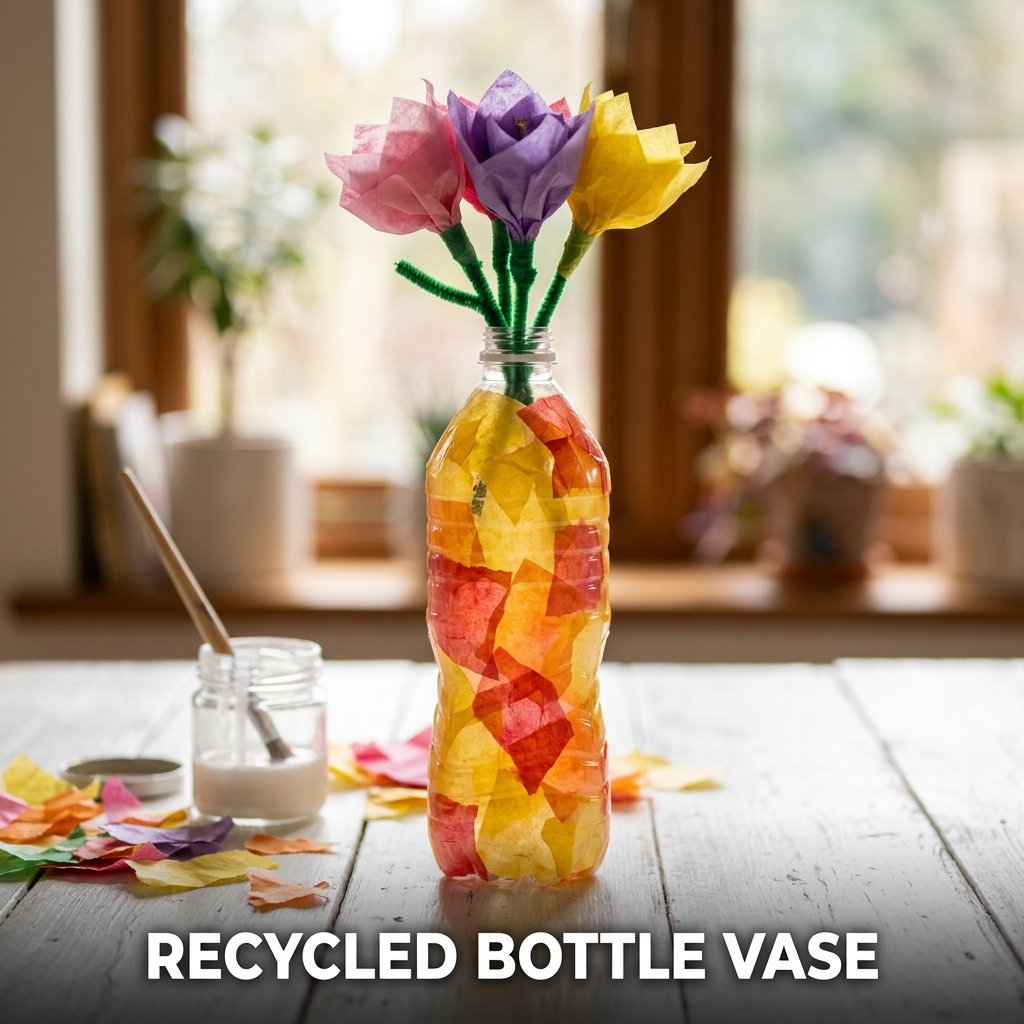
Applying Tissue Paper to a Bottle
Tear tissue paper into irregular pieces at approximately 5 x 5 cm each. Mix PVA glue with water at a 2:1 ratio in a small container. Brush the diluted glue mixture onto a small section of the bottle exterior. Press a tissue paper piece onto the wet glue and smooth it flat with the brush. Overlap pieces by 5 mm to prevent gaps. Cover the entire bottle exterior with 2 layers of tissue paper. Allow 2 hours of drying time before applying 3 final coats of undiluted PVA glue to seal and harden the surface.
Making Paper Flowers to Display in the Vase
Cut 5 circles from colored tissue paper at 6 cm diameter each. Stack all 5 circles together and fold the stack accordion-style in 1 cm folds from one edge to the other. Twist a green pipe cleaner tightly around the center of the folded stack to secure it. Fan the folded layers outward on both sides to form a round flower shape. Gently separate each tissue paper layer from the others by pulling them upward toward the center one at a time. Insert the pipe cleaner stem into the finished bottle vase. A single bottle holds 3 to 5 paper flowers in a full bouquet arrangement.
7. Cardboard Box House
A cardboard box house converts a medium-sized cardboard box into a small play building by cutting windows and a door, then painting and decorating the exterior surface. I built one with a group of children aged 6 to 10 during a school holiday session. They debated the window placement for 10 minutes, which was honestly the most democratic decision-making I have witnessed in any group. The finished house took 90 minutes total and became the centerpiece of a full cardboard village built over the following 2 sessions.
Cardboard box houses suit children aged 5 and above. Adult assistance is needed for cutting the windows and door with a box cutter or craft knife.
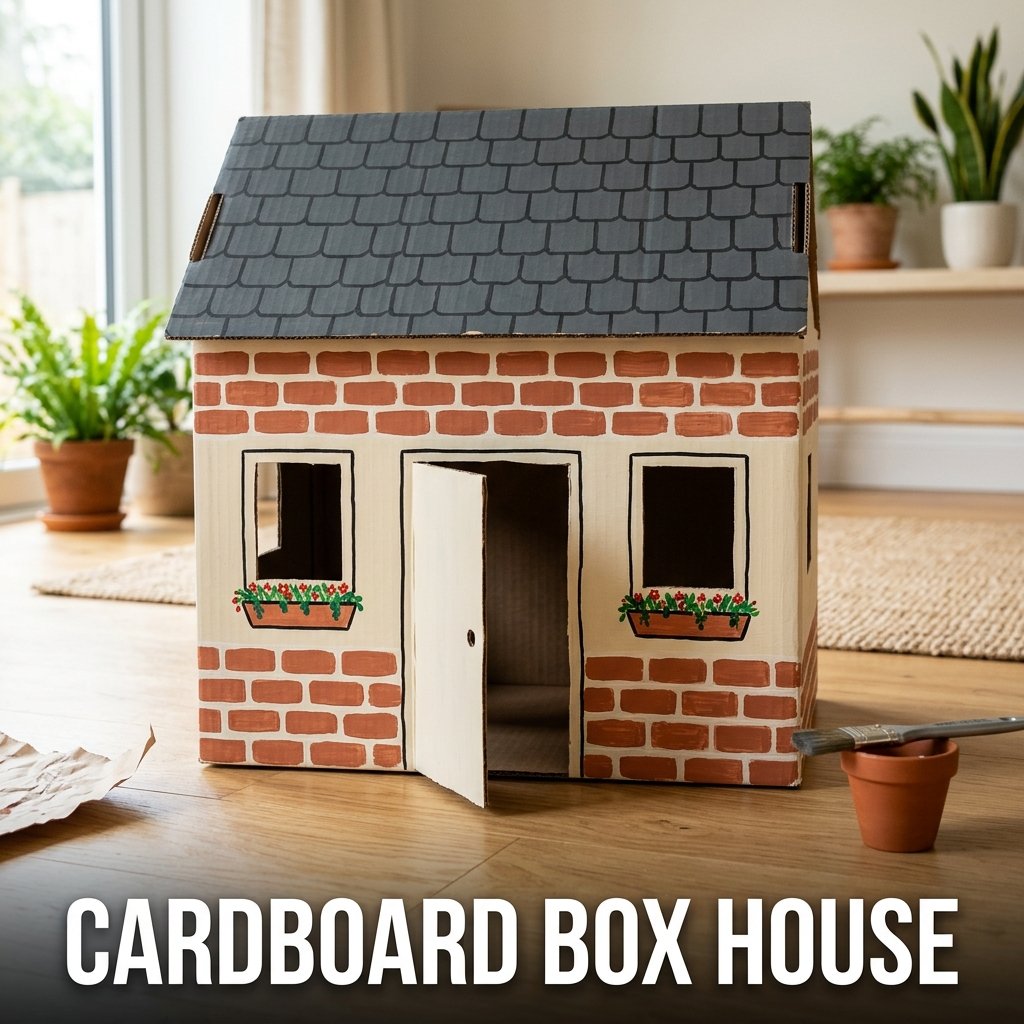
Cutting Windows and a Door in a Cardboard Box
Mark window positions on 3 sides of the box using a pencil and ruler: 2 windows per side at 8 x 6 cm each, positioned at equal heights. Mark a door shape on the front face at 10 x 14 cm centered on the lower half of the panel. An adult cuts all marked shapes using a box cutter. Leave the top edge of the door uncut to create a flap that opens and closes. Score the door top edge lightly for a clean hinge fold. Children paint and decorate all surfaces after cutting is complete.
Decorating the Outside of a Cardboard House
Paint the full exterior of the box with white or cream washable paint as a base coat. Allow 20 minutes of drying time. Paint brick patterns on the walls using a flat brush and terracotta paint applied in rows of small rectangles separated by thin white mortar lines. Cut a roof shape from a second piece of cardboard and paint it dark grey or brown to represent roof tiles. Glue the roof piece to the top of the box. Add window frame details using a black marker and draw flower boxes below each window cutout using green and red markers.
8. Butterfly Suncatcher
A butterfly suncatcher uses contact paper and colored tissue paper to produce a translucent butterfly decoration that displays colored light when hung in a window. I made these with a group of children aged 4 to 8 during an indoor craft session. Every child finished in under 20 minutes. The finished butterflies hung in the classroom windows and produced colored light patches on the walls during sunny afternoons for the full term they remained displayed.
Suncatchers suit children aged 4 and above. Children aged 4 to 5 need adult help cutting the butterfly outline frame.
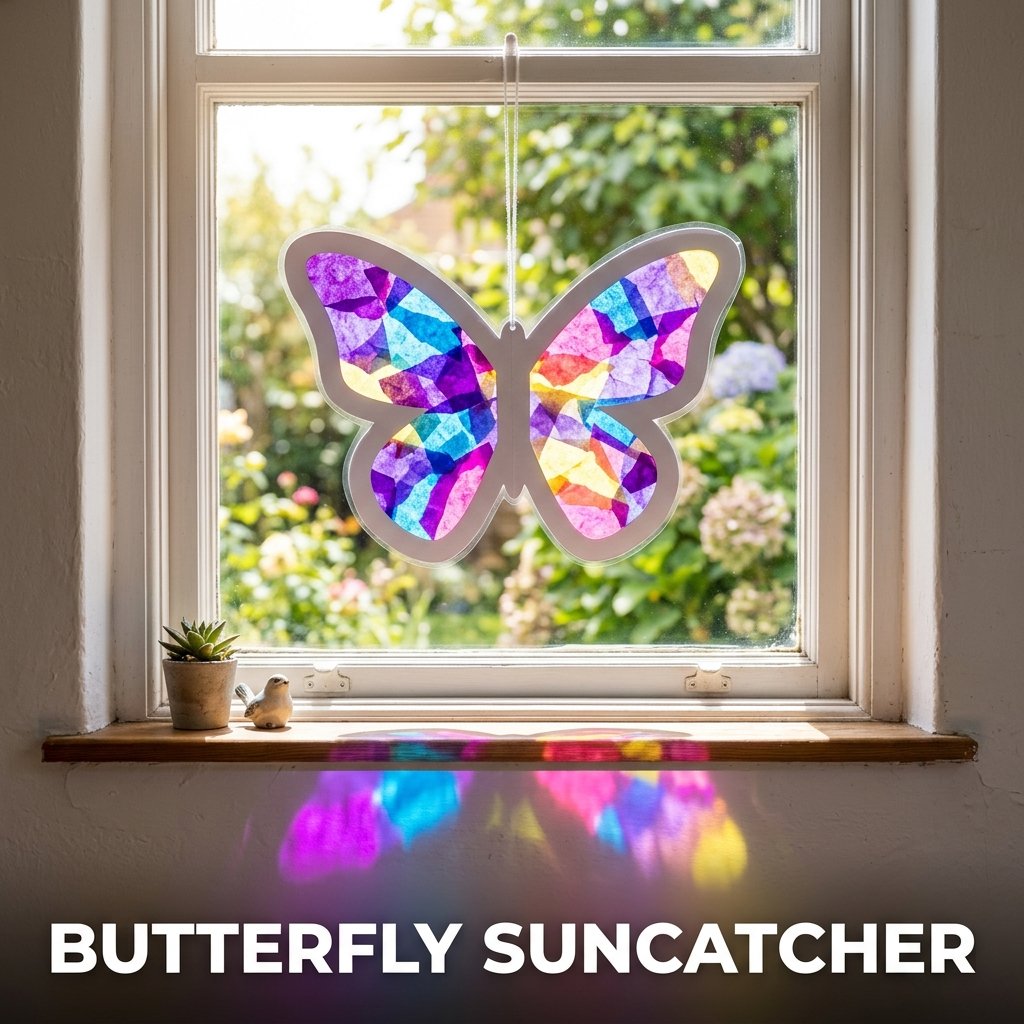
Preparing the Contact Paper Butterfly
Draw a butterfly outline at 20 cm wingspan on white cardstock and cut it out to produce a butterfly frame with a 3 cm wide border around all wing edges. Cut a piece of clear contact paper at 25 x 25 cm. Peel the backing and lay the contact paper sticky-side up on a flat surface. Position the cardstock butterfly frame on top of the sticky contact paper and press it flat. The open wing areas inside the frame now expose the sticky contact paper surface for tissue paper application.
Filling the Butterfly Wings With Tissue Paper
Tear tissue paper in 3 to 4 contrasting colors into small pieces at 2 to 3 cm each. Press the tissue paper pieces onto the sticky contact paper inside the open wing areas of the butterfly frame. Overlap pieces slightly to build up layers of color across each wing section. Cover all exposed sticky areas completely. Cut a second piece of contact paper at 25 x 25 cm and press it sticky-side down over the entire front surface to seal the tissue paper layers permanently. Trim the excess contact paper to the butterfly outline shape. Punch a hole at the top for a hanging thread.
9. Paper Chain Garland
A paper chain garland uses strips of colored paper linked into interlocking loops to produce a hanging decoration for rooms, doorways, and party spaces. I made these with children aged 3 to 7 at a birthday party craft table. Every child completed at least 10 links in 15 minutes. The children connected all their individual chains into one long garland at the end of the session, which produced a 4-meter decoration that hung across the party room ceiling for the full event.
Paper chain garlands suit children aged 3 and above. Children aged 3 to 4 need adult help applying the glue. Children aged 5 and above complete the full process independently.
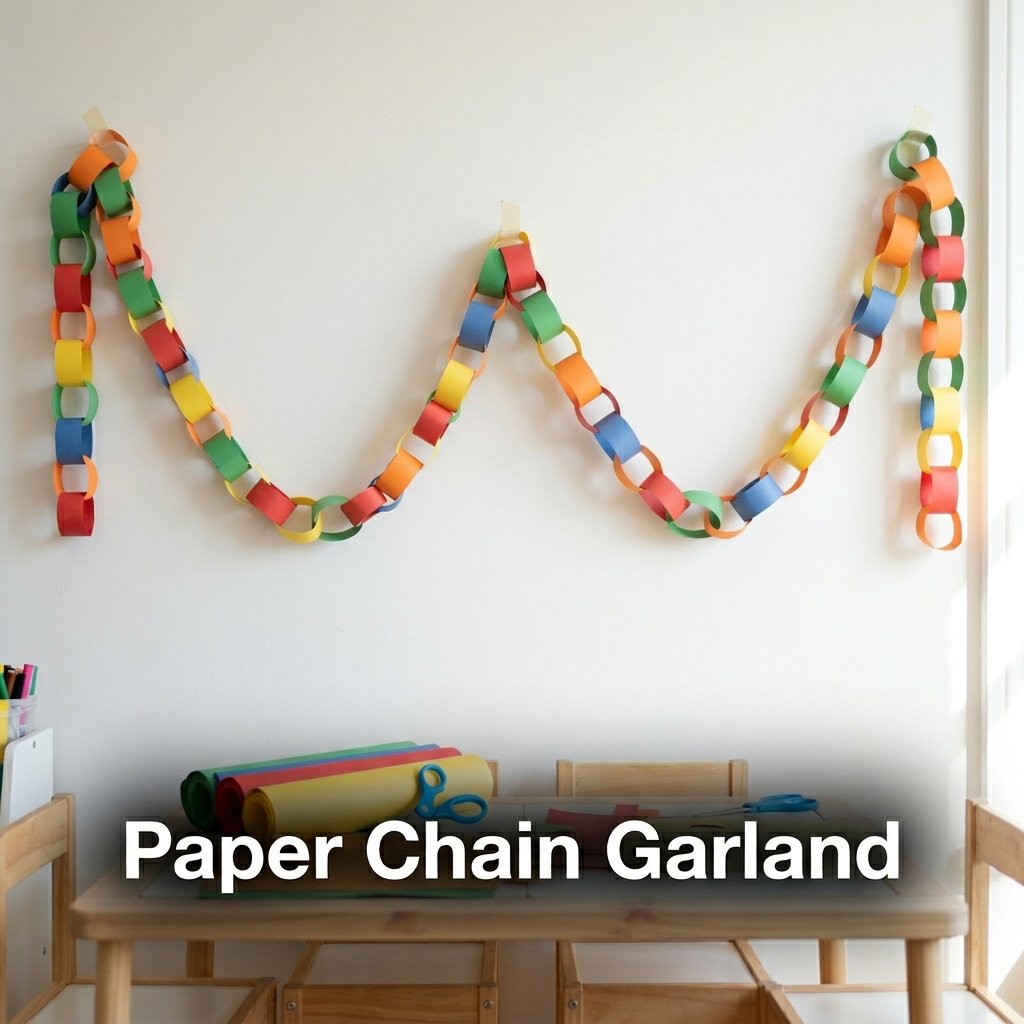
Cutting and Linking Paper Chain Strips
Cut colored paper into strips at 20 x 2 cm each. Use multiple colors for an alternating pattern across the finished chain. Form the first strip into a loop by overlapping the two short ends by 1 cm and pressing a glue stick across the overlap. Hold for 10 seconds until the glue tacks. Thread the second strip through the first loop before gluing its ends together. Continue adding strips through the previous loop before closing each new one. A 1-meter chain uses 50 strips. A standard A4 sheet of paper cut lengthwise produces 10 strips per sheet.
Displaying a Paper Chain Garland
Hang a paper chain garland using small pieces of masking tape applied to the wall at both ends and at 50 cm intervals along the full length. Masking tape removes from most wall surfaces without leaving marks or pulling paint, which makes it the safest hanging method for children’s craft decorations in rented homes and classrooms. Alternate 2 to 3 paper colors in a repeating pattern across the full chain for a more visually organized result than a random color arrangement. A 3-meter garland suits a standard doorway or window display at 30 cm of hanging depth.
10. Air Dry Clay Mini Figures
Air dry clay mini figures use non-toxic air dry clay shaped by hand into small animals, food items, or abstract characters that harden at room temperature without any oven baking. I made these with children aged 5 to 10 during a school holiday session. Each child shaped 2 to 3 figures in 30 minutes. After 24 hours of drying at room temperature, the figures painted with acrylic craft paint and sealed with PVA glue for a finished keepsake result.
Air dry clay suits children aged 4 and above. No oven access or adult supervision is needed for the drying step because the clay hardens at room temperature.
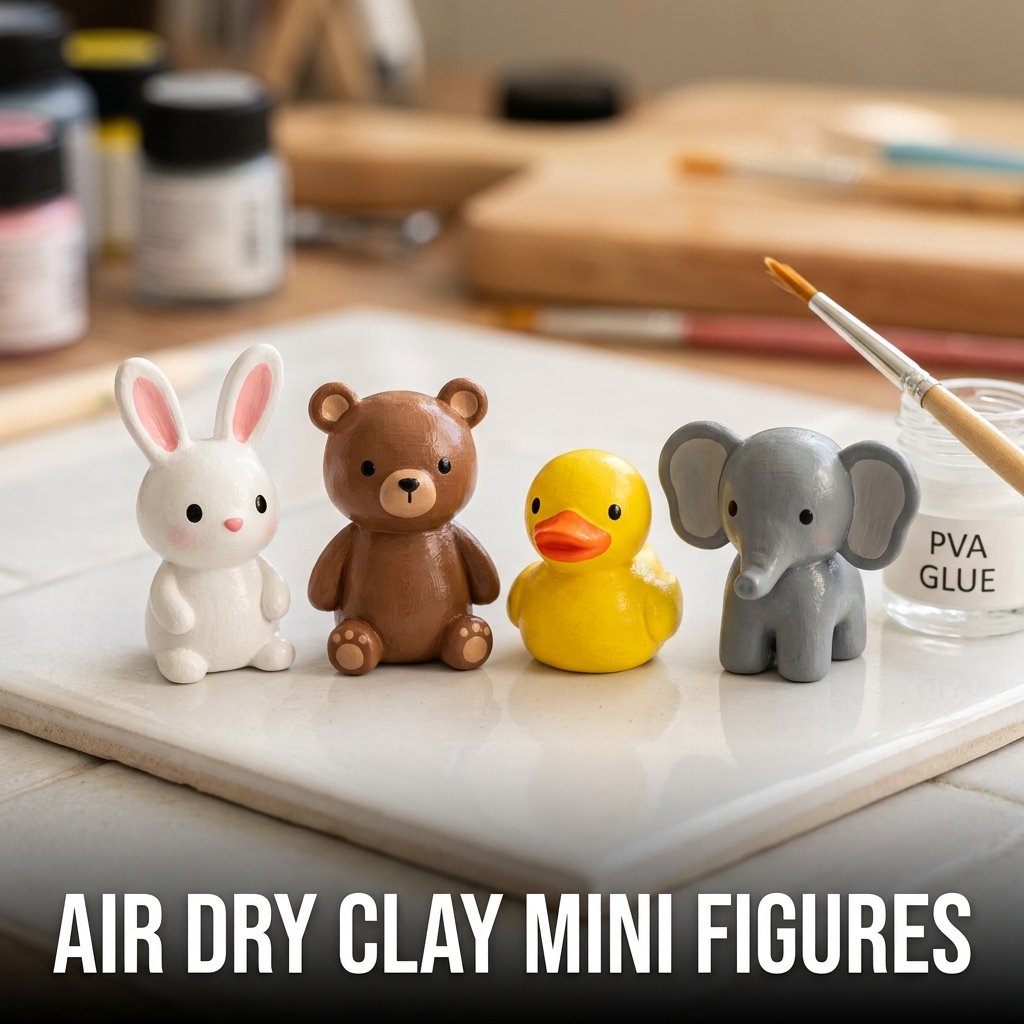
Shaping a Simple Clay Animal
Roll a ball of white air dry clay between the palms to produce a smooth sphere for the body. Roll a smaller ball for the head. Roll 4 thin cylinders for the legs and 2 small flat ovals for the ears. Press all pieces firmly together at the join points and smooth each join with a wet fingertip. Work on a smooth ceramic tile to prevent the clay from sticking to the work surface. Allow the assembled figure to dry flat on the tile for 24 hours before moving it to prevent the legs from bending under the body weight during drying.
Painting Air Dry Clay Figures After Drying
Sand the fully dried figure lightly with 220-grit sandpaper to remove surface bumps before painting. Apply one coat of white gesso or white acrylic paint as a base coat. Allow 30 minutes of drying time. Apply 2 coats of colored acrylic craft paint in the desired design, allowing each coat to dry for 20 minutes. Seal the finished figure with 2 coats of clear PVA glue diluted with water at a 2:1 ratio and allow each coat to dry fully before handling. The PVA seal prevents the acrylic paint from chipping during play and display.
11. Sticker Mosaic Art
A sticker mosaic uses small round dot stickers in multiple colors applied to black cardstock in a grid or pattern to produce a mosaic-style artwork without any cutting, gluing, or painting. I organized a sticker mosaic session for children aged 4 to 10 at a school event. Every child from the youngest to the oldest completed a full sheet of art without any adult assistance. The session required zero preparation and zero cleanup, which is an outcome that every parent and teacher deserves to experience at least once.
Sticker mosaics suit children aged 3 and above. No adult supervision is needed for the activity step because no scissors, glue, or paint are involved.
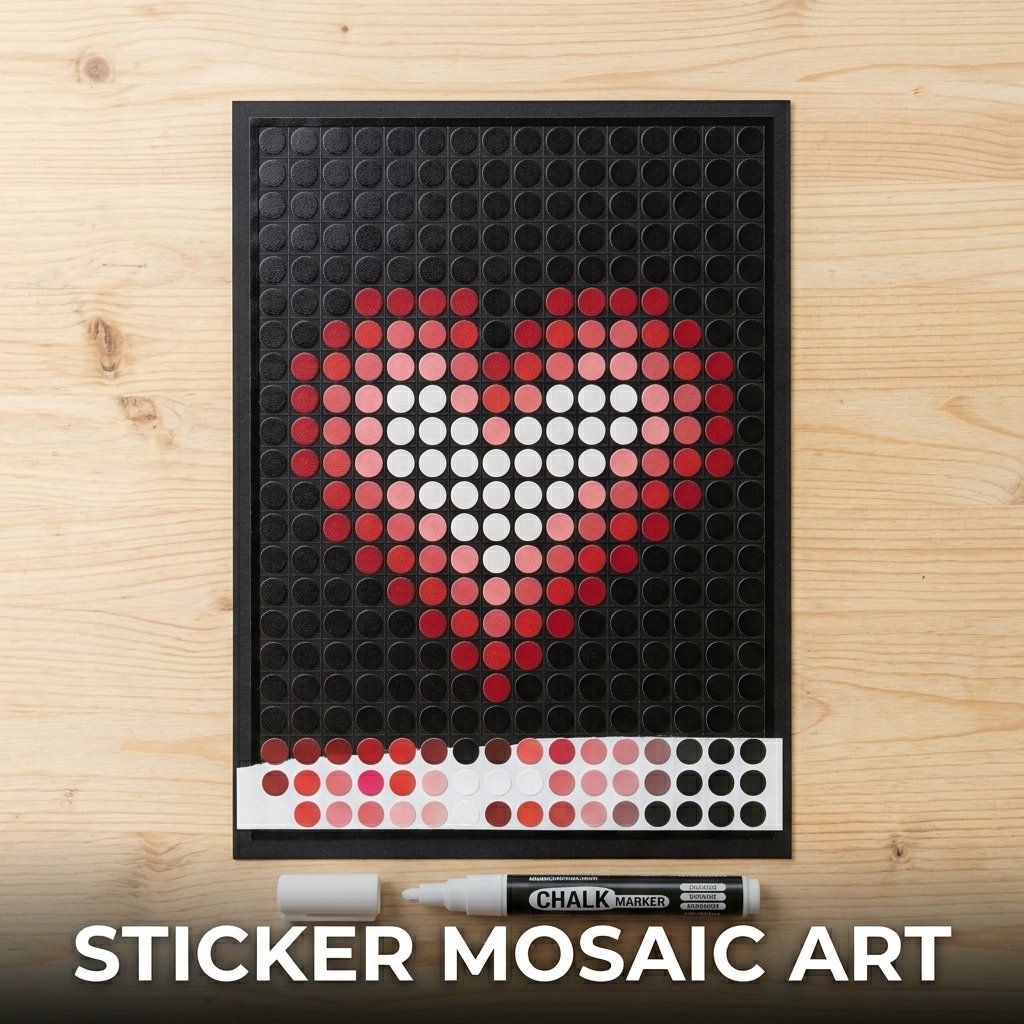
Setting Up a Sticker Mosaic Grid
Draw a grid on black cardstock at A4 size using a white pencil or chalk marker: 20 columns and 26 rows at 1 cm squares. This produces 520 grid squares on a standard A4 sheet. Provide the child with 3 to 4 colors of 1 cm round dot stickers. The child places one sticker in each grid square following a color pattern of their choice or following a pre-drawn color code design drawn inside the grid squares with colored pencil before the sticker session begins. A full A4 grid with no empty squares takes approximately 20 to 30 minutes for a child aged 6 to 8.
Simple Pixel Art Designs for Sticker Mosaics
Pre-draw simple pixel art designs inside the grid squares using colored pencils as a guide for children who prefer a structured activity. Suitable pixel designs for children include: a heart shape using red stickers on a 10 x 10 grid, a simple house using 4 colors on a 15 x 12 grid, and a rainbow arc using 6 colors on a 20 x 15 grid. Free pixel art grid templates for children are available on activity worksheet sites including activity village.co.uk and supercoloring.com as free printable downloads.
12. Washi Tape Wall Art
A washi tape wall art project uses rolls of decorative washi tape applied directly to a white cardstock sheet or a canvas board to produce geometric, striped, or patterned artwork without any painting or drawing. I set up a washi tape art station for children aged 5 to 12 at a school event. Every child produced a finished piece in under 20 minutes. The finished pieces looked like intentional geometric designs that most adults assumed were screen-printed rather than made by children using tape.
Washi tape art suits children aged 4 and above. No scissors or glue are needed for the basic tape application step, though scissors help children cut cleaner tape end lines.
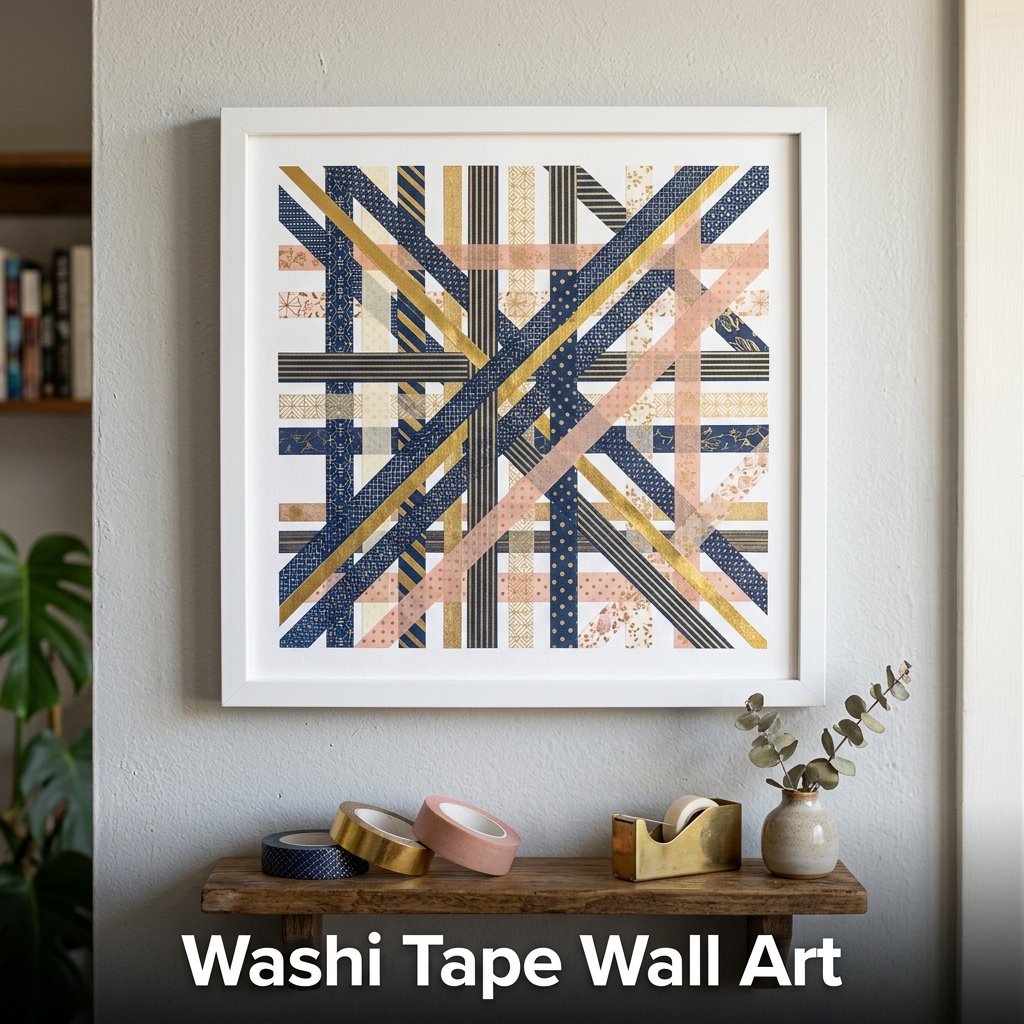
Creating a Geometric Washi Tape Design
Cut a piece of white cardstock at 20 x 25 cm. Apply strips of washi tape across the cardstock in different directions: horizontal, vertical, and diagonal. Overlap tape strips at intersections to produce a grid or plaid pattern. Vary the tape width across different strips by using narrow 6 mm tape for fine lines and wide 25 mm tape for block color sections. Trim the tape ends flush with the cardstock edges using scissors for a clean finish at all 4 borders. The finished piece mounts in a standard clip frame for display without any additional materials.
Color Combinations for Washi Tape Art
Two-color tape combinations produce the most visually organized geometric result. Black and white produce a graphic, modern design. Pastel pink and gold produce a soft decorative result suited to bedroom display. Navy and cream produce a classic striped result. Three or more tape colors produce a more energetic, playful result that suits younger children’s preference for high-contrast designs. Washi tape rolls cost between 1 and 3 dollars each at craft stores and stationery shops and are available in hundreds of patterns including stripes, dots, florals, and geometric prints.
13. Paper Weaving
Paper weaving uses strips of colored paper woven through a slotted base sheet to produce a flat textile-style artwork that develops fine motor skills in children aged 4 and above. I ran a paper weaving session with a class of 6-year-olds and every child completed a full woven sheet in under 30 minutes on their first attempt. The finished pieces looked like colorful plaid fabric squares and every child asked to make a second one immediately after finishing the first.
Paper weaving suits children aged 4 and above. Children aged 4 to 5 need adult help cutting the slotted base sheet. Children aged 6 and above complete the full project independently.
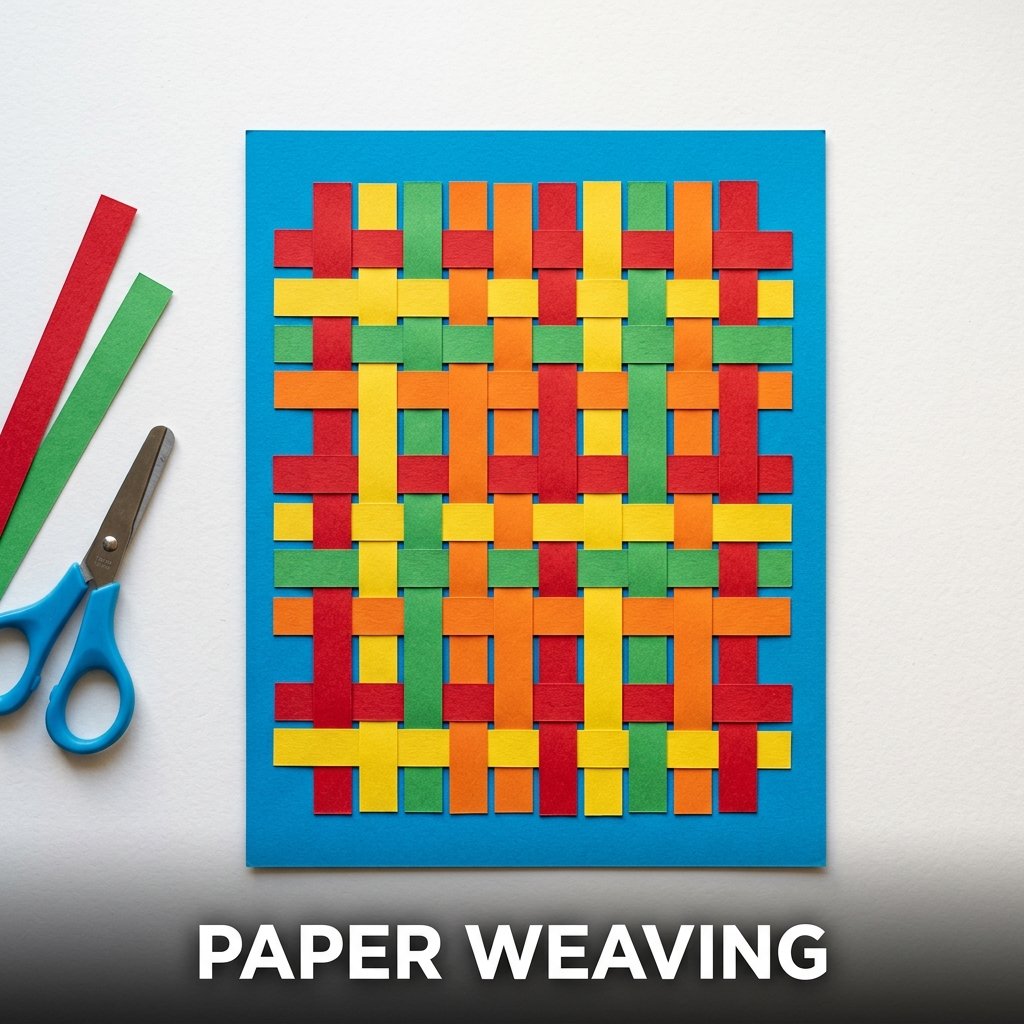
Preparing the Slotted Base Sheet
Cut a piece of cardstock at 20 x 25 cm in one color. Fold the sheet in half lengthwise. Cut parallel slots from the folded edge toward the open edge, stopping 2 cm from the open edge. Space the cuts at 2 cm intervals across the full folded width to produce approximately 8 to 10 parallel slots. Unfold the sheet to reveal the slotted weaving base. The 2 cm uncut border at all 4 edges of the sheet holds the woven structure together after all strips are woven through.
Weaving Paper Strips Through the Base
Cut 10 strips of contrasting colored paper at 22 x 2 cm each. Weave the first strip over and under each slot column alternately across the full base width. Push the strip to the top border of the base sheet. Weave the second strip in the opposite sequence: under and over each slot column alternately. Push it flush against the first strip. Alternate the weaving sequence with each new strip added until all slots are filled. The interlocking over-under pattern locks all strips in position without glue. Glue the strip ends to the base border after completing the full weave for a secure finished piece.
14. Sponge Painting Cards
A sponge painting card uses small pieces of household sponge dipped in paint and pressed onto folded cardstock to produce a textured print pattern as a handmade greeting card or piece of artwork. I ran this activity with children aged 3 to 8 and found that 3-year-olds produced results as visually striking as 8-year-olds because the stamping technique requires no drawing skill and every result looks different. The only supply needed beyond cardstock and paint is a discarded kitchen sponge cut into small pieces.
Sponge painting suits children aged 3 and above. Children aged 3 to 4 need adult paint loading assistance. Children aged 5 and above manage the full process independently.
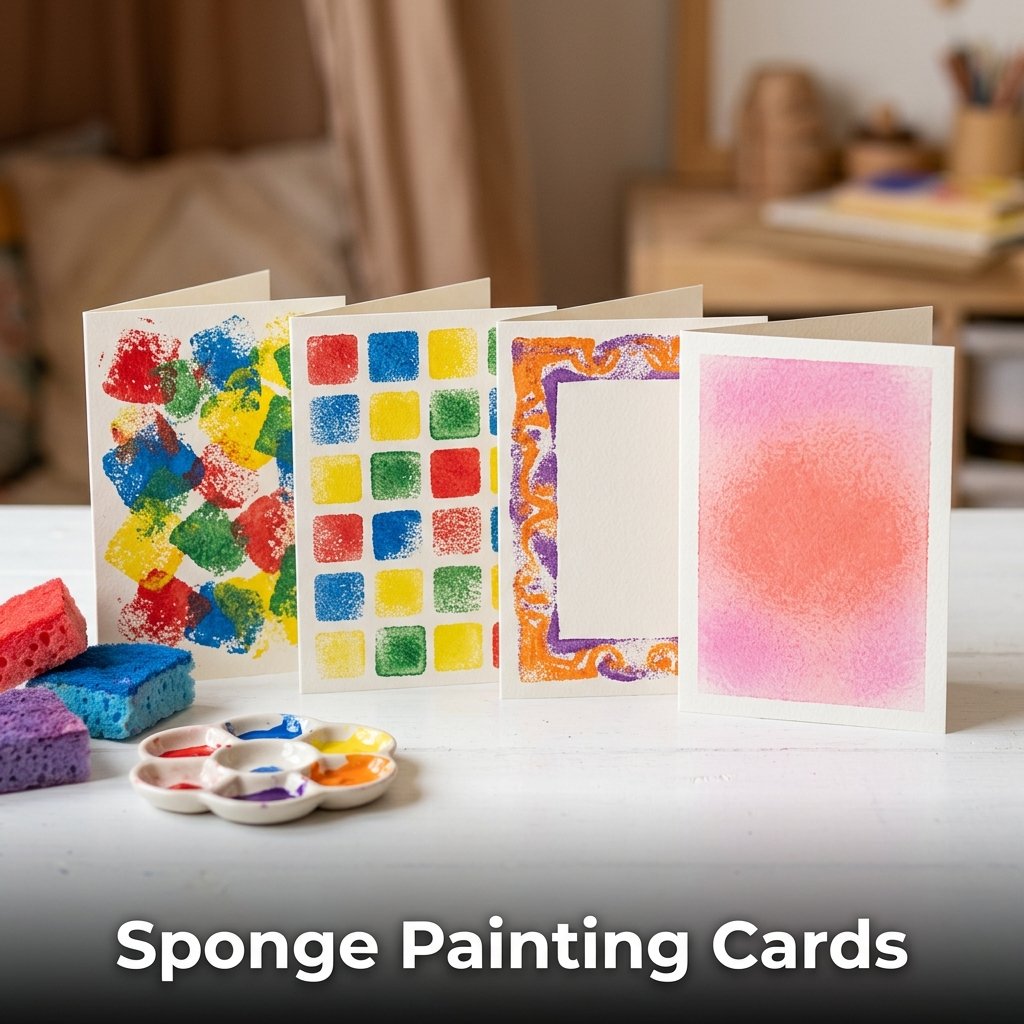
How to Sponge Paint a Greeting Card
Fold a piece of white cardstock at 20 x 28 cm in half to produce a card at 20 x 14 cm. Cut a kitchen sponge into 4 pieces at approximately 3 x 3 cm each. Press one sponge piece onto a flat plate loaded with a thin layer of acrylic paint. Press the paint-loaded sponge onto the card front surface in a random or grid pattern. Use a different sponge piece for each paint color to prevent color mixing on the paint plate. Layer 3 to 4 colors across the card front for a rich, multi-toned result. Allow 15 minutes of drying time before writing inside the card.
Sponge Painting Techniques for Different Ages
Children aged 3 to 5 produce the most satisfying results with free random stamping across the full card surface. Children aged 6 to 9 enjoy creating patterns including alternating color rows, border frames, and shape outlines produced by stamping around a pencil-drawn outline before erasing the pencil lines after drying. Children aged 10 to 12 produce more controlled designs including gradient color effects made by overlapping 2 sponge colors at their edges while both are still wet on the card surface.
15. Finger Painting Canvas Art
Finger painting canvas art uses washable finger paints applied directly with fingertips, palm prints, and full-hand prints to a small canvas board to produce a mixed-media artwork for framing and display. I ran a finger painting session with children aged 2 to 8. The 2-year-olds produced abstract pieces that looked genuinely like modern art. This was both encouraging for them and slightly deflating for me, given that I spent three years learning to paint with brushes.
Finger painting suits children aged 2 and above. Use only non-toxic, washable finger paint labeled specifically as safe for young children.
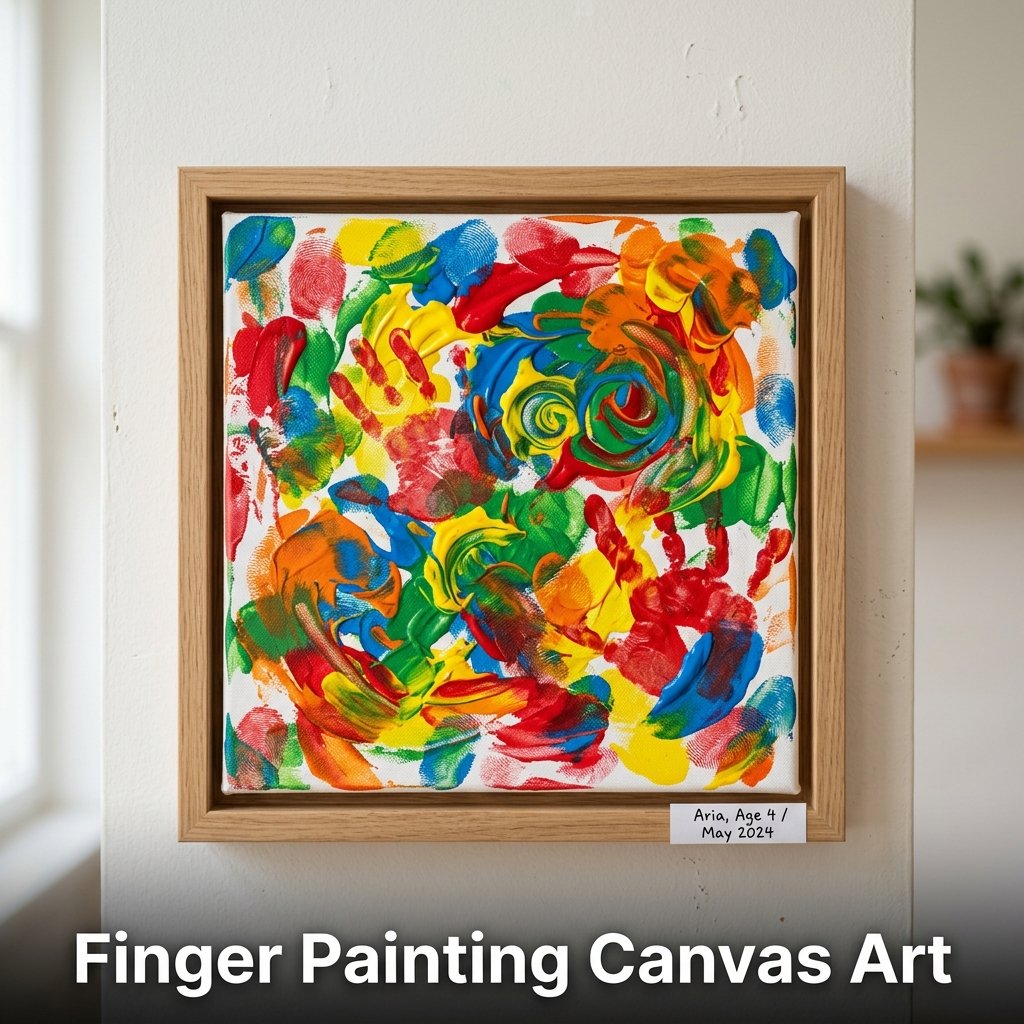
Setting Up a Finger Painting Station
Cover the work surface with newspaper or a plastic sheet. Place a 15 x 15 cm canvas board in front of each child. Pour small amounts of 3 to 5 finger paint colors onto a paper plate with separate sections for each color. Instruct children to press fingers, thumbs, and palms into the paint and then onto the canvas in any pattern they choose. Provide a bowl of water and a cloth for cleaning hands between color changes to prevent all colors mixing into brown across the canvas surface.
Displaying a Finished Finger Painting
Allow the finished canvas to dry flat for 1 hour before standing it upright. Canvas boards display without frames because the painted surface sits flush with the board edges, which makes them self-contained display pieces. Apply a coat of clear PVA glue diluted to 50% concentration over the fully dried painting surface using a soft flat brush. This coat seals the finger paint and produces a slight sheen that makes the finished artwork look more intentional. Write the child’s name and date on the back of the canvas before displaying.
16. Paper Crown
A paper crown uses a strip of cardstock cut into a zigzag top edge, decorated with markers and stickers, and joined at the back to produce a wearable head decoration for dress-up play, parties, and classroom celebrations. I made paper crowns with 22 children aged 4 to 7 at a school birthday celebration. Every child finished their crown in under 15 minutes and wore it for the rest of the school day, including during lunch, outdoor play, and the bus ride home. One child wore his until bedtime.
Paper crowns suit children aged 3 and above. Children aged 3 to 4 need adult help cutting the zigzag edge and measuring the correct head circumference before joining.
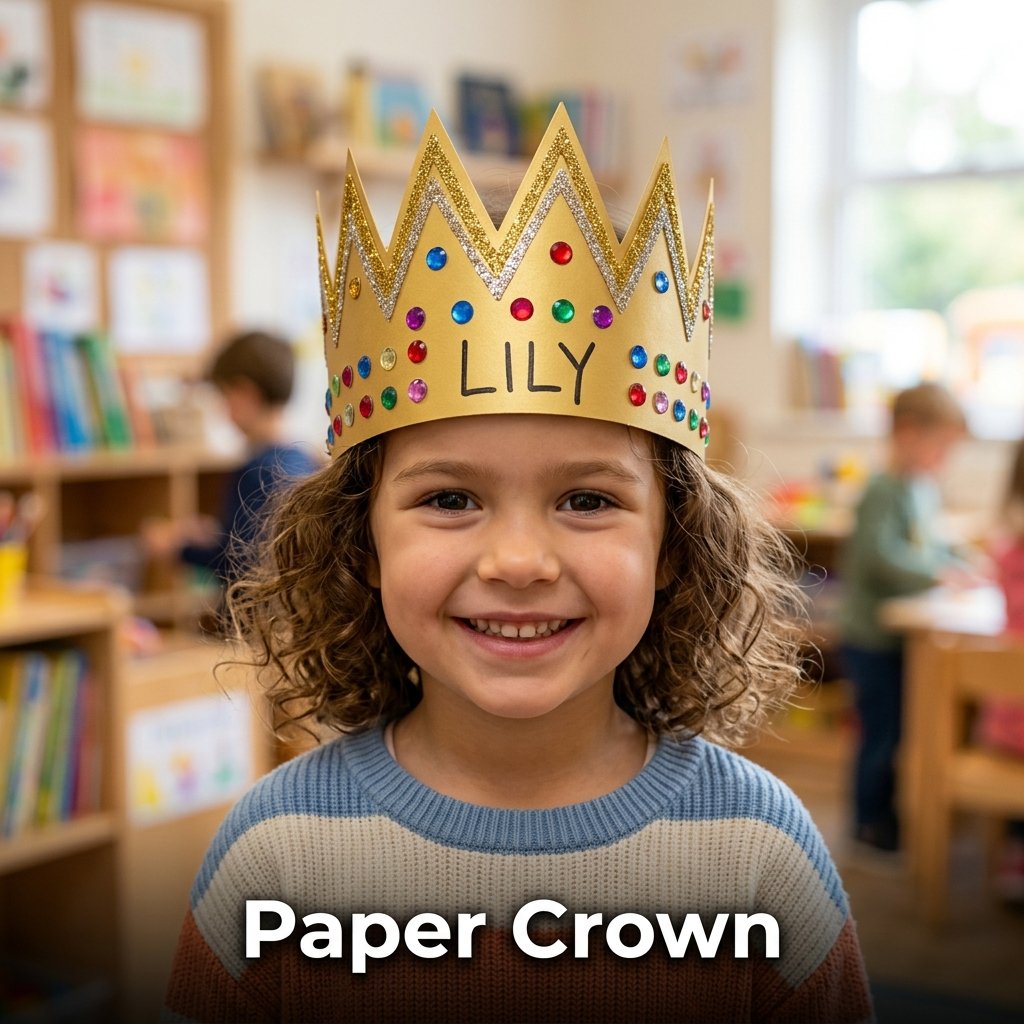
Cutting and Sizing a Paper Crown
Cut a strip of gold or yellow cardstock at 60 x 8 cm for a standard child-size crown. Fold the strip in half lengthwise to mark the center. Draw a zigzag pattern along the top edge using a pencil with points at 4 cm intervals, producing 8 to 10 zigzag points across the full length. Cut along the pencil zigzag line through both layers of the folded strip simultaneously for identical zigzag points on both halves. Unfold the strip. Wrap it around the child’s head to measure the correct fit before joining the ends with a staple or tape.
Decorating a Paper Crown
Apply gold or silver glitter glue along the base of all zigzag points for a jeweled effect. Press round dot stickers or star stickers across the crown band as gemstone decorations. Draw colored patterns between the stickers using markers. Children aged 5 to 12 enjoy adding their own name or title to the front center of the crown band using a black marker. Allow 15 minutes of drying time for any glitter glue before the child puts the crown on to prevent glitter from transferring to hair and skin before the adhesive dries fully.
FAQ
What are the simplest crafts for kids aged 3 to 5?
The simplest crafts for kids aged 3 to 5 are paper chain garlands, handprint greeting cards, sponge painting cards, and paper bag puppets. Paper chain garlands need only paper strips and a glue stick with adult help at the gluing step. Handprint cards require only paint and cardstock with adult support during the hand pressing step. Sponge painting needs only a sponge, paint, and paper with no cutting or gluing required for the child. Paper bag puppets use pre-cut parts pressed with a glue stick. All 4 projects finish in under 20 minutes and use materials costing under 2 dollars each.
What simple crafts for kids use only paper?
Six simple crafts for kids use only paper as the primary material: paper plate animal faces, paper chain garlands, paper crowns, paper weaving, origami shapes, and handprint cards. Paper plate animals need only a paper plate, colored paper, markers, and a glue stick. Paper chains use only paper strips and a glue stick. Paper crowns use one strip of cardstock and stickers. Paper weaving uses two sheets of contrasting cardstock. All 6 projects use standard A4 or cardstock paper available at any stationery store or supermarket for under 3 dollars per pack of 50 sheets.
What crafts suit children aged 6 to 12 years working independently?
Crafts that suit children aged 6 to 12 working independently include paper weaving, washi tape wall art, sticker mosaic pixel art, salt dough shapes, recycled bottle vases, and cardboard box houses. All 6 projects require no adult supervision during the main construction steps. Paper weaving and sticker mosaics develop fine motor skills without any risk of injury. Washi tape art requires no scissors for the basic design step. Salt dough shapes require adult oven supervision only during the baking step. All 6 projects produce a finished display or play item on the first attempt without prior craft experience.
How do I set up simple crafts for kids in a classroom?
To set up simple crafts for kids in a classroom, prepare individual material packs for each child before the session begins. Each pack contains pre-cut paper shapes, a glue stick, crayons or markers, and any other project-specific supplies portioned per child. Pre-cutting all paper parts reduces active supervision needs during the craft session and prevents material competition between children. Cover all desks with newspaper before any paint or glue activities. Set up a drying area with labeled spaces for each child’s finished piece. A 30-minute classroom craft session works best with a single project using 4 or fewer steps.
What simple crafts for kids can be made with recycled materials?
Five simple crafts for kids use primarily recycled materials: recycled bottle vases, cardboard tube animals, cardboard box houses, paper bag puppets, and paper chain garlands. Bottle vases use empty plastic or glass food containers. Cardboard tube animals use toilet paper rolls. Cardboard box houses use medium-sized delivery or cereal boxes. Paper bag puppets use plain paper lunch bags. Paper chain garlands use strips cut from old magazines, printed paper, or scrap colored paper. All 5 projects cost zero dollars in primary materials because every base material is a household item that would otherwise be discarded.