14 Creative Tree Branch Crafts to Spruce Up Your Space
I picked up a fallen branch from my backyard one afternoon and almost threw it in the trash. Then I noticed how smooth the wood was, and instead I brought it inside. Three hours later, it was a wall-mounted coat rack that my guests still ask about every time they visit.
Creative tree branch crafts turn natural wood into functional and decorative home pieces. The most popular projects include wall hangings, candle holders, coat racks, photo frames, and rustic shelves. Most require basic tools like a glue gun, sandpaper, twine, and paint.
Tree branches work across multiple decor styles, including rustic, boho, farmhouse, and minimalist. I have made over a dozen branch-based DIY projects in the last two years, and the material cost for most stayed under $15 because branches are free to collect outdoors.
This article covers 14 creative tree branch crafts that work for beginners and experienced DIY crafters alike. Each project includes the materials needed, the time required, and practical steps based on real experience. Whether you want living room wall decor, garden decoration, or seasonal pieces, at least one project here fits your space and skill level.
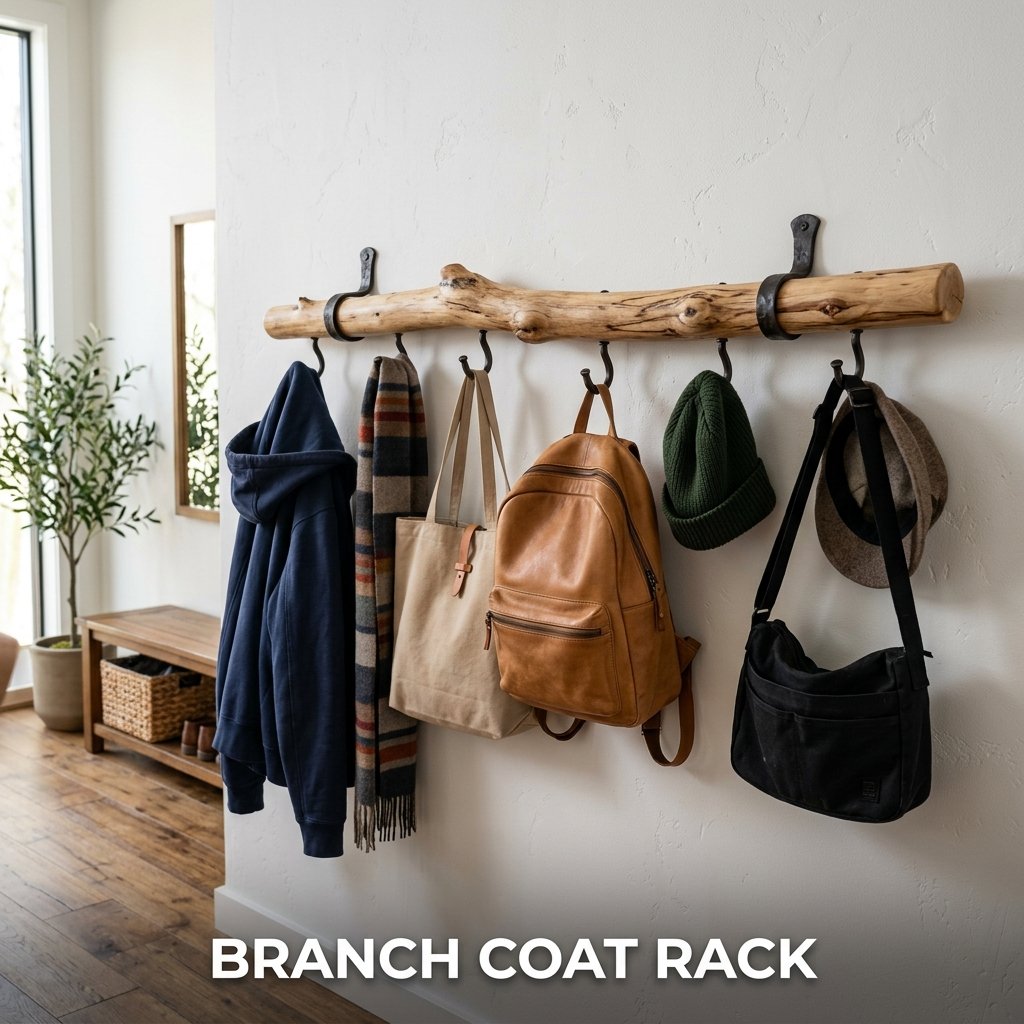
1. Branch Coat Rack
A branch coat rack is a functional creative tree branch craft that mounts directly to a wall and holds coats, bags, and hats using metal hooks screwed into the wood. A single branch measuring 3 to 4 feet long and 2 to 3 inches in diameter works best. I made mine from a maple branch I sanded smooth and sealed with clear wood stain. It holds 6 hooks and carries up to 4 coats at once without any bending.
Materials Needed for a Branch Coat Rack
The required materials are one straight branch measuring 3 to 4 feet long, sandpaper in 80 and 120 grit, clear wood stain or varnish, 4 to 6 metal screw hooks, two wall mounting brackets, and wood screws. Total material cost runs $10 to $20 if the branch is collected outdoors. Metal screw hooks cost $3 to $8 per pack of 10 at hardware stores. The entire project takes 2 to 3 hours including drying time.
How to Assemble a Branch Coat Rack
Sand the branch starting with 80-grit sandpaper to remove bark and rough spots, then finish with 120-grit for smoothness. Apply one coat of wood stain and let it dry for 1 hour. Mark hook positions evenly along the branch, spacing them 6 to 8 inches apart. Screw each hook in by hand. Mount two wall brackets to studs using a drill and wall screws. Set the branch across the brackets and secure it in place.
2. Branch Photo Frame
A branch photo frame uses small twigs arranged in a rectangular border to hold a printed photo without glass or a traditional frame backing. Four straight twigs of equal length are glued at the corners using a glue gun to form the frame shape. I made a set of three matching branch photo frames for a gallery wall arrangement, and the total material cost was under $5 because all branches came from one outdoor collection.

How to Make a Branch Photo Frame
Cut four twigs to matching lengths using garden shears or a small handsaw. Two pieces form the horizontal top and bottom, and two form the vertical sides. Glue the corners together using a glue gun, holding each joint for 30 seconds until set. Let the frame cool completely for 10 minutes before attaching a photo. Tape or glue the photo to the back of the frame. Attach a short length of twine to the top two corners for hanging.
Size and Proportion for Branch Photo Frames
A frame sized for a 4×6 inch photo requires twigs cut to 5 inches for the short sides and 7 inches for the long sides to allow a half-inch overlap at each corner. For a 5×7 inch photo, cut twigs to 6 and 8 inches respectively. Twigs measuring 1/4 to 1/2 inch in diameter keep the frame lightweight enough to hang using a single thumbtack. Thicker twigs over 3/4 inch in diameter require a wall hook for stable hanging.
3. Branch Candle Holder
A branch candle holder positions a flat-cut wood slice or branch segment as a base for pillar candles or tea light cups. Branches with flat, stable bases hold candles without any additional stand. I collected three birch branches of different heights, cut flat bottoms on each with a handsaw, and arranged them as a centerpiece cluster on my dining table. The natural white bark of the birch branches photographed well for every seasonal table setting I used them in.
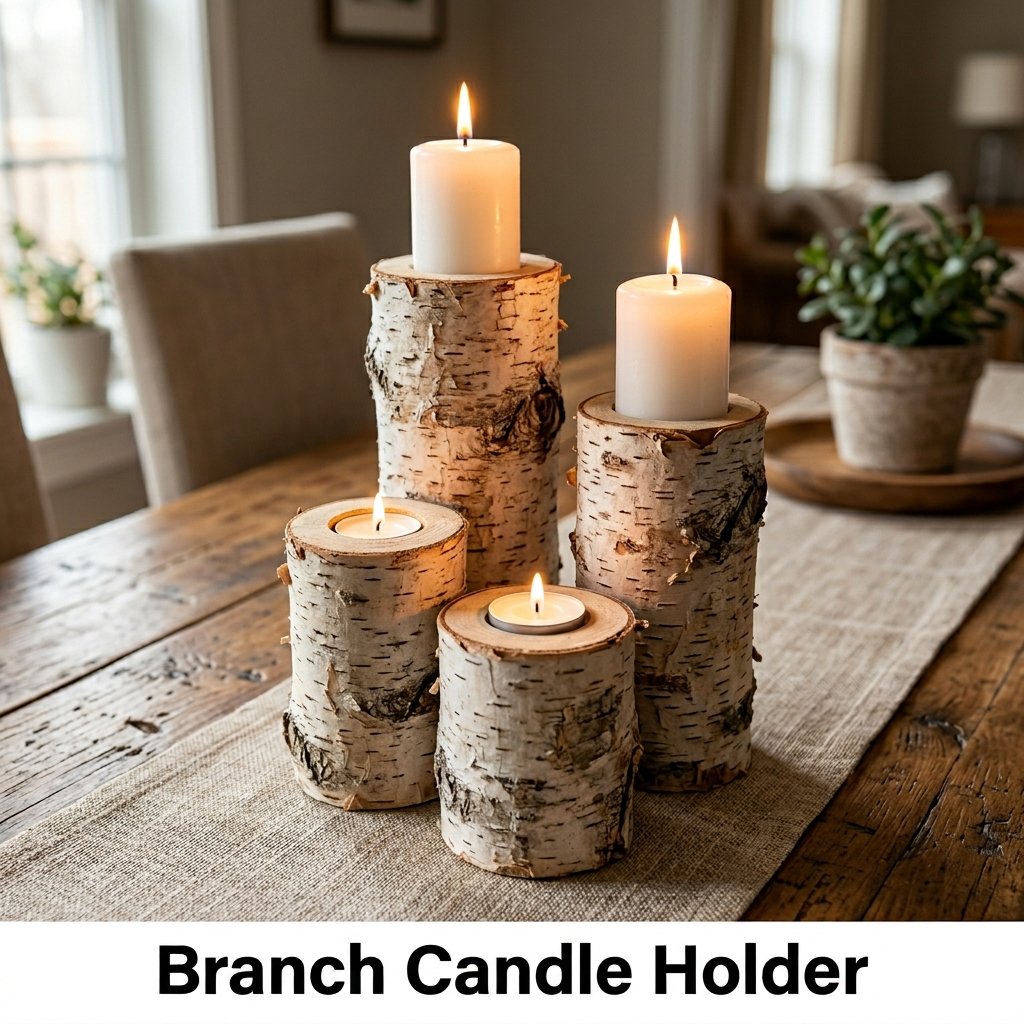
Cutting and Preparing Branch Candle Holders
Cut each branch segment to the desired height using a handsaw. Heights of 4 inches, 6 inches, and 8 inches create a varied cluster effect. Sand the top surface flat so candles sit without rocking. Drill a shallow indent 1/2 inch deep into the top surface using a spade bit sized to match the candle diameter. This indent keeps the candle centered and reduces the risk of tipping. Apply a thin coat of clear sealant to the cut surfaces to prevent cracking.
Safety Guidelines for Branch Candle Holders
Never leave open flame candles unattended on wood surfaces. Use flameless LED tea lights inside the drilled indent as a safer alternative. LED tea lights produce no heat and eliminate fire risk entirely while maintaining the visual effect of real candles. Place a small metal washer or foil disc inside the indent before inserting any real candle to catch dripping wax. Keep finished branch candle holders away from fabric, paper, or other flammable materials during use.
4. Branch Wall Hanging
A branch wall hanging uses one horizontal branch as the top rod from which fabric strips, yarn, macrame knots, feathers, or dried flowers are hung to create a boho or woodland theme wall decoration. This is one of the most searched creative tree branch craft ideas on Pinterest because the finished result suits multiple interior styles and requires no power tools. I made my first one in 90 minutes using a branch from my garden and leftover yarn from a previous project.
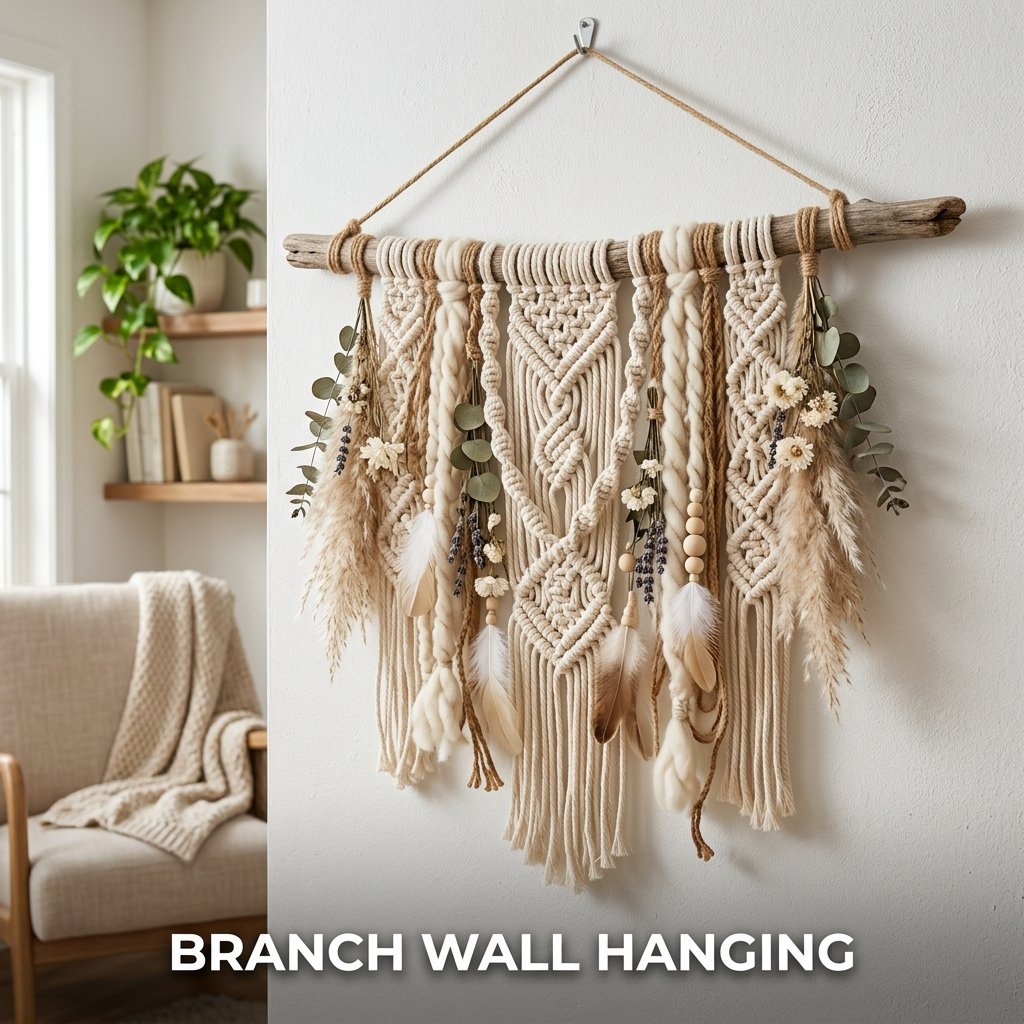
How to Make a Branch Wall Hanging
Select a branch measuring 18 to 30 inches long and 1 to 1.5 inches in diameter. Remove loose bark and wipe the surface clean with a damp cloth. Cut yarn, fabric strips, or macrame rope into lengths of 12 to 24 inches. Fold each piece in half and attach it to the branch using a lark’s head knot. Fill the full length of the branch with attached pieces, spacing them 1/2 inch apart. Tie a length of twine to both ends of the branch for hanging.
Decoration Options for Branch Wall Hangings
Common additions to branch wall hangings include dried pampas grass, artificial eucalyptus sprigs, small feathers, wood bead strings, and painted leaf cutouts. Attach these elements using a glue gun or by tying them onto the hanging strands with thin twine. Mixing textures like smooth beads with rough yarn creates visual contrast without additional cost. A finished branch wall hanging measuring 24 inches wide by 20 inches long suits walls in living rooms, bedrooms, and nurseries.
5. Branch Jewelry Organizer
A branch jewelry organizer mounts a small branch horizontally on a wall and uses the natural side twigs as hooks for necklaces, bracelets, and earrings. Branches with multiple short side twigs spaced 2 to 4 inches apart work best for this project. I found a perfect 20-inch branch with 8 natural side twigs during a walk near my home. After sanding and staining it, I mounted it above my dresser and it now holds 14 necklaces without any tangling.
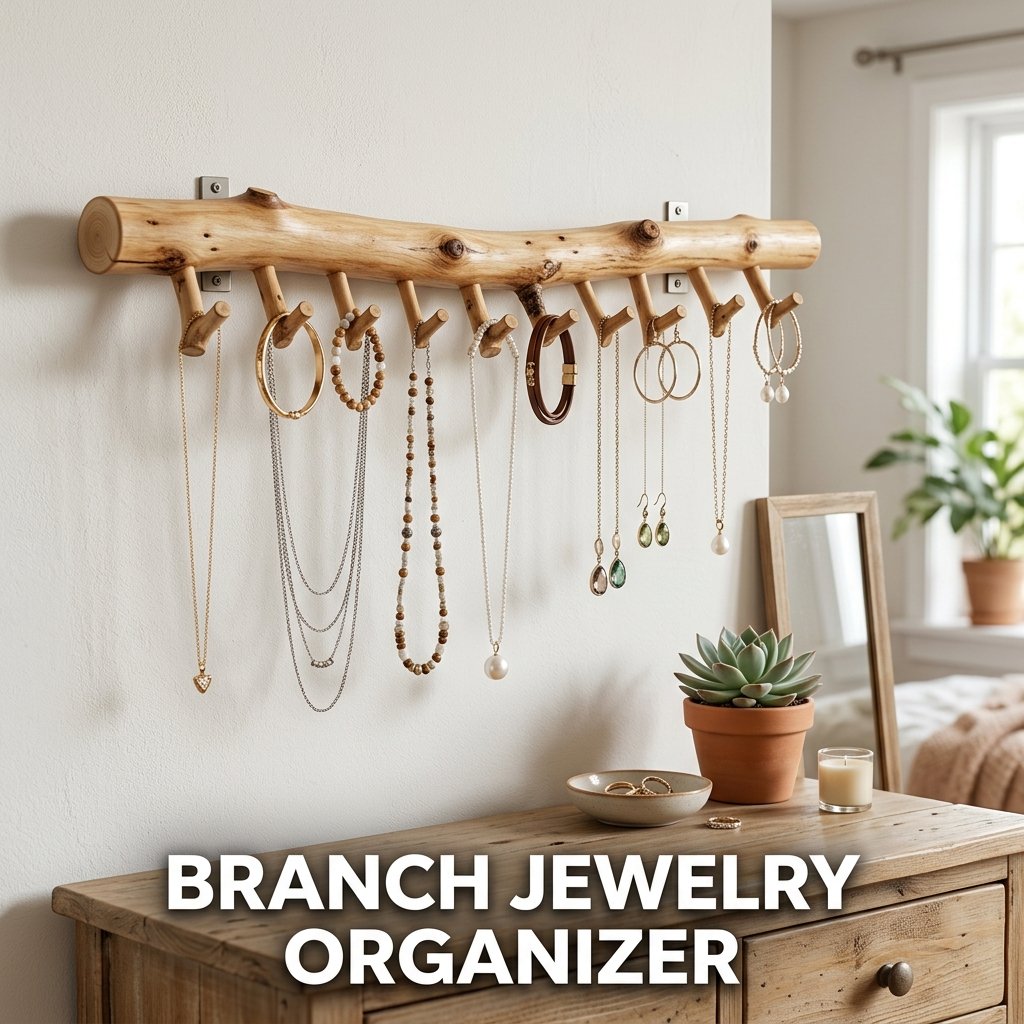
How to Mount a Branch Jewelry Organizer
Sand the branch lightly with 120-grit sandpaper to remove sharp edges that could snag delicate jewelry chains. Apply one coat of wood stain or white paint depending on your room’s decor style. Let it dry fully for 1 hour. Attach two small D-ring wall hooks to the back of the branch using short wood screws. Hang the D-rings on corresponding wall hooks mounted into studs. The finished organizer holds jewelry weighing up to 2 pounds total without pulling from the wall.
Best Branch Types for a Jewelry Organizer
Birch and oak branches produce the neatest finished result because their bark is smooth and holds paint or stain evenly. Willow branches are too flexible for wall mounting. Branches measuring 3/4 to 1.5 inches in diameter provide enough structural strength to hold multiple necklace chains without bending. Side twigs measuring 2 to 4 inches long catch necklace chains securely without requiring additional hooks. Collect branches with natural side twigs intact rather than cutting and re-attaching them separately.
6. Branch Rustic Shelf
A branch rustic shelf uses two thick parallel branches as support rails mounted horizontally on a wall, with a wood plank or additional branch laid across them as the shelf surface. This DIY home decor project suits farmhouse and woodland theme interiors. I built a small branch shelf in my bathroom to hold three small plants. The total material cost was $12, which covered only the mounting hardware since I sourced the branches and plank from my yard.
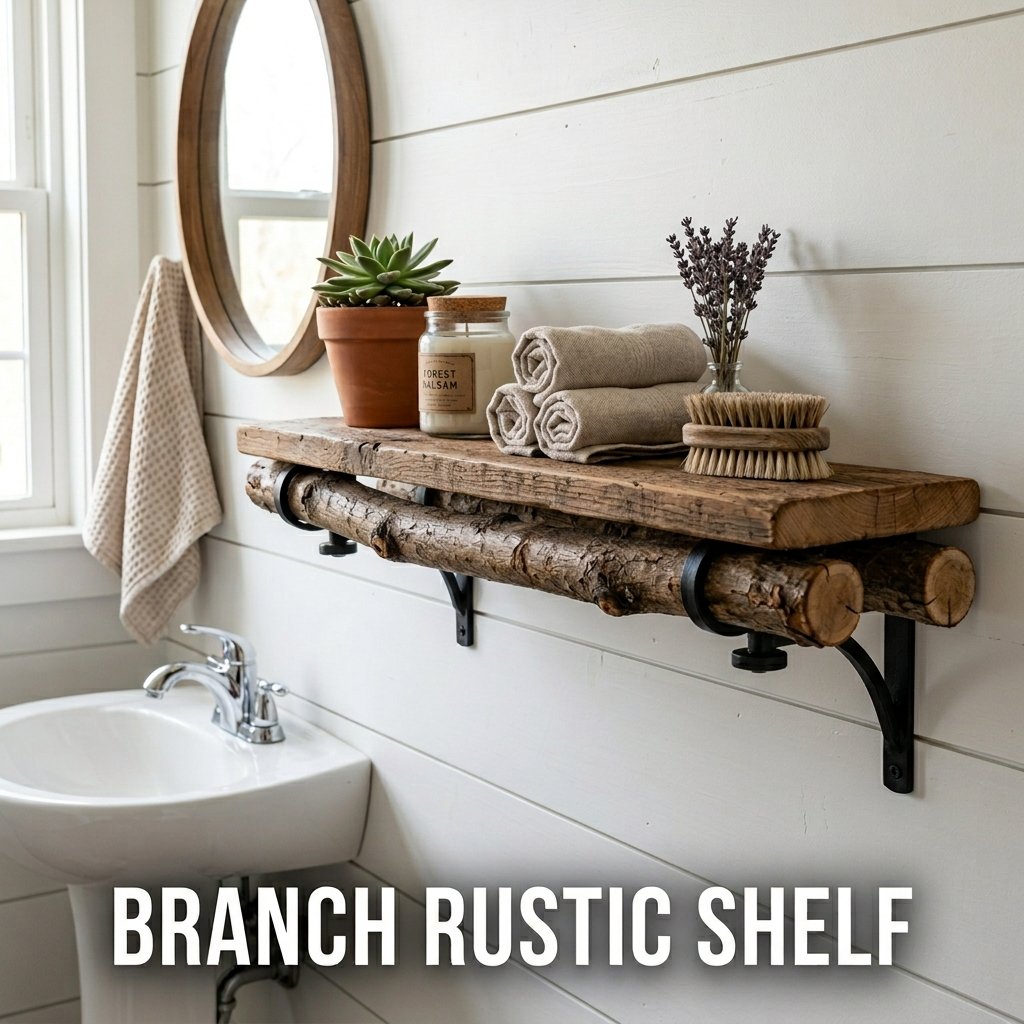
How to Build a Branch Rustic Shelf
Select two matching branches measuring 6 to 8 inches long and 1.5 to 2 inches in diameter for the support rails. Drill a pilot hole through the back of each branch and into the wall stud using a 1/4 inch drill bit. Secure each branch to the wall using a 3-inch wood screw. Position both support branches at the same height and 10 to 14 inches apart. Lay a plank or flat branch section across the two supports and secure it from below using short screws.
Weight Capacity of a Branch Rustic Shelf
A branch shelf with two support rails mounted into wall studs holds 8 to 12 pounds of weight. This is sufficient for small potted plants, books, candles, and decorative items like ceramic figures or small vases. Avoid placing items heavier than 12 pounds on branch-based shelving without additional center support. Adding a third branch support rail in the center increases weight capacity to 18 to 22 pounds. Always mount support branches into studs rather than drywall alone to prevent pull-out failure.
7. Branch Plant Holder
A branch plant holder suspends small potted plants using a wooden branch as the top rod from which rope or twine hangers are tied. This is a practical DIY nature craft that suits both indoor and outdoor spaces. I hung three 4-inch terracotta pots from a single 30-inch branch in my kitchen window. The setup cost $8 total and created a vertical herb garden that takes up no counter space.
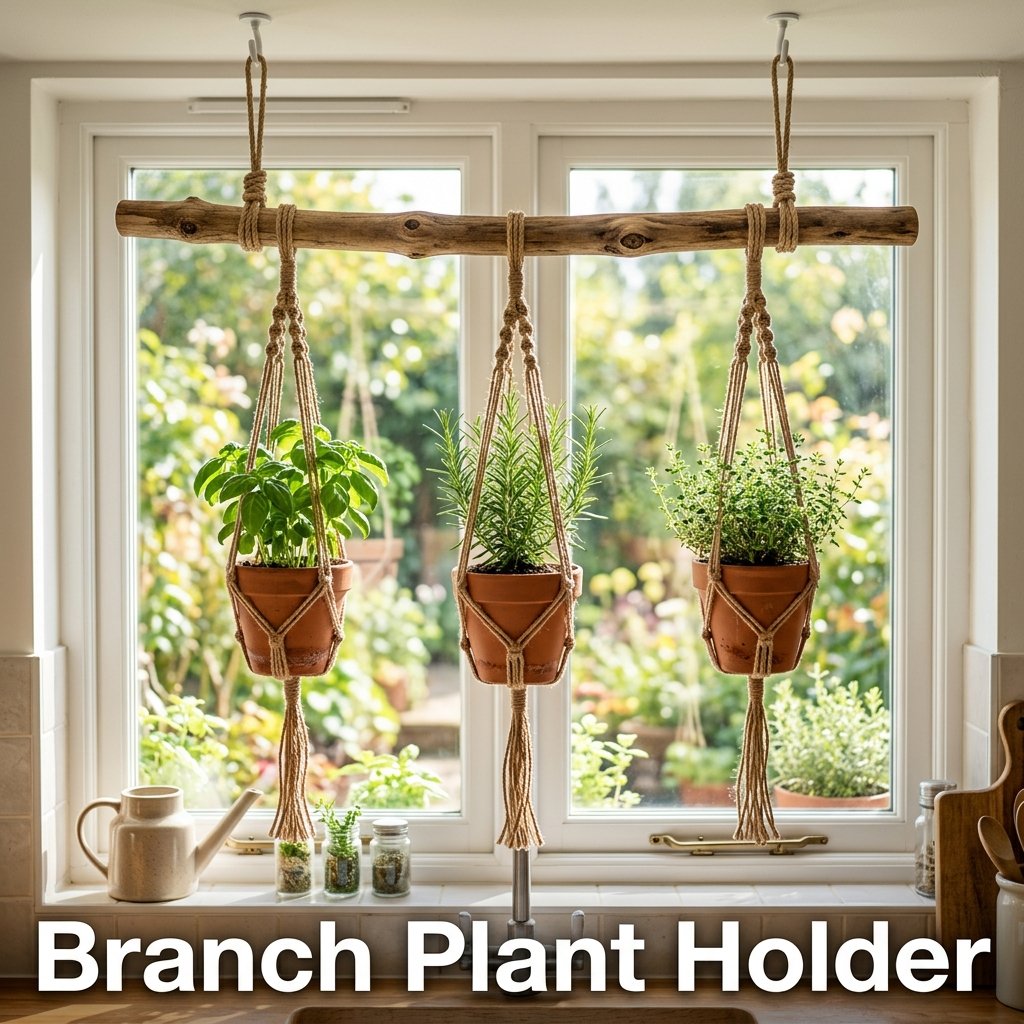
How to Make a Branch Plant Holder
Select a branch 24 to 36 inches long and strong enough to hold the weight of filled pots. Cut four lengths of jute twine or cotton rope to 36 inches each per pot. Tie the four rope lengths to the branch in two pairs, spacing each pair 3 inches apart at the pot position. Braid or knot the four ropes down to pot level and create a cradle shape by knotting all four together below the pot base. Test each cradle with the filled pot before final hanging.
Weight Limits for Branch Plant Holders
A single branch plant holder holds 3 to 5 pounds of combined pot and soil weight per hanging point when mounted on a ceiling hook rated for 15 pounds. Use branches measuring at least 1.5 inches in diameter to prevent bending under load. Terracotta pots in 4-inch size weigh approximately 1 pound empty and 2 to 3 pounds when filled with moist soil. Plastic nursery pots reduce the total hanging weight by 30 to 50 percent compared to terracotta at the same size.
8. Branch Bird Feeder
A branch bird feeder attaches a small feeding tray or hollowed log segment to a natural branch to create an outdoor garden decoration that attracts birds. This is one of the most practical creative tree branch crafts for garden decor because it reuses fallen wood that would otherwise be discarded. I built a simple tray feeder from a flat branch slice and mounted it on a standing branch post in my garden. Birds began using it within 48 hours of placement.
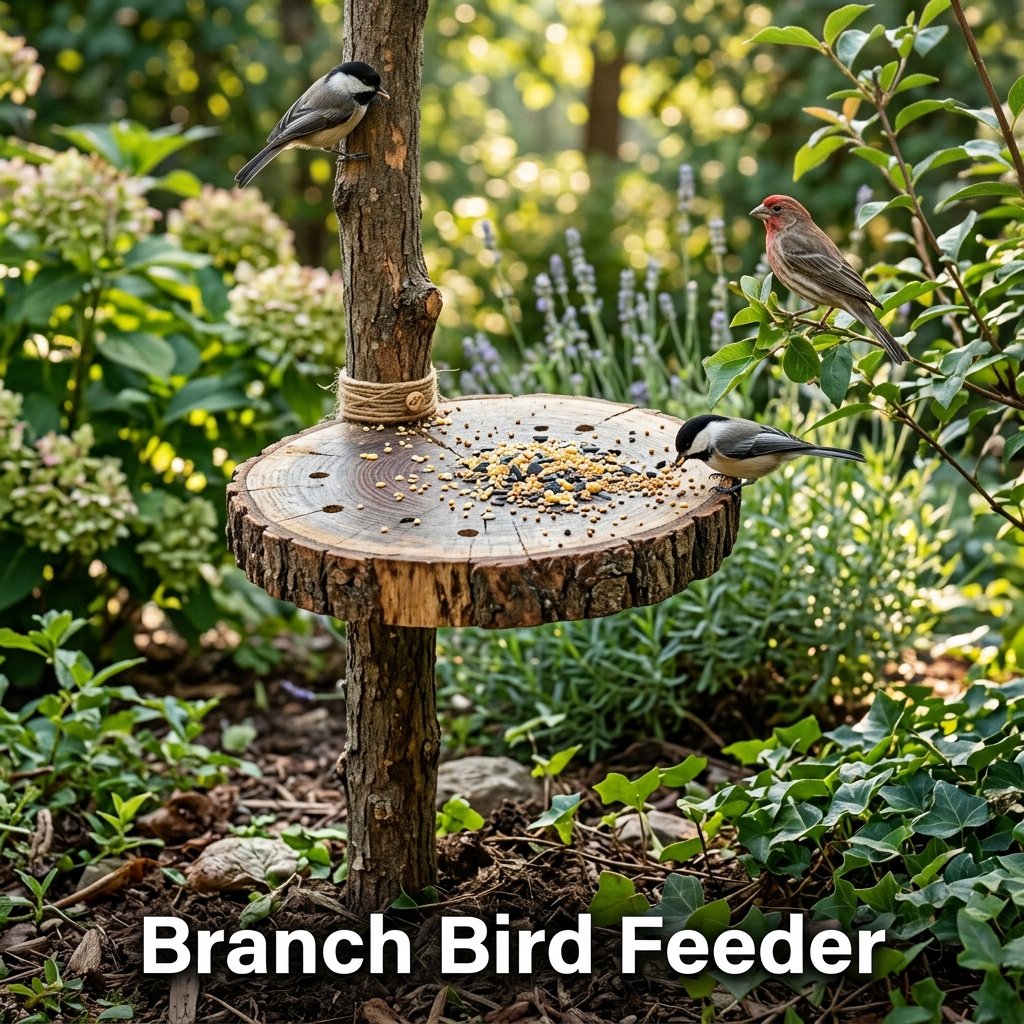
How to Build a Basic Branch Bird Feeder
Cut a flat branch slice measuring 8 to 12 inches in diameter and 1 to 1.5 inches thick as the feeding tray. Sand the edges smooth. Drill 4 drainage holes measuring 1/4 inch in diameter through the tray base to prevent water pooling. Screw the tray to the top of a vertical branch or wooden post using two 2-inch wood screws from below. Mount the post in the ground at a depth of 12 inches to keep it stable in wind. Apply an outdoor wood sealant to all cut surfaces.
Branch Feeder Placement and Maintenance
Place a branch bird feeder at least 5 feet from the ground to keep seeds away from ground-level predators like cats. Position it within 10 to 15 feet of a shrub or tree so birds have a nearby perch to retreat to. Clean the tray every 7 days using a stiff brush and mild soap solution to prevent mold growth on seeds. Rinse with clean water and let it dry fully before refilling. Sunflower seeds attract the widest variety of bird species in most regions of North America and Europe.
9. Branch Decorative Ladder
A branch decorative ladder uses 2 long straight branches as the side rails and 4 to 6 shorter branches as the rungs to create a freestanding rustic display structure for blankets, plants, or seasonal decorations. I built one for my living room corner using branches collected after a storm. It stands 5 feet tall and holds 3 folded blankets without any wobbling.
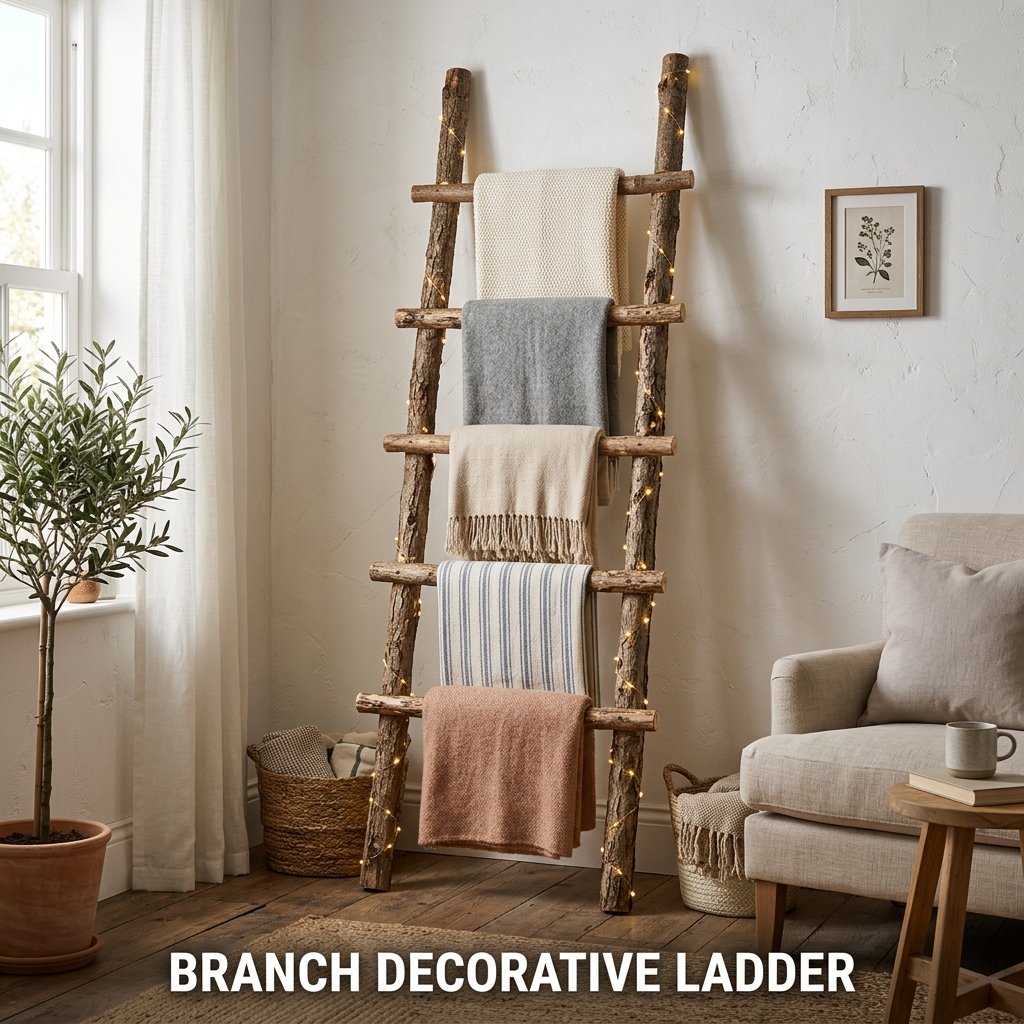
How to Assemble a Branch Decorative Ladder
Select two straight branches measuring 5 to 6 feet long and 1.5 to 2 inches in diameter for the side rails. Cut 4 to 6 rung branches measuring 18 to 24 inches long each. Space the rungs evenly at 10 to 12 inch intervals along the rails. Drill pilot holes through the side rails at each rung position using a 3/8 inch bit. Apply wood glue to each rung end and insert it into the hole. Secure with a small finishing nail driven through the rail into the rung end for added strength.
Finishing and Decorating a Branch Ladder
Sand all surfaces with 120-grit sandpaper after assembly. Apply one coat of wood stain or leave the natural bark intact for a woodland theme appearance. Lean the finished ladder against a wall at a 10 to 15 degree angle for stability. Drape blankets, fairy lights, or seasonal decorations like garlands across the rungs. A branch ladder measuring 5 feet tall by 20 inches wide holds up to 8 pounds of decorative items across all rungs combined when leaned against a solid wall.
10. Branch Holiday Ornament Display
A branch holiday ornament display uses a tall, multi-branched tree limb as a natural alternative to a traditional Christmas tree or seasonal decoration stand. The branch stands in a weighted container like a sand-filled pot or cement-filled bucket and holds hanging ornaments on each side twig. I used a 4-foot birch branch with 12 natural side twigs as my holiday display for two consecutive years. It occupied less floor space than a full tree and required no lights of its own.

Setting Up a Branch Ornament Display
Select a branch with multiple side twigs spaced across its full height. Place the base of the branch in a terracotta pot or bucket and fill around it with sand, gravel, or quick-set cement to hold it upright. Allow cement to cure for 24 hours before hanging ornaments. Hang lightweight ornaments including glass baubles, wooden cutouts, and paper decorations from the side twigs using thin ribbon or ornament hooks. Limit each twig to ornaments weighing no more than 2 ounces to prevent bending.
Decorating Styles for Branch Ornament Displays
A minimalist style uses white or clear ornaments only on a bare branch with no added paint. A boho style adds dried orange slices, cinnamon sticks, and fabric bunting alongside glass ornaments. A glam style uses gold and silver metallic ornaments paired with fairy lights draped across the twigs. Spray painting the entire branch white before decorating creates a cleaner, more modern appearance while keeping the natural branch structure visible beneath the paint.
11. Branch Wind Chime
A branch wind chime suspends small hanging objects from a horizontal branch so they produce sound when moved by outdoor wind. Common hanging elements include painted wood slices, clay discs, shells, metal washers, and ceramic beads. I made a wind chime using a 16-inch branch and 8 clay discs I stamped with leaf prints. The total cost was $6, and it has hung on my patio for over a year without any deterioration.
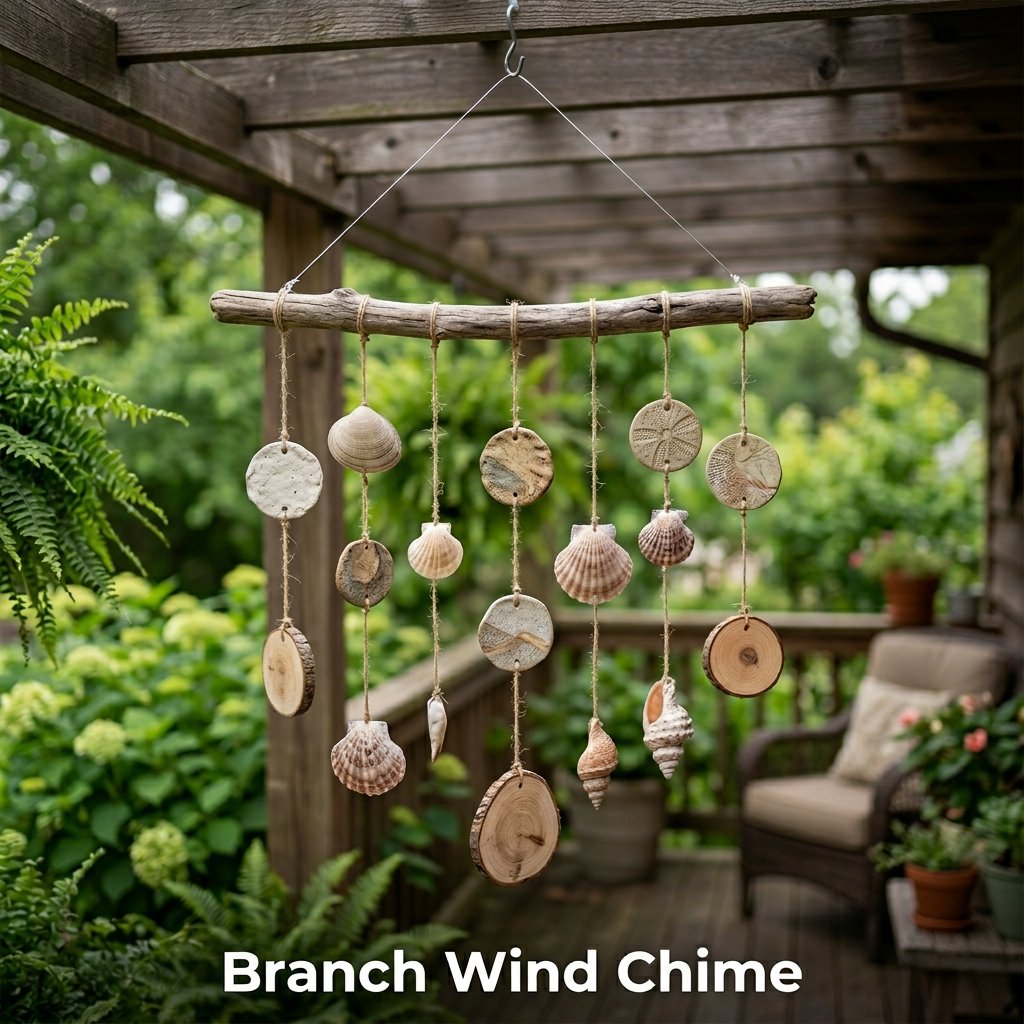
How to Make a Branch Wind Chime
Select a branch measuring 14 to 20 inches long. Tie a length of fishing line or twine to each end for the top hanging loop. Cut 6 to 10 additional lengths of twine measuring 8 to 14 inches each for the hanging strands. Space the strands evenly across the branch at 1.5 to 2 inch intervals. Tie one hanging element to the bottom of each strand. Vary the strand lengths by 1 to 2 inches so elements hang at different heights and strike each other when the wind moves them.
Best Materials for Wind Chime Elements
Ceramic and clay discs produce a soft tapping sound when they contact each other. Metal washers and old keys produce a sharper, louder tone. Painted wood slices produce a muted knock. Shell pieces produce a light, high-pitched sound. Mix 2 material types on the same branch to create a layered sound effect. Seal wood slice elements with outdoor varnish before hanging to prevent weathering. Avoid using paper or cardboard elements outdoors as these deteriorate in rain within 1 to 2 weeks.
12. Branch Canopy Bed Frame Accent
A branch canopy accent attaches 2 to 4 long branches horizontally above a bed frame to create a woodland theme ceiling feature from which fabric, fairy lights, or hanging plants are draped. This is one of the more involved creative tree branch crafts for adults, but the visual result changes the entire feel of a bedroom without painting walls or buying new furniture. I installed one above a guest bed using birch branches and white tulle, and the room looked completely different within 2 hours.

How to Install Branch Canopy Accents Safely
Attach two ceiling hooks into ceiling joists directly above the head and foot of the bed using a stud finder to locate joist positions. Hang each branch horizontally from the ceiling hooks using strong jute rope tied in a level knot. Branches measuring 5 to 6 feet long suit standard queen and king bed widths. Test each branch for stability before adding any draped fabric or lights. Each ceiling hook rated for 25 pounds supports one branch and its decorations safely when mounted into a joist.
Decoration Ideas for a Branch Canopy
Drape sheer white or ivory fabric panels over the branches, letting the fabric fall to the sides of the bed. Wrap warm white fairy lights along each branch and let the cord drape naturally between them. Hang small air plants or trailing pothos cuttings in lightweight hanging pots from the branch using twine. Dried eucalyptus bundles tied to the branch with jute twine add fragrance for 2 to 4 weeks after installation. Replace eucalyptus bundles monthly to maintain the scent.
13. Branch Twig Picture Ledge
A branch twig picture ledge uses a flat, wide branch slice as a wall-mounted mini shelf for leaning small framed photos, cards, or art prints without hanging them individually. This project suits minimalist and rustic decor styles and requires only a branch slice, two screws, and a drill. I installed three branch slice ledges in a staircase arrangement and they hold a rotating display of 4×6 inch prints that I update monthly without putting new holes in the wall.
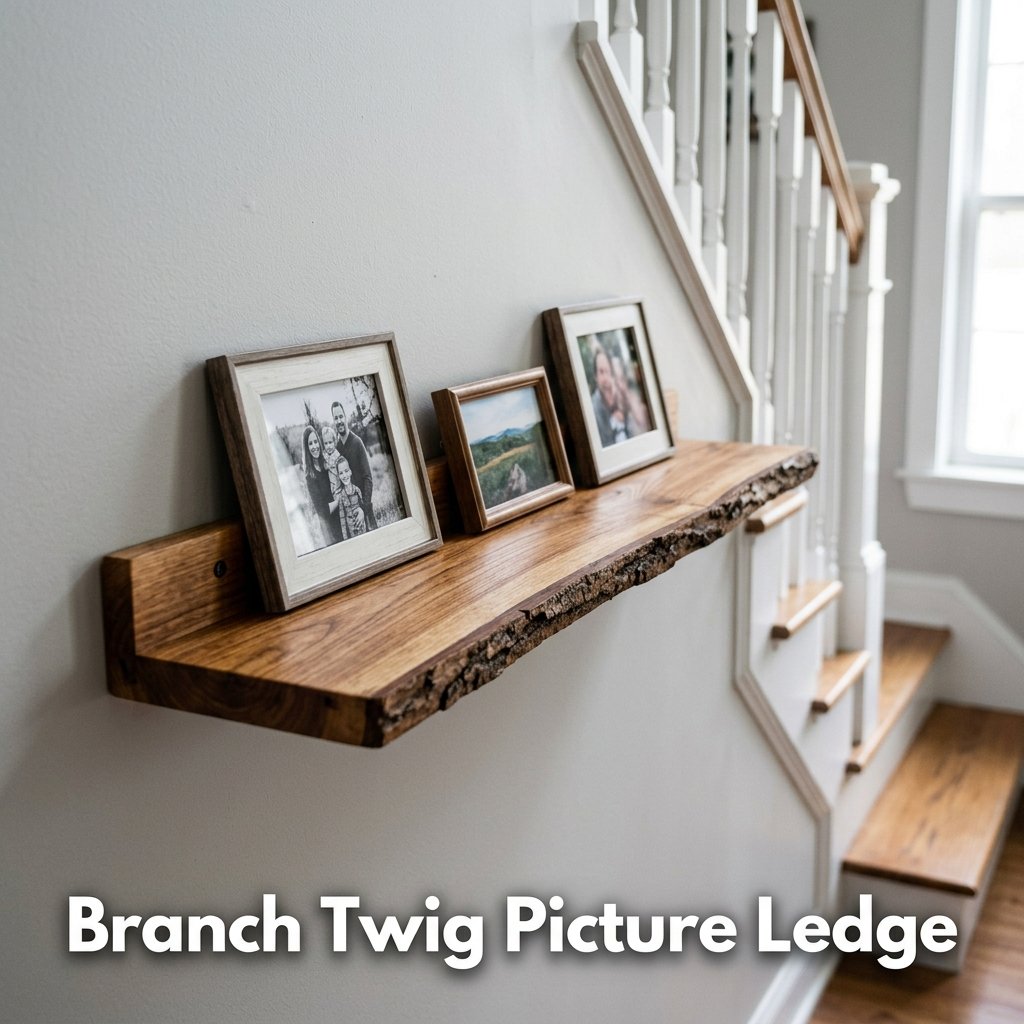
How to Make and Mount a Branch Slice Ledge
Cut a branch at a 45-degree downward angle on the back face to create a natural lip at the front that keeps items from sliding off. The front face remains flat. Sand all surfaces smooth and apply wood stain or sealant. Drill two pilot holes through the back of the branch slice and into wall studs. Drive 2-inch wood screws through the holes to mount the ledge flat against the wall. The angled back face creates a slight forward tilt that keeps leaned photos stable.
Sizing a Branch Twig Picture Ledge
A branch slice measuring 8 to 12 inches wide holds 2 to 3 small photos leaned side by side. A 14 to 18 inch slice holds 3 to 5 photos. Branch slices measuring 1.5 to 2 inches thick provide enough depth for the front lip to catch leaned frames without them tipping forward. Branches with a naturally flat grain like maple and ash cut into the cleanest and most level ledge surfaces. Oak and walnut slices add darker grain patterns that complement rustic and farmhouse decor styles.
14. Branch Twig Letters
Branch twig letters spell out words or initials using small twigs cut and arranged into letter shapes and glued onto a cardboard or foam board backing. This is one of the easiest creative tree branch craft ideas for beginners because it requires no power tools and produces a finished piece in under 2 hours. I made a set of letter initials for a nursery wall using twigs from a willow tree, and the total cost was $3 because the backing came from a recycled cardboard box.
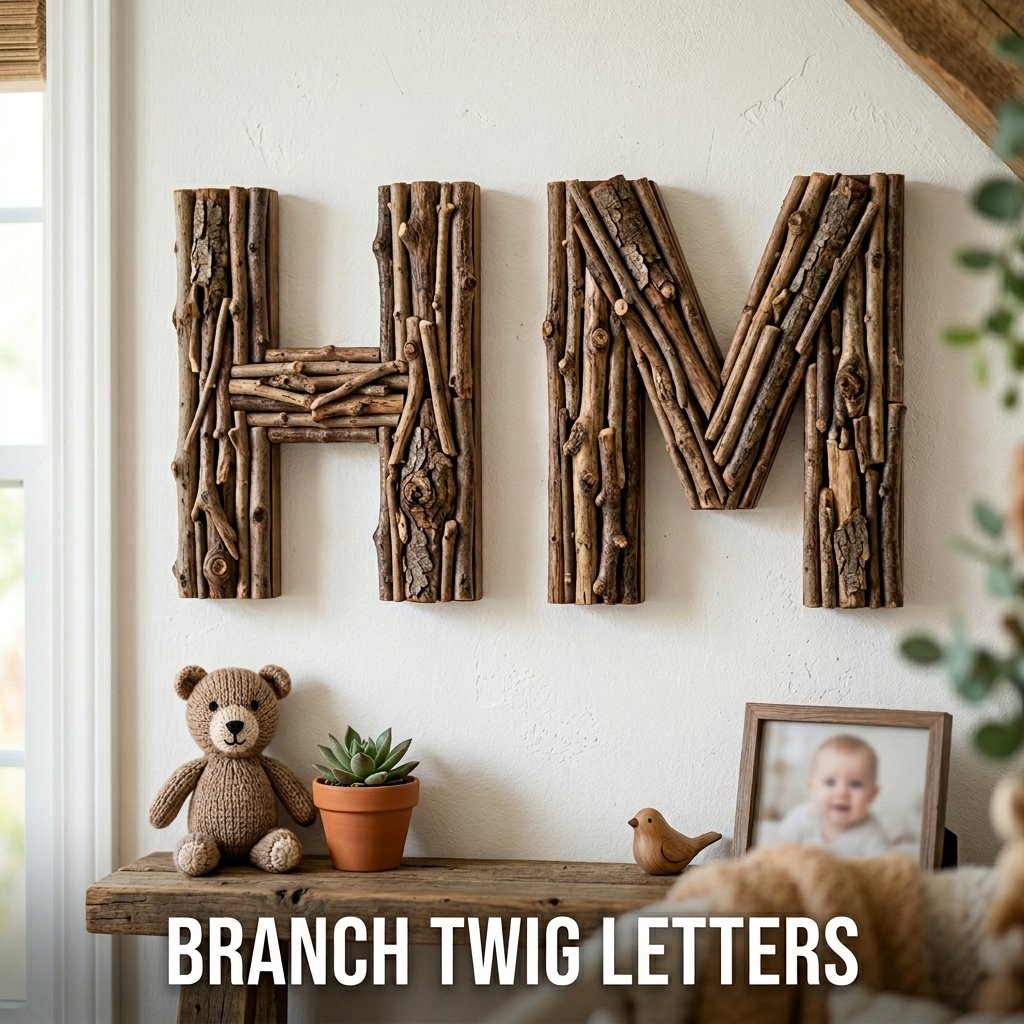
How to Make Branch Twig Letters
Print or draw your chosen letter in a large font on cardboard or foam board and cut out the shape. Sort collected twigs by thickness and cut them into short lengths of 1 to 4 inches using garden shears. Apply a line of hot glue to the letter surface and press twig pieces flat onto the glue, covering the full surface of the letter. Work in small sections so the glue does not dry before the twigs are placed. Fill all gaps with shorter twig pieces or small bark fragments.
Display Options for Branch Twig Letters
Hang completed twig letters on the wall using adhesive picture hanging strips rated for the letter’s weight. A twig letter measuring 8 inches tall weighs approximately 3 to 5 ounces depending on twig density, which falls within the capacity of standard command strips. Lean smaller letters against a shelf, mantle, or windowsill without mounting. Paint the entire twig surface white or gold using spray paint after assembly for a more polished, modern finish. Natural unpainted twig letters suit rustic, boho, and woodland decor themes without any added color.
Frequently Asked Questions
Where do I find tree branches for crafts?
Tree branches for crafts are collected from backyards, public parks, hiking trails, and roadsides after storms or seasonal pruning. Most parks allow visitors to collect fallen branches from the ground without cutting live trees. Local tree trimming companies frequently give away trimmed branches for free when contacted directly. Craft stores like Michaels and Hobby Lobby sell pre-cut decorative branches in bundles costing $5 to $15. Online retailers including Amazon and Etsy sell birch branch bundles, driftwood pieces, and decorative sticks in sizes suited for specific craft projects.
How do I prepare tree branches for indoor crafts?
Prepare tree branches for indoor crafts by removing loose bark, sanding the surface, and allowing the wood to dry fully before use. Fresh branches contain moisture that causes cracking and warping as they dry indoors. Allow freshly cut branches to air dry in a warm, ventilated space for 2 to 4 weeks before using them in finished projects. Brush off insects and debris with a stiff brush. Apply a coat of wood sealant or clear varnish to cut ends to slow the drying process and reduce the chance of splitting during the curing period.
What tools do I need for tree branch crafts?
The core tools for creative tree branch crafts are a handsaw or garden shears for cutting, sandpaper in 80 and 120 grit for smoothing, a glue gun for bonding, a drill for mounting holes, and a paintbrush for applying stain or sealant. A miter box helps produce clean, straight cuts on smaller twigs without a power saw. Most beginner projects require only a glue gun, sandpaper, and garden shears. Power tools become necessary only for projects involving structural mounting, shelf building, or precision cuts on branches thicker than 2 inches in diameter.
How do I make tree branch crafts last longer?
Tree branch crafts last longer when the wood is sealed with an outdoor or indoor wood sealant applied to all cut surfaces and exposed grain areas. Outdoor branch crafts benefit from 2 coats of waterproof polyurethane varnish applied before placement in the garden. Indoor branch crafts require only 1 coat of clear interior sealant. Avoid placing branch crafts in direct sunlight for extended periods, as UV exposure causes the wood to gray and crack faster. Reapply sealant to outdoor pieces every 12 months to maintain weather resistance and prevent deterioration of the wood surface.
What wood branch types work best for DIY crafts?
Birch, oak, maple, and willow are the most commonly used branch types for DIY nature crafts. Birch branches have smooth white bark that suits boho and minimalist decor styles. Oak and maple branches are dense and strong, making them suitable for structural projects like shelves, coat racks, and decorative ladders. Willow branches are flexible and work best for woven or bent projects. Avoid pine and spruce branches for indoor crafts because the resin they produce leaves sticky residue on surfaces and tools. Dry hardwood branches produce the cleanest cuts and the most stable finished pieces.