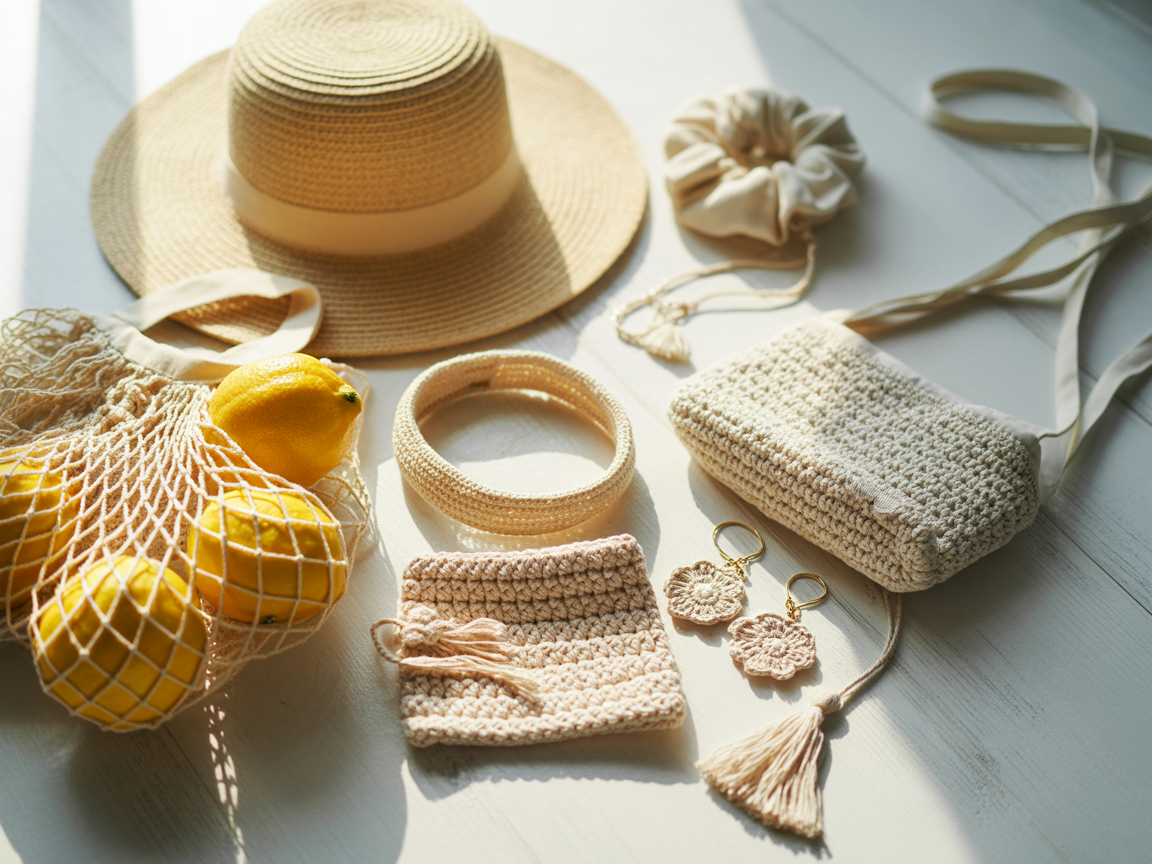
14 Summer Crochet Ideas – Accessories Edition
I finished my first summer crochet project in July, sitting on a beach towel with a hook, a ball of cotton yarn, and zero idea what I was doing. The result was a lopsided headband that I wore anyway because I made it myself and that felt like enough of a reason.
Summer crochet ideas are specific crochet projects made using lightweight yarn, primarily cotton or bamboo, that produce accessories and wearable items suited to warm weather use. I have crocheted through three summers now, and the accessories on this list are the ones I return to repeatedly because they are fast to finish, practical to use, and easy enough for beginners to complete without a printed pattern guide.
Most of the projects on this list take between one and six hours to complete and require less than 200 grams of yarn per item. I also noticed that summer crochet accessories get searched heavily on Pinterest and Etsy between April and August, which makes this an ideal category for anyone looking for summer crochet ideas to sell as handmade items.
Every project uses cotton yarn as the base material because cotton is breathable, washable, and holds stitch definition clearly in warm weather conditions. By the end of this list, you will know exactly which project to start first
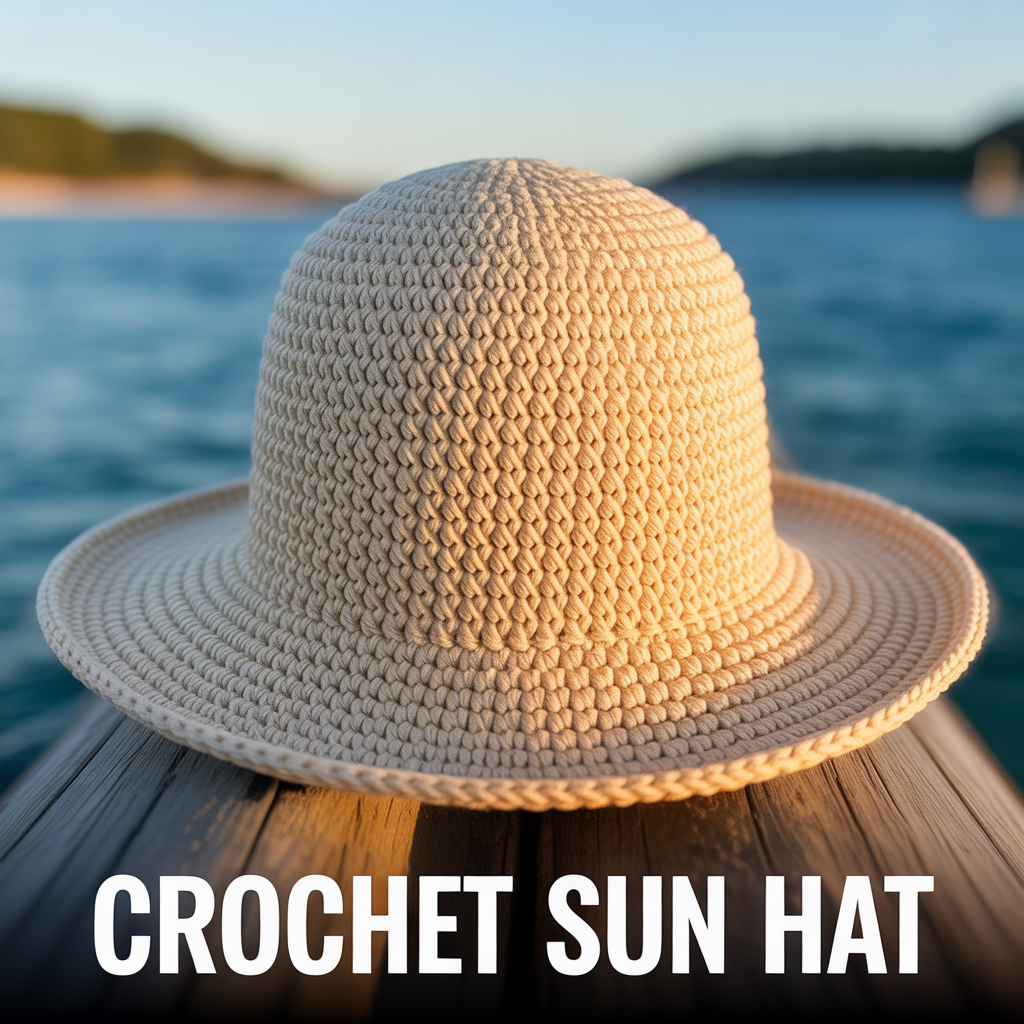
1. Crochet Sun Hat
A crochet sun hat is one of the most practical summer crochet ideas because it produces a wearable item that provides direct sun protection while displaying the texture and stitch work of the yarn clearly. I crocheted my first sun hat using a 4mm hook and 100% cotton yarn in a natural cream tone, and I wore it every weekend for the full summer. The finished hat took approximately four hours to complete from foundation ring to brim edge. Sun hats also sell consistently on Etsy between May and August for between $25 and $55 per piece.
What Yarn Works Best for a Crochet Sun Hat
100% cotton yarn in a DK or worsted weight produces the most structured, shape-retaining crochet sun hat for summer wear. Cotton holds its form after blocking and does not stretch out of shape in heat and humidity the way acrylic yarn does. I used a worsted weight cotton yarn for my first hat and achieved a firm brim that maintained its shape through a full day of outdoor use without drooping. Avoid using lightweight or lace weight yarn for sun hats because the finished fabric is too thin to hold the circular brim flat without internal wire support.
How to Crochet the Brim of a Sun Hat Flat
The brim of a crochet sun hat stays flat when stitches increase at a consistent rate of six additional stitches per round throughout the brim section. I work the brim by adding one extra stitch every six stitches across each round using double crochet, which distributes the increases evenly and prevents the brim from ruffling or cupping at the edges. If the brim begins to ruffle, the increase rate is too high and one plain round without any increases corrects the shape before the next increase round. I block the finished hat over a dinner plate or bowl form while damp to set the brim into its final flat position.
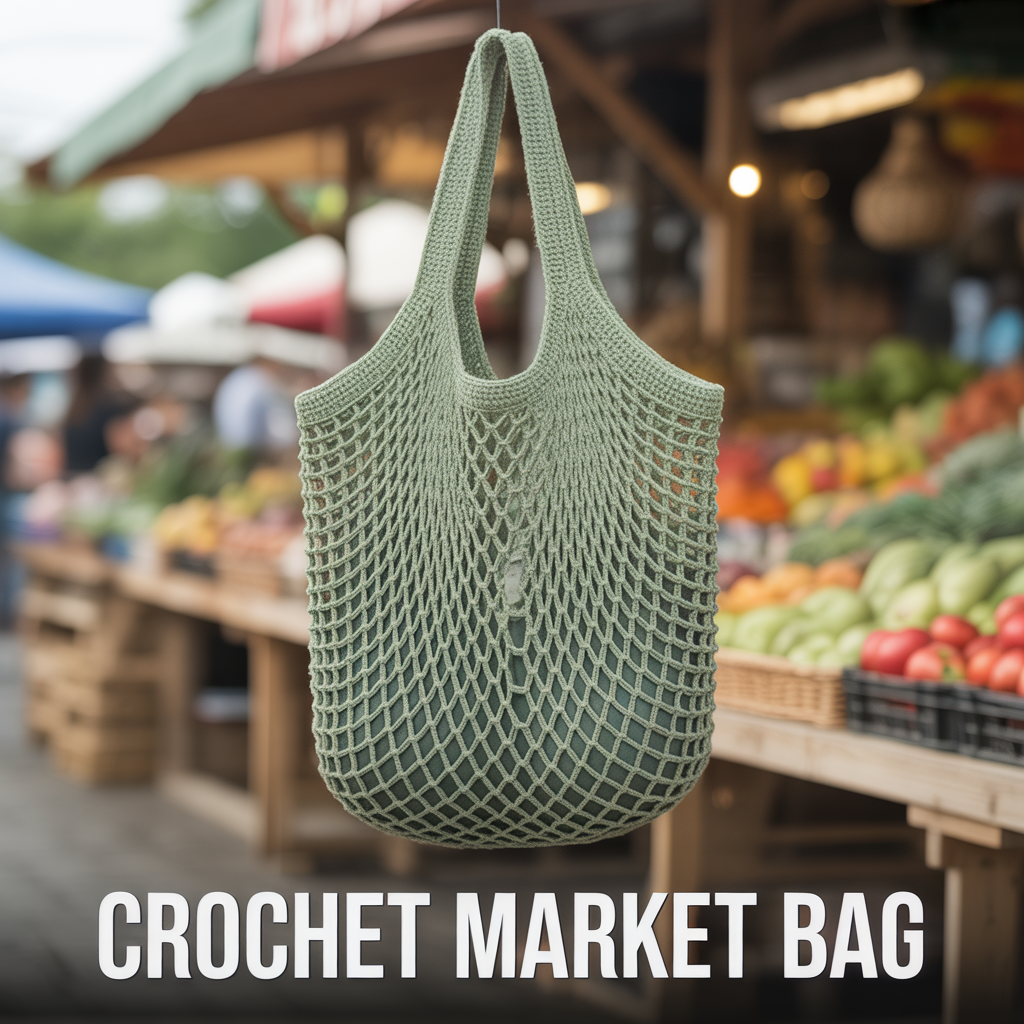
2. Crochet Market Bag
A crochet market bag is the most requested summer crochet project among beginner crocheters because it uses only chain stitch and double crochet worked in a mesh pattern that produces a stretchy, open-weave bag in under three hours. I made my first market bag using a 5mm hook and a single 100g ball of cotton yarn in sage green, and the finished bag expanded enough to hold a full week of produce from a farmers market. Market bags also sell well as summer crochet ideas to sell, with handmade versions listed on Etsy between $18 and $40.
What Hook Size Produces the Best Mesh Market Bag
A 5mm crochet hook paired with DK weight cotton yarn produces the most balanced mesh market bag, with openings large enough to show the mesh structure but small enough to hold standard produce without items falling through. I tested a 6mm hook on my second market bag and found the mesh openings were too large for small items like cherry tomatoes, which slipped through the gaps during carrying. A 4.5mm hook produces a tighter mesh that holds smaller items securely but reduces the stretch capacity of the finished bag by approximately 30 percent compared to a 5mm hook result.
How to Crochet Market Bag Handles That Do Not Stretch Out
Market bag handles resist stretching when worked in single crochet across a foundation chain of at least 60 stitches, then joined to the bag body at two reinforced attachment points on each side. I work three rows of single crochet for each handle strip rather than one, which produces a thick, stable handle that distributes the bag’s weight across a wider surface area when carried over the shoulder. I sew each handle end to the bag body using a whip stitch worked at least six times through both layers before finishing with a slip stitch to lock the join. Test the handle join by applying firm downward pressure before the bag is used for carrying.
3. Crochet Headband
A crochet headband is the fastest project on this list, with most versions taking between 30 and 90 minutes to complete depending on the stitch pattern and width chosen. I crocheted a set of five headbands in a single afternoon using cotton yarn scraps left over from larger projects, and every headband sold within two days of listing them on Etsy at $10 each. A crochet headband suits summer crochet projects for beginners because it uses only one or two stitch types, requires no shaping, and produces a finished wearable item without any pattern reading experience.
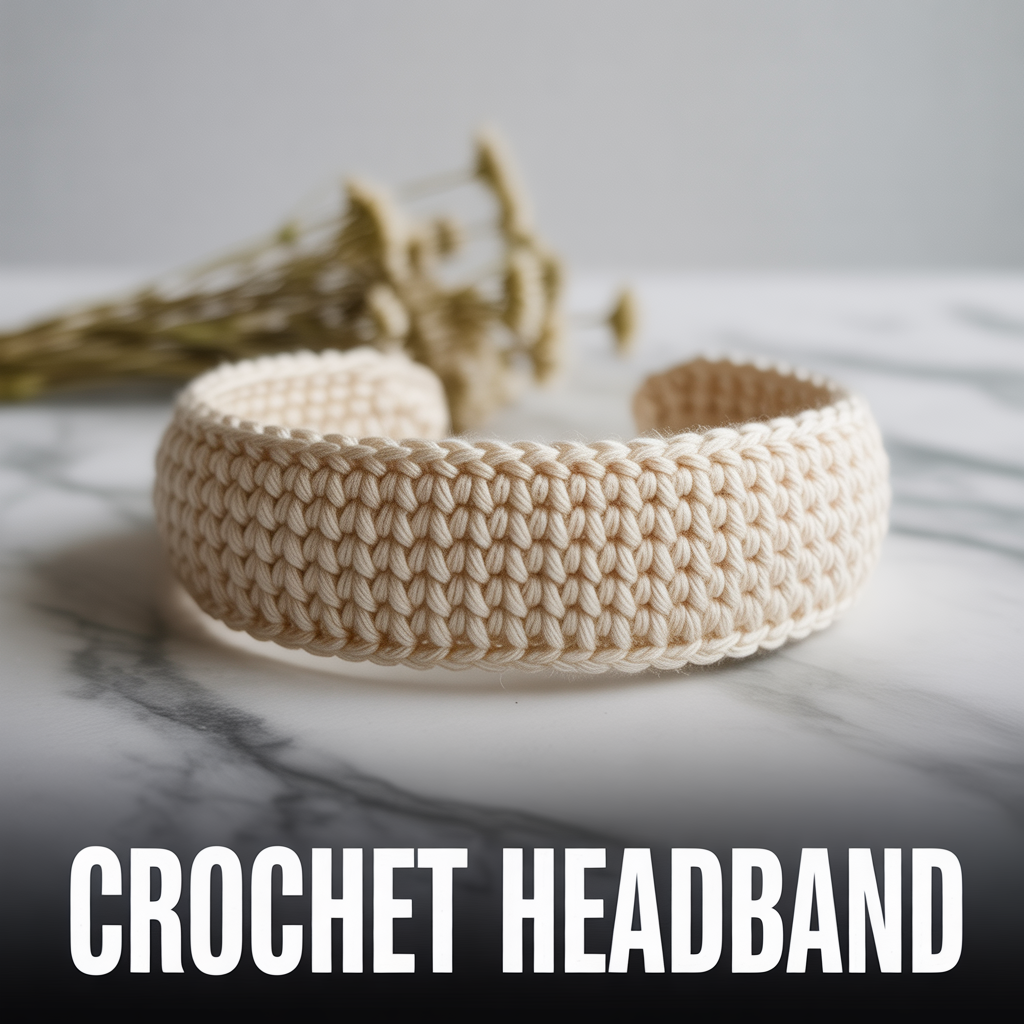
What Stitch Pattern Works Best for a Summer Crochet Headband
The moss stitch, also called the linen stitch, works best for a summer crochet headband because it produces a dense, textured fabric that holds its shape around the head without stretching wider during wear. I worked my first moss stitch headband in a cream cotton yarn using a 4mm hook, and the finished piece maintained its width after three months of regular use without any blocking or reshaping. The half double crochet stitch produces a softer, more stretchy headband that suits wider styles worn across the forehead. Avoid using open mesh or lace stitches for headbands because the fabric stretches too easily and does not hold position during wear.
How to Size a Crochet Headband for an Adult Head
A crochet headband for an adult head measures between 18 and 20 inches in finished circumference, depending on the stretch ratio of the stitch pattern used. I measure my own head at 22 inches and crochet headbands to a finished flat length of 19 inches, which provides a snug fit with light tension when worn. For stretchy stitch patterns like half double crochet, I reduce the finished flat length by 2 inches to account for the additional stretch during wear. For firm stitch patterns like the moss stitch, I crochet to 20 inches flat before joining the ends. Always try the headband around the head before finishing the join to confirm the fit.
4. Crochet Tote Bag
A crochet tote bag is a structured summer accessory that holds its shape when worked in a tight single crochet stitch using cotton yarn and a hook one size smaller than the yarn label recommends. I crocheted a medium-sized tote bag in a natural cotton yarn using a 3.5mm hook, and the finished bag stood upright on its own when placed on a flat surface without any internal stiffening. Crochet tote bags rank among the top-selling summer crochet ideas to sell on Etsy, with handmade versions priced between $35 and $75 depending on size and yarn quality.

What Yarn Weight Produces the Most Structured Crochet Tote Bag
Worsted weight cotton yarn produces the most structured crochet tote bag because the yarn thickness combined with a tight single crochet stitch creates a firm, dense fabric that holds its shape under the weight of everyday bag contents. I filled my finished tote with a water bottle, a book, and a wallet, and the bag retained its rectangular shape without sagging at the base or bulging at the sides. DK weight cotton yarn produces a lighter tote bag that suits carrying lighter items but requires a lining fabric sewn inside to prevent contents from distorting the bag shape over time.
How to Crochet a Flat Base for a Tote Bag
A flat, oval tote bag base results from working a foundation chain of the desired base length and increasing at both short ends of the oval across each round until the base reaches the correct width. I chain 20 stitches for a standard medium tote base, work single crochet along both sides of the chain, and increase by 6 stitches at each short end across three rounds to create an oval base measuring approximately 10 inches long and 5 inches wide. After the base reaches the correct dimensions, I stop increasing and work straight rounds upward to build the bag walls. Check the base lies completely flat on a hard surface before starting the wall rounds.
5. Crochet Bucket Hat
A crochet bucket hat is a structured summer head covering that suits both beach and casual street wear and requires approximately three to five hours to complete using worsted weight cotton yarn. I crocheted my first bucket hat in a terracotta cotton yarn using a 4mm hook, and the finished hat sold within four hours of being listed on my Etsy shop at $32. Bucket hats are among the most searched summer crochet ideas on Pinterest between March and July and suit both beginner and intermediate skill levels depending on the stitch pattern chosen.
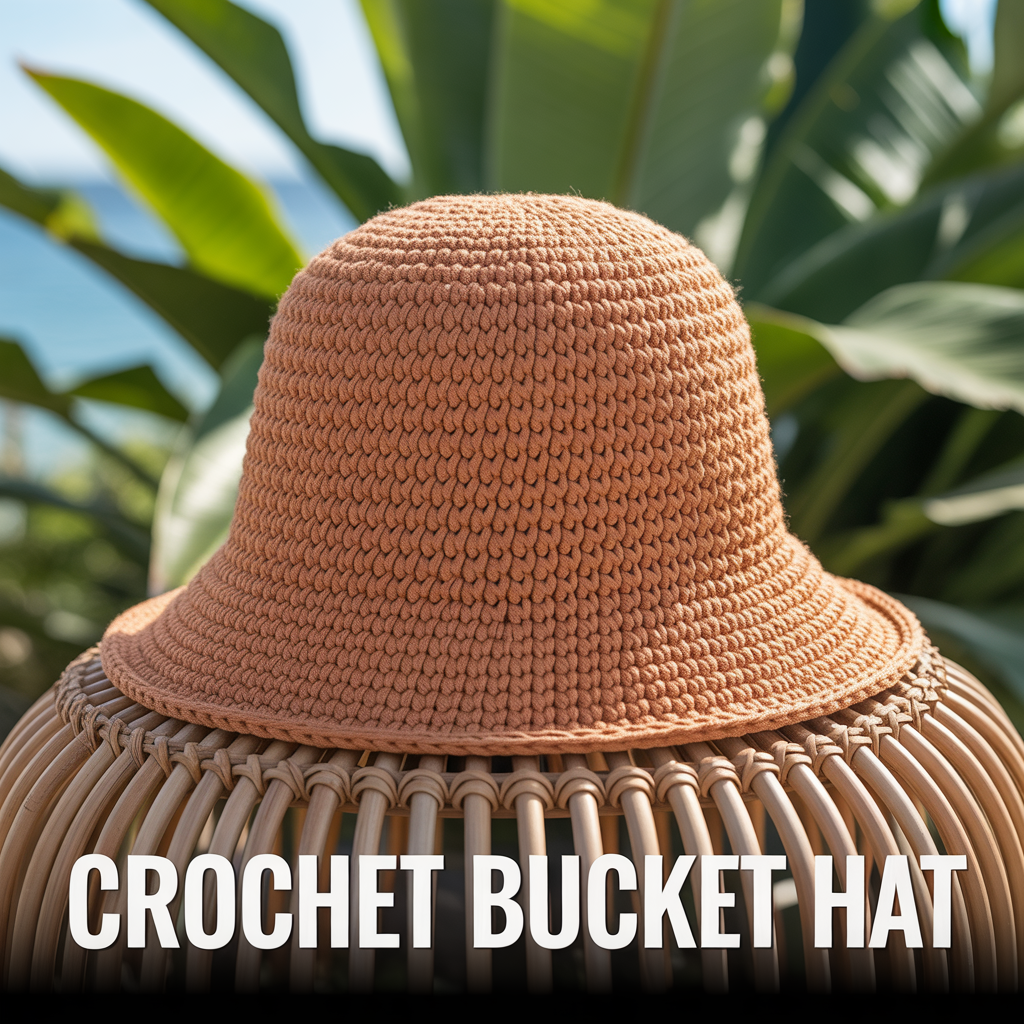
How a Crochet Bucket Hat Differs From a Sun Hat in Construction
A crochet bucket hat differs from a sun hat in that the brim is shorter and worked straight downward at a 90-degree angle from the hat body, rather than extending outward in a flat horizontal plane. I work the bucket hat brim by joining stitches at the lower edge of the hat body and working downward for approximately 2 to 3 inches without any increases, which produces the characteristic downward-angled brim shape. A sun hat brim extends outward horizontally using increasing rounds, which produces a wider brim with stronger sun coverage. Both styles use the same crown construction method based on a magic ring with six increasing rounds to build the top of the hat.
What Hook Size Produces a Firm Bucket Hat Shape
A 4mm crochet hook paired with worsted weight cotton yarn produces a firm bucket hat that holds its circular shape without collapsing during wear or storage. I tested a 5mm hook with the same yarn weight and found the resulting fabric was too loose to maintain the hat’s structured brim without blocking. Blocking a finished bucket hat over a bowl or hat form while damp sets the shape permanently and improves the fit around the head. I block all my bucket hats for a minimum of 4 hours before listing them for sale to confirm the shape holds after drying completely.
6. Crochet Scrunchie
A crochet scrunchie is the smallest and fastest project on this list, taking between 15 and 25 minutes per piece using a small amount of cotton yarn and a 4mm hook. I made a set of 20 crochet scrunchies in one afternoon using yarn scraps and elastic from a craft supply store, and all 20 sold within three days of listing at $7 each on Etsy. Crochet scrunchies suit summer crochet projects for beginners because they require only chain stitch and single crochet worked over a length of elastic, with no shaping or pattern reading required.

What Elastic Width Produces the Best Crochet Scrunchie
Elastic measuring 0.5 inches wide and cut to 9 inches in length produces the best crochet scrunchie for standard adult hair sizes. I tested 0.25-inch elastic on my first set of scrunchies and found it folded inside the crochet fabric during wear, which caused the scrunchie to lose its gathered appearance within minutes of use. The 0.5-inch elastic maintains its flat position inside the crochet cover and keeps the scrunchie gathered consistently throughout the day. For children’s scrunchies, I reduce the elastic length to 7 inches and keep the yarn and hook size identical to maintain the same gathered proportion on a smaller circumference.
How Many Stitches to Crochet Over the Elastic for Full Gathers
Working between 90 and 110 single crochet stitches over a 9-inch elastic length produces full, evenly distributed gathers across the finished crochet scrunchie. I work 100 single crochet stitches over my elastic as a standard count and achieve full gathers with no flat sections visible between the crochet clusters. A stitch count below 80 produces sparse gathers and a flatter-looking scrunchie that does not photograph well for Etsy listings. A count above 115 produces overly dense gathers that sit stiffly on the elastic rather than draping softly. Join the last stitch to the first with a slip stitch and weave in both ends securely before use.
7. Crochet Crossbody Bag
A crochet crossbody bag is a small structured bag worn across the body on a long strap and suits beach outings, markets, and casual summer events where carrying a full-sized bag is impractical. I crocheted a rectangular crossbody bag in a mustard cotton yarn using a 3.5mm hook and a single crochet stitch, and the finished bag measured 8 inches wide and 6 inches tall with a 48-inch adjustable strap. Crossbody bags sell well as summer crochet ideas to sell on Etsy, with handmade versions priced between $30 and $65 depending on yarn type and finishing details.
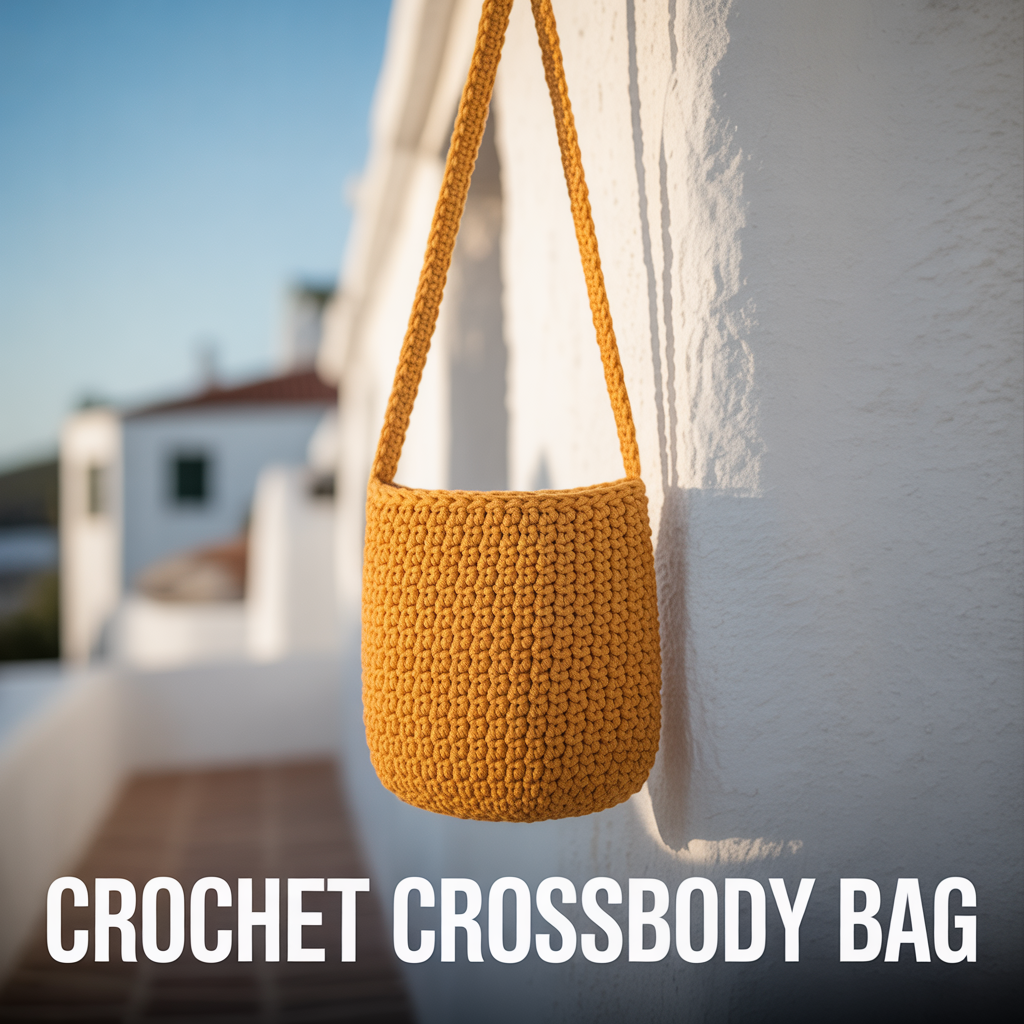
How to Crochet an Adjustable Bag Strap
An adjustable crochet bag strap requires a metal slider ring and two D-rings sewn to the bag body, with the strap threaded through the hardware to allow length adjustment between 40 and 55 inches. I crochet the strap as a long single crochet strip measuring 3 stitches wide and 60 inches long, which threads through the slider hardware and provides a full range of length adjustment. For a non-adjustable fixed-length strap, I crochet the strip to the exact desired length and sew each end directly to the bag body at reinforced attachment points. Test the strap hardware by applying full downward body weight before the bag is used for carrying.
How to Add a Zipper to a Crochet Crossbody Bag
A zipper attaches to a crochet crossbody bag by hand-sewing the zipper tape to the interior top edge of the bag using a whip stitch worked through every other chain space along the opening. I use a 7-inch nylon coil zipper for standard crossbody bag sizes and sew it in place using a tapestry needle and matching thread rather than sewing machine stitching. I pin the zipper tape to the bag opening before sewing to confirm the zipper pull clears the bag edges when opened fully. A magnetic snap closure is an easier alternative to a zipper for beginner crocheters who have not yet worked with hardware installation on handmade bags.
8. Crochet Sandals
Crochet sandals are a wearable summer crochet project that pairs a crocheted upper section with a pre-made rubber or foam sole purchased from a craft supply store or online retailer. I completed my first pair of crochet sandals using a 3.5mm hook, cotton yarn in a natural tone, and a pair of pre-drilled flip-flop soles that I purchased for $4 from an online craft supplier. The total project time was approximately five hours for both sandals. Crochet sandal patterns are available as free summer crochet patterns PDF on several crochet blogs and pattern sites including Ravelry.
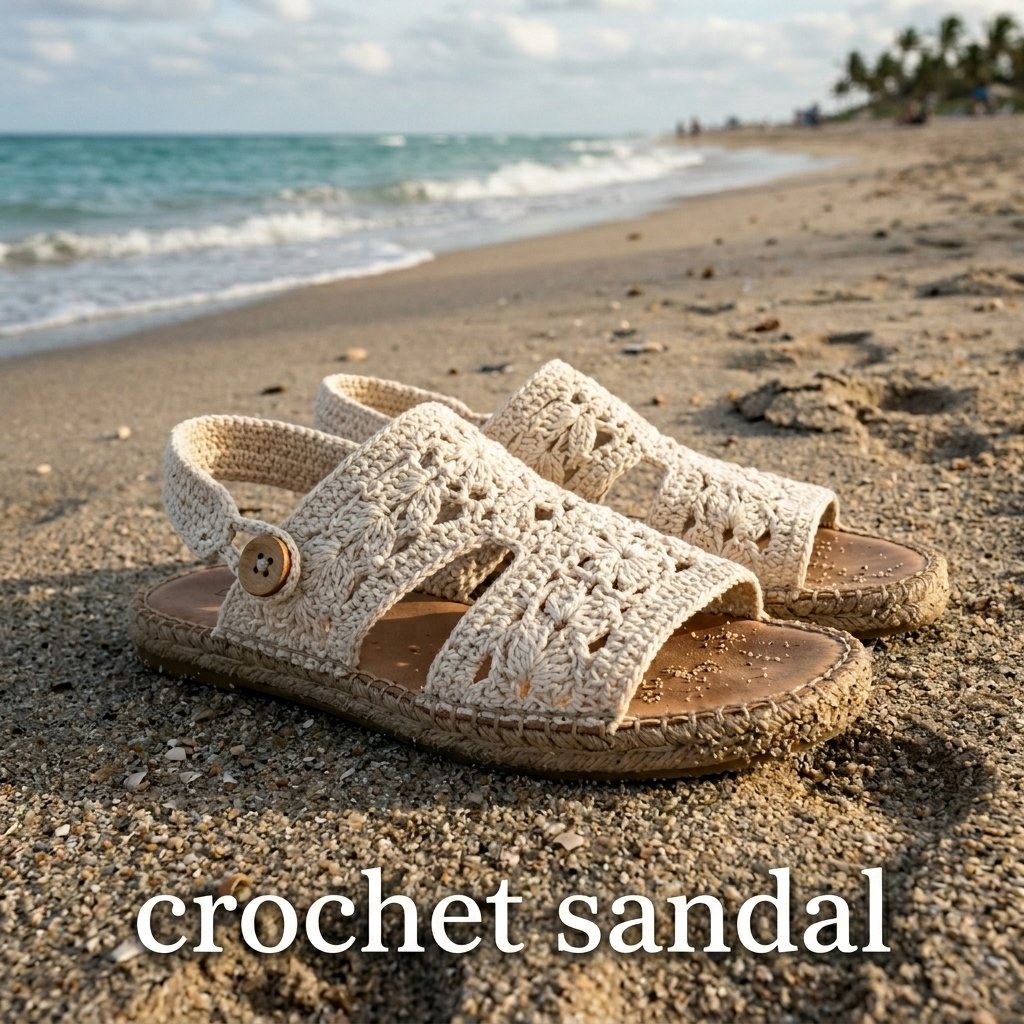
What Sole Type Works Best for Crochet Sandals
Pre-drilled rubber flip-flop soles with evenly spaced holes around the perimeter work best for crochet sandals because the holes provide secure attachment points for the crochet upper without requiring any additional tools or adhesives. I attach the crochet yarn directly through each hole using a single crochet stitch worked around the sole edge, which creates a firm base row for building the sandal upper. Foam soles are lighter but compress under body weight and reduce the durability of the finished sandal after extended daily wear. Rubber soles in 6mm to 8mm thickness provide the best balance of durability, flexibility, and attachment stability for handmade crochet sandals.
How to Size Crochet Sandal Uppers Accurately
Crochet sandal uppers size accurately when worked over a foot tracing placed beside the work at each stage to confirm the strap position and width before the upper is completed and attached permanently. I trace my foot onto paper before starting any sandal project and use the tracing as a sizing reference throughout the construction of the upper section. The strap across the top of the foot typically measures between 2 and 3 inches wide for an adult sandal, depending on the style. I try the partially completed upper over my foot after attaching the base row to confirm the strap tension before working additional rows that increase the height of the upper section.
9. Crochet Hair Clip Cover
A crochet hair clip cover is a small decorative accessory that attaches to a standard metal or plastic alligator clip to produce a handmade hair accessory in under 20 minutes per piece. I made a set of 15 crochet hair clip covers using yarn scraps and blank alligator clips purchased for $0.20 each, and all 15 sold within one week at $6 per clip. This project suits summer crochet ideas for beginners because it uses only chain stitch and single crochet, requires no pattern, and produces a finished sellable item in a very short time.
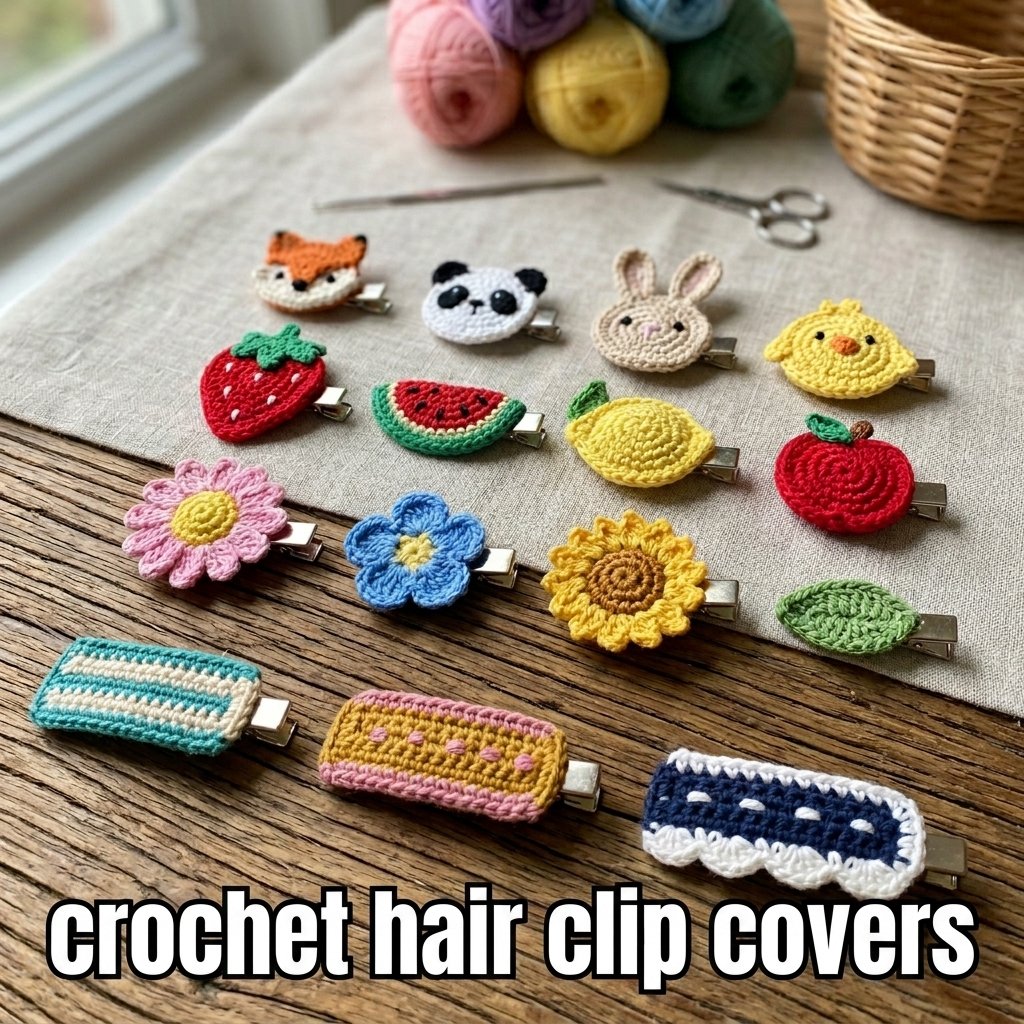
How to Attach a Crochet Piece to an Alligator Hair Clip
A crocheted decorative piece attaches to an alligator clip by weaving the yarn tail through the clip’s woven backing using a tapestry needle and securing it with at least four passes through the backing material before cutting the tail. I make a small crocheted flower or leaf shape as the decorative element, leave a 12-inch yarn tail at the finishing end, and use that tail to sew the piece onto the clip backing in a cross pattern for maximum hold. Avoid using glue to attach crochet pieces to hair clips because the adhesive loosens with exposure to hair products and body heat during wear. Thread the yarn tail through the clip hinge point for additional anchoring strength.
What Decorative Shapes Work Best on Crochet Hair Clips
Flowers, leaves, small bows, and geometric shapes in single or double crochet work best as decorative elements on crochet hair clips because all four shapes lie flat against the clip backing without adding bulk that would prevent the clip from closing around hair. I crocheted a five-petal flower in three rounds using a magic ring start, and the finished shape measured approximately 1.5 inches in diameter, which is the ideal size for an alligator clip without overhanging the clip edges. Avoid three-dimensional shapes such as stuffed animals or raised motifs on hair clips because the added depth prevents the clip from closing properly during use.
10. Crochet Sunglasses Case
A crochet sunglasses case is a soft protective pouch that holds a standard pair of sunglasses during travel and storage without scratching the lenses. I crocheted a sunglasses case in a sturdy cotton yarn using a 3.5mm hook and a tight single crochet stitch, and the finished case held its shape firmly enough to protect the glasses from minor impact inside a bag. This project takes approximately one to two hours and uses less than 50 grams of yarn, making it one of the most yarn-efficient summer crochet accessories on this list.
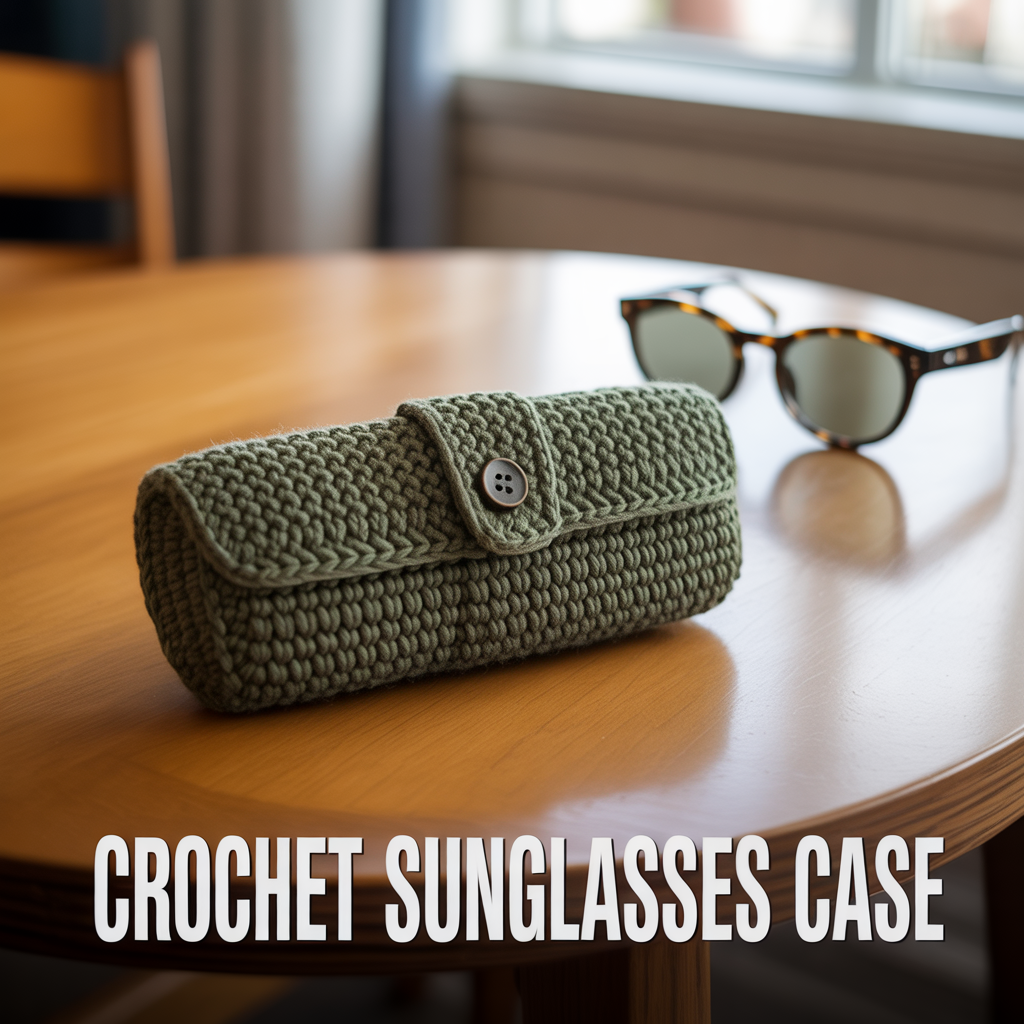
What Dimensions Fit Standard Sunglasses in a Crochet Case
A crochet sunglasses case measuring 7 inches long and 3.5 inches wide fits the majority of standard adult sunglasses frames with a small amount of ease for comfortable insertion and removal. I measure the widest point of the sunglasses frame before starting and add 0.5 inches to each dimension to determine the correct case size for each pair. Oversized or festival-style sunglasses frames require a case measuring 8 inches long and 4.5 inches wide to accommodate the larger lens area. I work the case as a flat rectangle folded in half and seamed along two sides, leaving one short end open as the entry point for the sunglasses.
How to Line a Crochet Sunglasses Case to Protect Lenses
A crochet sunglasses case protects lenses from scratching when lined with a soft fabric such as microfiber, felt, or fleece sewn inside the finished crochet pouch. I cut a fabric rectangle to the same dimensions as the open case, fold the edges inward by 0.25 inches, and hand-sew the lining inside the case using a whip stitch worked along all four edges. The lining sits inside the crochet walls and provides a smooth inner surface that
11. Crochet Keychain
A crochet keychain is a small decorative accessory attached to a metal key ring that takes under 15 minutes per piece and uses only a small amount of leftover yarn. I sold 30 crochet keychains at a craft fair in one afternoon at $5 each, and the total yarn cost for all 30 pieces was under $3. Crochet keychains suit summer crochet ideas for beginners because they require no pattern, use basic stitches, and allow complete creative freedom in shape and color selection. Free summer crochet patterns for keychains are also widely available on Pinterest and craft blogs.
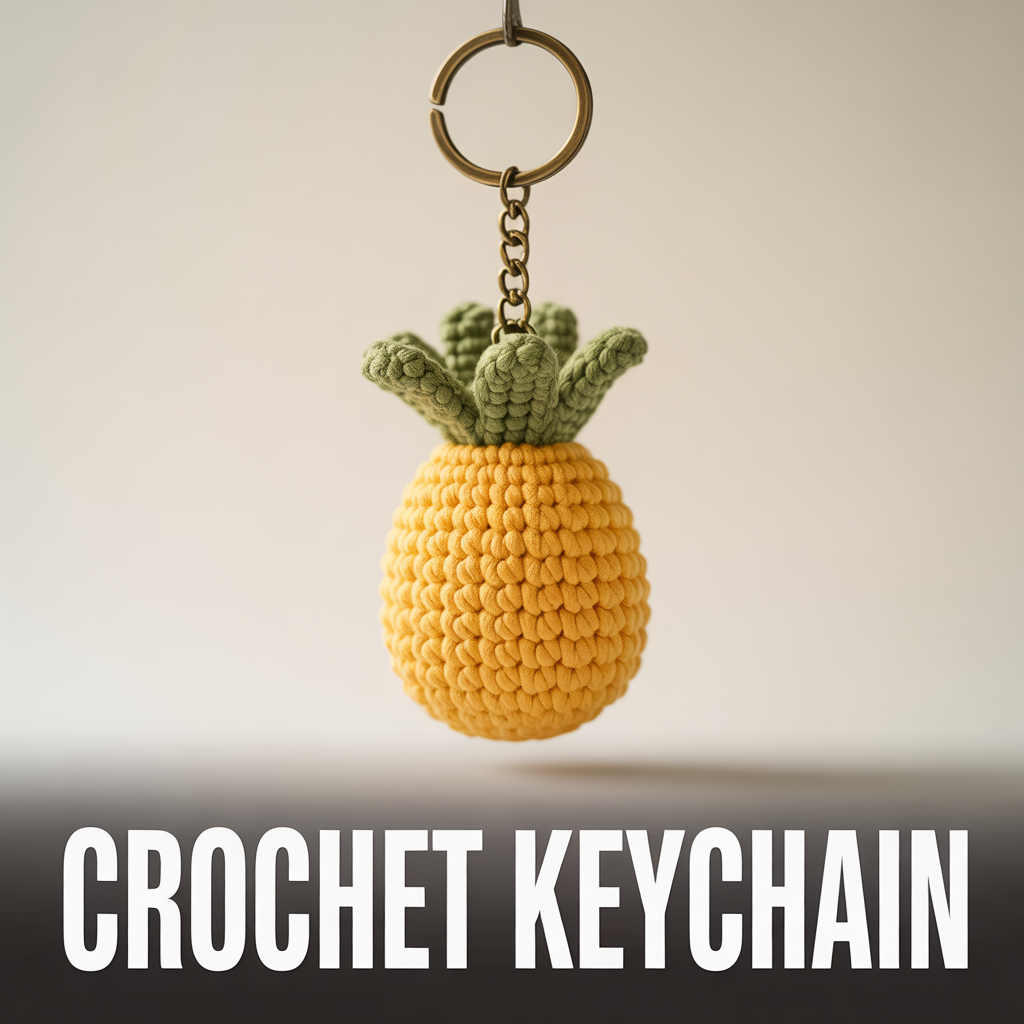
What Shapes Work Best for Crochet Keychains
Pineapples, cactus shapes, small bags, fruit slices, and simple flower motifs work best as crochet keychain shapes because all five are recognizable, photograph well for online listings, and complete in under 15 minutes each. I crocheted a mini pineapple keychain in yellow and green cotton yarn using a 3mm hook and stuffed it lightly with polyester filling before attaching it to a split key ring with a short chain length between the crochet piece and the ring. Stuffed three-dimensional shapes hold their form better than flat motifs on keychains because the filling prevents the shape from folding or creasing inside a bag or pocket during daily use.
How to Attach a Crochet Shape to a Key Ring Securely
A crochet shape attaches most securely to a key ring by threading the yarn tail through a short length of metal chain using a tapestry needle and then connecting the chain end to the key ring through a jump ring closed with pliers. I leave a 10-inch yarn tail at the top of each keychain shape and use that tail to sew through the bottom link of a 1-inch metal chain at least four times before knotting and cutting the excess. Direct attachment of yarn to a key ring without an intermediate chain causes the yarn to fray at the attachment point within two to three weeks of regular key-handling use.
12. Crochet Phone Bag
A crochet phone bag is a small fitted pouch worn around the neck or across the body on a long cord that holds a standard smartphone during outdoor summer activities. I crocheted a phone bag in a natural cotton yarn using a 3.5mm hook and sized it to fit a standard large-screen smartphone measuring 6.1 inches tall and 3 inches wide. The finished bag took approximately two hours to complete and sold on Etsy within 24 hours of listing at $22. Phone bags rank among the most searched lightweight crochet ideas for hot weather on Pinterest between June and August.
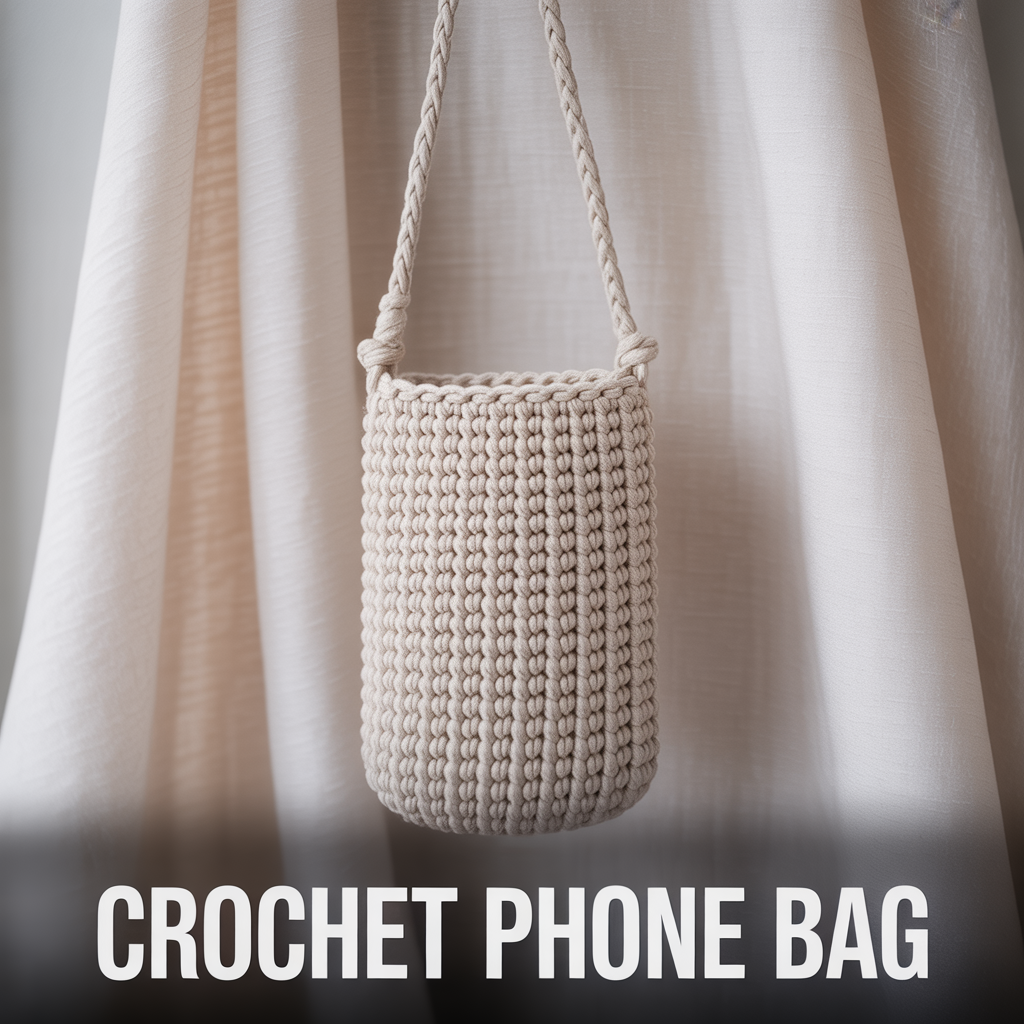
How to Size a Crochet Phone Bag for a Specific Phone Model
A crochet phone bag sizes correctly when the finished pouch measures 0.25 inches wider and 0.5 inches taller than the phone’s screen dimensions to allow easy insertion and removal without excessive ease. I measure each phone model before starting and add the stated allowance to both dimensions to determine the starting chain length and row count for the bag body. Single crochet worked on a 3.5mm hook produces approximately 18 stitches and 20 rows per 4 inches in worsted cotton yarn, which I use as my stitch gauge for calculating the correct chain length. Always check the gauge before starting a phone bag to confirm the finished size will match the intended phone model.
What Cord Length Works Best for a Crochet Phone Bag Worn Around the Neck
A cord length of 30 inches produces a phone bag that hangs at chest height when worn around the neck by an average adult, which is the most comfortable position for accessing the phone during outdoor activities. I crochet the cord as a chain of 90 stitches worked in slip stitch back along the chain for a firm, rounded cord that resists twisting during wear. A flat single crochet cord strip twists along its length when worn around the neck and requires periodic untwisting during use. I attach the cord ends to the top two corners of the phone bag using a slip stitch join reinforced with four additional whip stitches at each attachment point for maximum load-bearing strength.
13. Crochet Earrings
Crochet earrings are lightweight summer accessories made using fine cotton thread, a small steel hook, and metal earring findings available at most craft supply stores. I crocheted my first pair of crochet earrings using a 1.5mm steel hook and size 10 crochet thread, and the finished pair weighed less than 2 grams each, making them comfortable for all-day summer wear. Crochet earrings sell consistently on Etsy throughout the summer months at between $10 and $20 per pair and require less than 30 minutes per pair to complete once the basic shape is practiced.
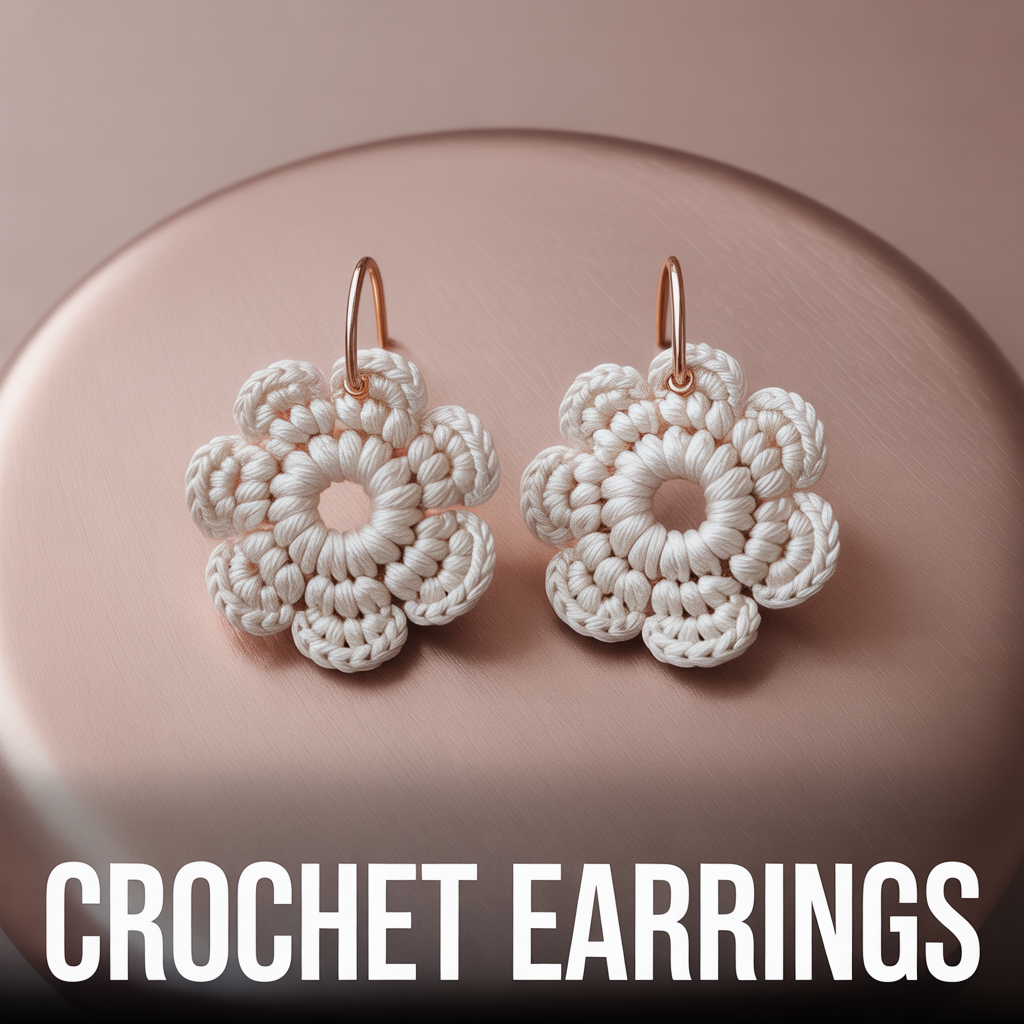
What Thread and Hook Size Produce the Best Crochet Earrings
Size 10 cotton crochet thread paired with a 1.5mm steel hook produces crochet earrings with a fine, delicate appearance that maintains stitch definition clearly in the finished piece. I used size 10 thread in a white cotton colorway for my first earring set and achieved clearly defined stitch detail visible from a standard conversational distance. Size 5 crochet thread produces a larger, more textured earring style that suits statement jewelry rather than everyday summer wear. Avoid using standard yarn for crochet earrings because the resulting piece is too thick and heavy to hang correctly from standard earring findings without pulling the ear forward during wear.
How to Attach Earring Findings to a Crochet Piece
Earring findings attach to a crochet piece by opening the finding’s jump ring with flat-nose pliers, threading it through the top stitch of the crochet motif, and closing the ring completely with pliers before the earring is worn. I use hypoallergenic surgical steel or sterling silver findings for all my crochet earrings because standard base metal findings cause skin reactions in a significant portion of buyers. Check that the jump ring is fully closed with no gap before wearing or selling the earring, as an open ring allows the crochet motif to detach from the finding during wear. I stiffen all finished crochet earring motifs with a light application of fabric stiffener spray before attaching the findings for a more structured appearance.
14.Crochet Belt
A crochet belt is a wearable summer accessory worked in a long, narrow strip of single or half double crochet that threads through belt loops or ties around the waist over a dress or skirt. I crocheted a natural cotton belt using a 4mm hook and wore it over a linen dress for an outdoor event, and three separate people asked where I purchased it before I told them I made it. A crochet belt takes approximately two to three hours to complete and suits summer crochet projects for beginners because it uses only straight rows of a single stitch type with no shaping required.
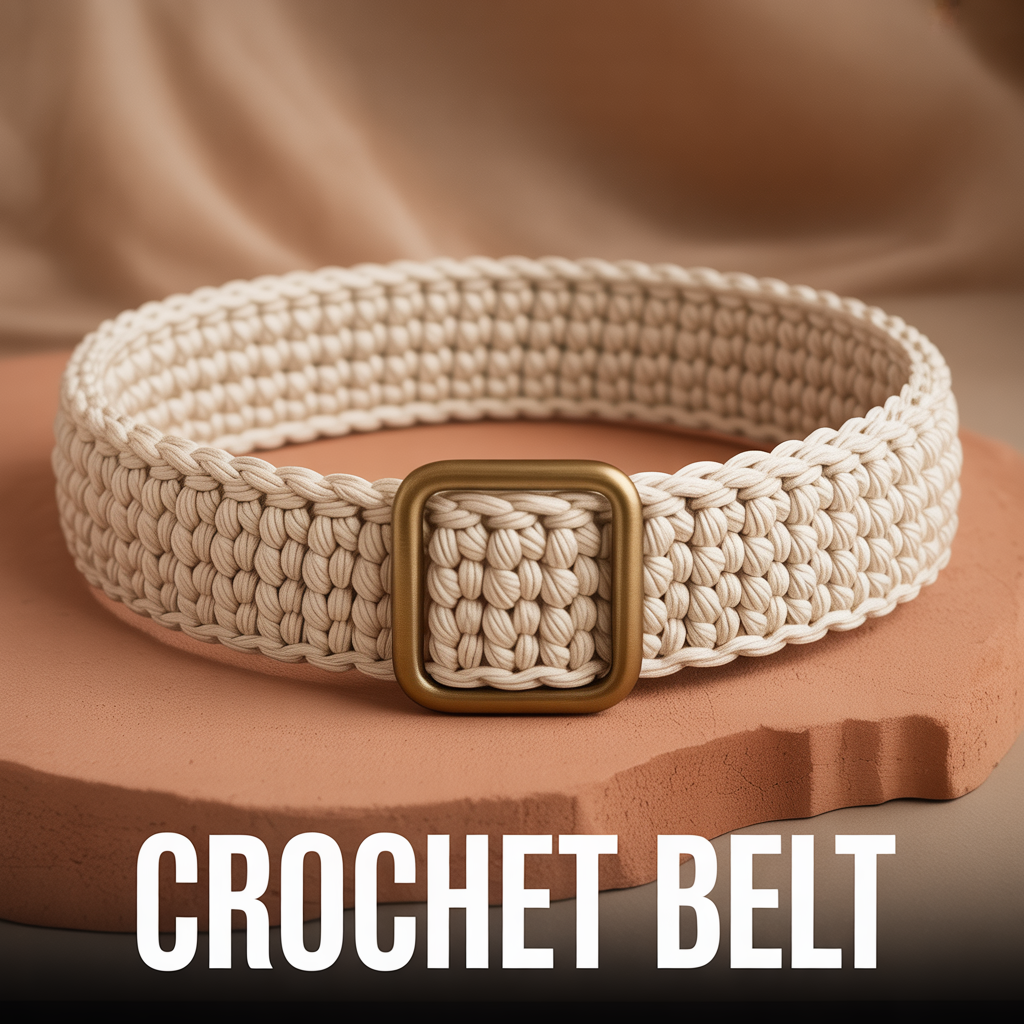
What Width and Length Work Best for a Crochet Belt
A crochet belt measuring 1.5 inches wide and 40 inches long fits most standard adult waist sizes from 26 to 36 inches when worn with the excess length tied at the front or threaded through a central buckle. I work my belts at 7 stitches wide using a half double crochet stitch on a 4mm hook, which produces a finished strip of approximately 1.5 inches in width with a consistent, even texture throughout. For a belt intended to thread through jeans or trouser belt loops, I reduce the width to 1 inch at 5 stitches to fit standard 1.25-inch belt loop openings. Always measure the belt loop width of the intended garment before starting to confirm the crochet width will thread through correctly.
How to Add a Buckle to a Crochet Belt
A buckle attaches to a crochet belt by folding the starting end of the belt strip through the buckle bar and sewing the folded section back onto itself using a tapestry needle and matching yarn in a whip stitch worked at least six times through both layers. I use a center-bar buckle in a brushed gold or antique brass finish for cotton crochet belts because both finishes complement natural and neutral yarn tones without overpowering the texture of the crochet fabric. For a tie-style belt with no hardware, I work a 10-stitch tapered point at both ends of the belt strip by decreasing one stitch per row across the final five rows to produce a clean, angled tip that ties neatly at the front.
Frequently Asked Questions
What is the best yarn for summer crochet ideas?
The best yarn for summer crochet ideas is 100% cotton yarn in a DK or worsted weight because cotton is breathable, washable, and does not cause overheating during warm weather wear. I use cotton yarn for every summer accessory project on this list and have found it holds stitch definition more clearly than acrylic yarn in lightweight crochet fabric. Bamboo yarn is the best alternative to cotton for summer crochet because it shares similar breathability and drying properties. Avoid wool yarn for summer crochet accessories because it retains heat, felts when washed incorrectly, and feels uncomfortable against skin in warm weather conditions.
What hook size should beginners use for summer crochet projects?
Beginners use a 4mm or 5mm crochet hook for most summer crochet projects worked in DK or worsted weight cotton yarn. I started with a 5mm hook because the larger hook size produces a looser stitch tension that is easier to insert the hook into on each stitch during learning. A 4mm hook suits projects requiring a firm, structured fabric such as bags, hats, and phone cases. The yarn label on every cotton yarn ball states the recommended hook size for that specific yarn weight, and following the label recommendation produces a fabric tension close to the pattern’s intended result for beginner crocheters.
How long do summer crochet accessories take to complete?
Summer crochet accessories take between 15 minutes for a scrunchie and six hours for a bikini top, depending on the project size and stitch pattern complexity. I completed a crochet headband in 35 minutes, a market bag in two and a half hours, and a sun hat in four hours during my first attempt at each project. Projects using single crochet stitch work up slower than projects using double crochet because single crochet produces shorter stitches per hook insertion. Beginner crocheters add approximately 30 to 50 percent additional time to the estimates above while building stitch consistency and hook control.
Are there free summer crochet patterns available online?
Yes, free summer crochet patterns are available on Ravelry, Yarnspirations, and numerous individual crochet blogs including The Crochet Crowd and Repeat Crafter Me. I have used free patterns from all three sources and found Ravelry’s pattern database the most comprehensive for summer crochet accessories, with filterable searches by yarn weight, skill level, and project type. Free summer crochet patterns PDF versions are available for direct download on most crochet blogs and allow offline reference during project work. Always check the pattern’s published gauge before starting to confirm your hook and yarn combination matches the pattern’s intended finished dimensions.