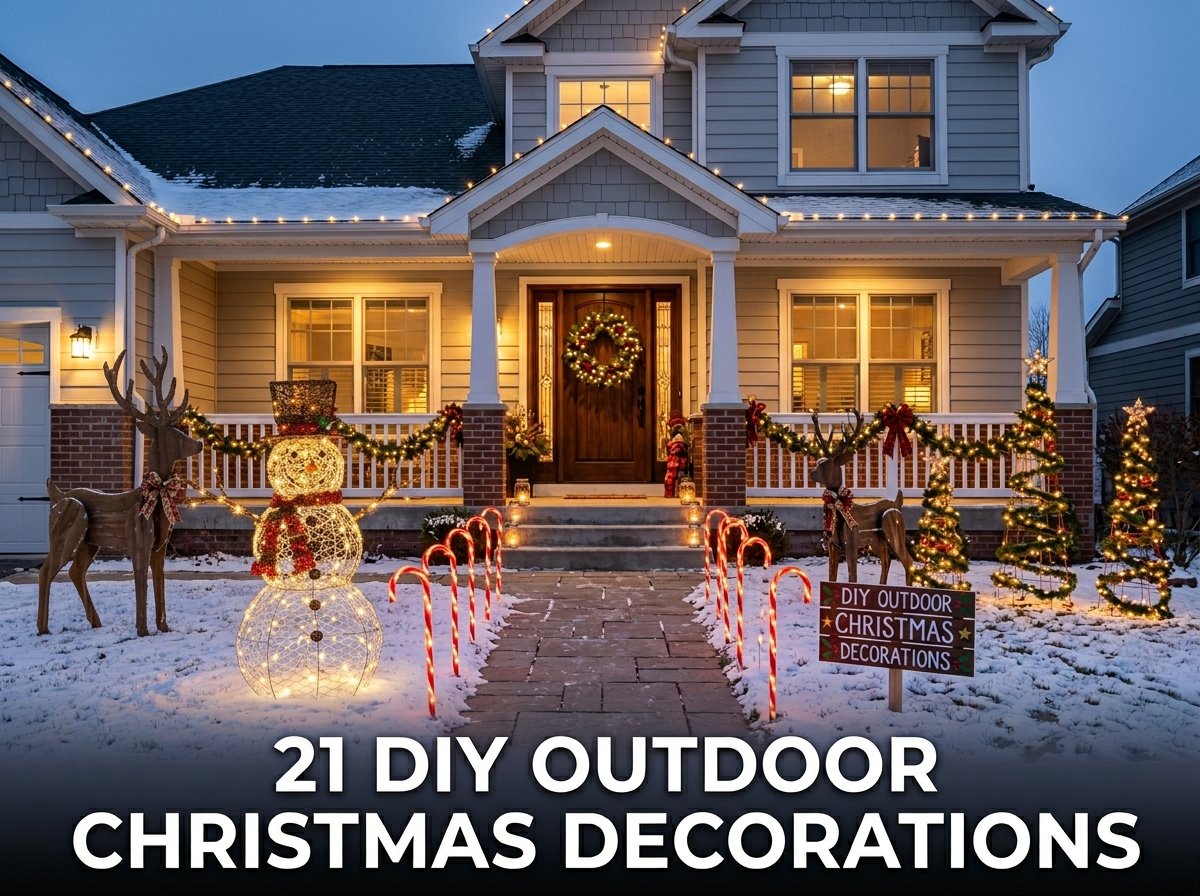
21 DIY Outdoor Christmas Decorations
Last December, my neighbor spent over two hundred dollars on store-bought outdoor Christmas decorations. Half of them broke before Christmas Eve. I spent forty dollars on materials and built everything myself. Every single piece survived the full season, including two rainstorms and one night of heavy wind.
DIY outdoor Christmas decorations cost significantly less than store-bought versions and last longer when built from weather-resistant materials like treated wood, PVC pipe, and outdoor-rated paint. Most of the projects in this guide cost between five and twenty dollars in materials and take under two hours to complete.
I have decorated my front yard and porch every Christmas for six years using handmade pieces. Some projects I repeated every year. Some I improved after the first season based on what the weather did to them. All of them drew more attention from neighbors than anything I ever bought at a shop.
This guide covers 21 DIY outdoor Christmas decorations that I have personally built or studied in detail. Each section includes the materials needed, the key construction steps, and practical advice for making each piece weather-resistant enough to last the full holiday season outdoors without falling apart.
1. Wooden Christmas Sign
A wooden Christmas sign is a painted board with a holiday message mounted on a stake or hung on a fence, wall, or porch railing as a DIY outdoor Christmas decoration. Pressure-treated pine boards cut to 12 by 24 inches produce outdoor signs that withstand rain and freezing temperatures without warping during a full holiday season. I made my first wooden Christmas sign using a single pine plank, outdoor acrylic paint, and two metal stakes driven into the front lawn.
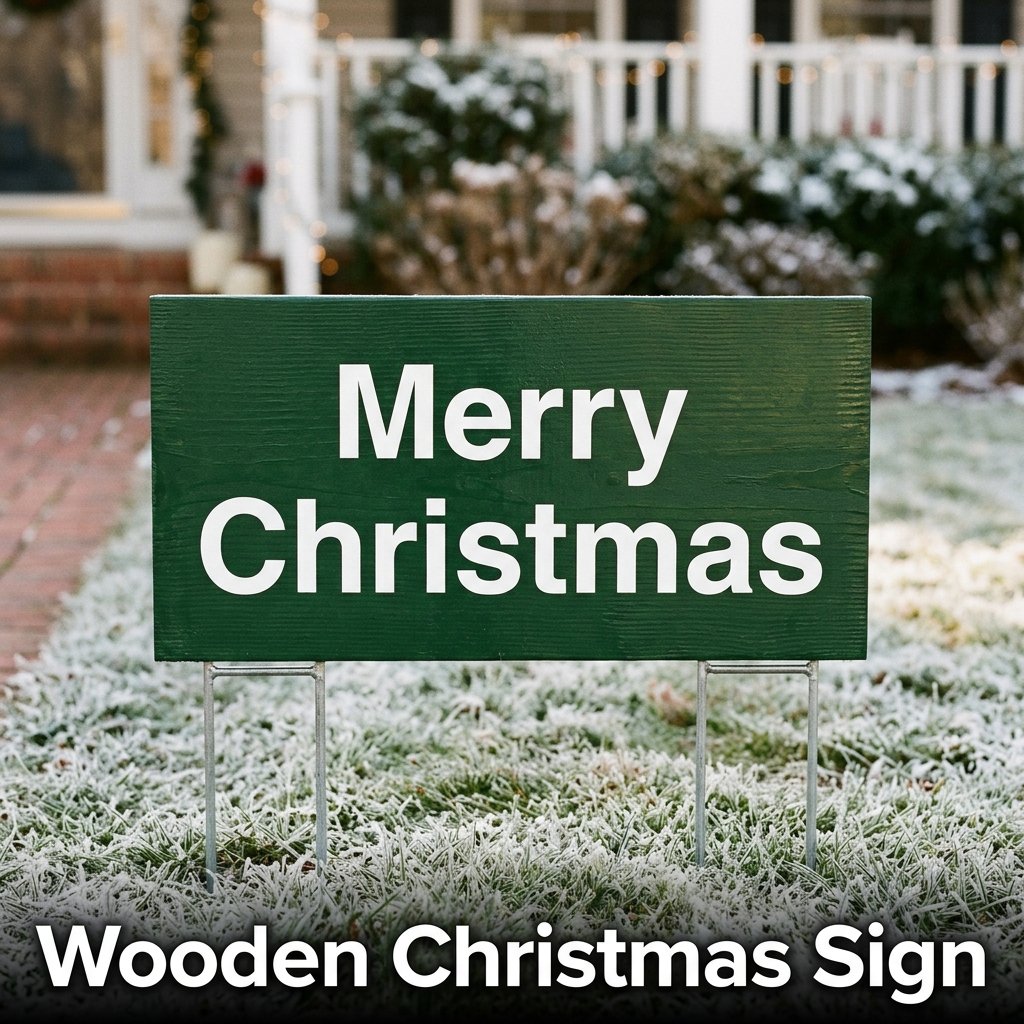
Cutting and Preparing the Board
Cut a pine board to your desired size using a hand saw or circular saw. Sand all edges smooth with 120-grit sandpaper to remove splinters. Apply one coat of outdoor primer to all surfaces and allow it to dry for two hours before adding paint. Priming is the step most beginners skip, and it is the main reason unpainted wood signs crack or peel after the first rain.
Painting the Message
Apply two coats of outdoor acrylic paint in your base color, allowing full drying time between coats. Once dry, paint or stencil your chosen message on the front face. Seal the finished sign with two coats of clear outdoor polyurethane varnish. I applied the varnish in thin, even layers using a foam brush and allowed 24 hours of curing time before placing the sign outside in December weather.
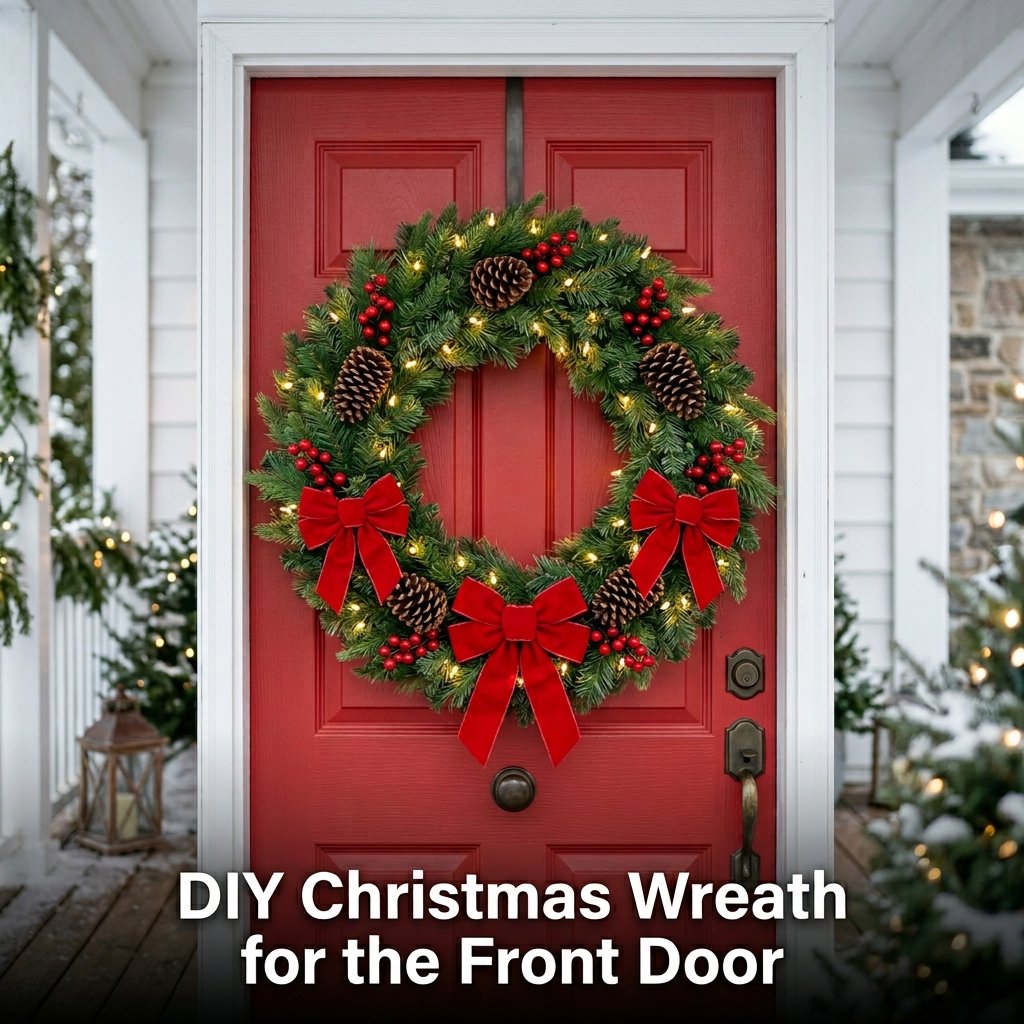
2. DIY Christmas Wreath for the Front Door
A DIY Christmas wreath for the front door uses a wire or foam base ring decorated with artificial greenery, ribbon, pinecones, and LED string lights to create a circular outdoor Christmas decoration. A 24-inch wire wreath frame holds enough decorative material to produce a full, layered wreath visible from the street in front of a standard residential home. I made one for my front door three years ago and still use the same base frame each December with refreshed decorations.
Building the Wreath Base
Attach artificial pine or fir branches to the wire frame by wrapping each stem around the frame wire and twisting it to secure. Work in one direction around the entire frame, overlapping each stem slightly so no wire shows through the finished front face. I used approximately 12 individual branch stems per 24-inch frame to achieve a full, dense coverage without any gaps showing through the front surface.
Adding Lights and Decorations
Wrap a battery-operated LED string light strand around the completed greenery base before adding any decorations on top. Battery-operated lights remove the need for an outdoor power cable running to the front door. I used 50 warm white LED lights on a 16-foot strand and wrapped them in three full circles around the wreath frame. Add ribbon, pinecones, and ornaments after the lights are in place and secure each item using floral wire.
3. PVC Pipe Candy Cane Stakes
PVC pipe candy cane stakes are curved white tubes painted with red diagonal stripes and pushed into the ground along a walkway or driveway as DIY outdoor Christmas decorations. Three-quarter-inch diameter PVC pipe in four-foot lengths produces candy cane stakes that are visible from the street and strong enough to stand upright in firm soil without additional support structures. I made a set of eight for my front walkway and the entire set cost eleven dollars in materials.

Shaping the PVC Pipe
Heat one end of each PVC pipe section using a heat gun set to medium temperature. Apply heat while rotating the pipe slowly so it warms evenly. Once the pipe becomes flexible, bend the heated end into a curved hook shape and hold it in that position until it cools and hardens, which takes approximately two minutes. Work outdoors and wear heat-resistant gloves throughout this step to avoid burns.
Painting the Stripes
Apply two coats of white outdoor spray paint over the entire pipe surface. Once dry, wrap strips of painter’s tape diagonally around the pipe at four-inch intervals to mask the areas that will stay white. Spray the exposed sections with red outdoor spray paint. Remove the tape after the red paint dries fully. I sealed the finished candy cane stakes with clear outdoor spray varnish to prevent the red paint from fading before the end of the season.
4. Outdoor Snowman Decoration
An outdoor snowman decoration uses three circular forms made from chicken wire stuffed with white plastic bags or white fabric, stacked and secured together, then dressed with a scarf, buttons, and a hat. Chicken wire forms measuring 18, 14, and 10 inches in diameter produce a snowman approximately 42 inches tall, which is visible from the street when placed in a front yard. I built one in about 90 minutes using materials bought at a hardware store for under fifteen dollars.
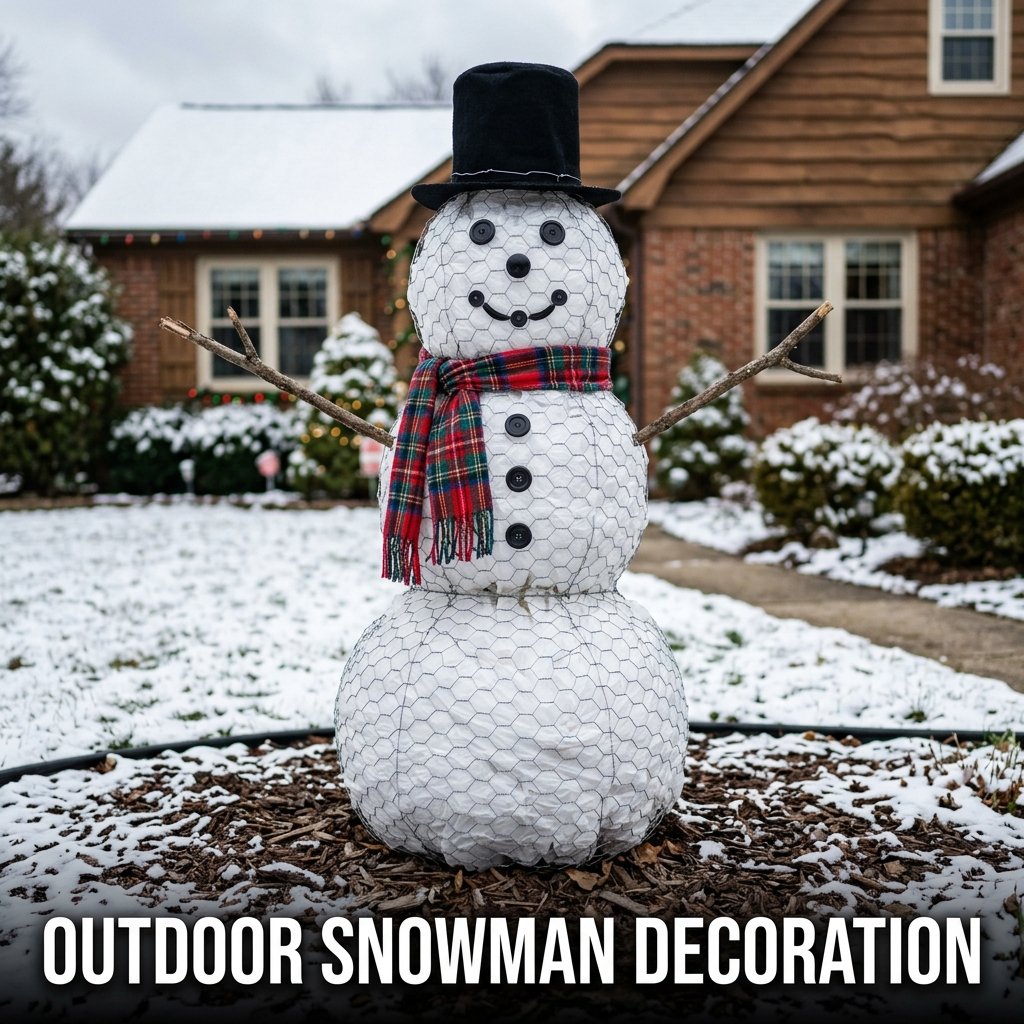
Building the Wire Forms
Cut chicken wire into three rectangular sections sized to roll into circles of the required diameters. Roll each section into a cylinder, connect the cut edges using wire ties, and then pinch and close the top and bottom of each cylinder to form a sphere. Stuff each sphere firmly with white plastic bags until the form holds its round shape without sagging. Connect the three spheres together using additional wire ties fed through both touching surfaces.
Adding the Face and Accessories
Push black buttons or large black stones into the front surface of the top sphere to form eyes, a nose, and a mouth. Wrap a fabric scarf around the joint between the top and middle spheres. Push two stick arms into the sides of the middle sphere and secure them with wire. Place a hat on the top and anchor it with a short length of wire fed through the hat brim and into the sphere below it.
5. DIY Outdoor Lighted Christmas Tree
A DIY outdoor lighted Christmas tree uses a tomato cage or a conical PVC frame wrapped in LED string lights, placed in the yard as an illuminated tree-shaped outdoor Christmas decoration. A standard tomato cage wrapped with 200 LED warm white lights produces a lighted tree shape approximately 36 inches tall that is visible from across the street at night. I placed three of these in my front garden at different heights and the effect at night matched displays I had seen at commercial properties.
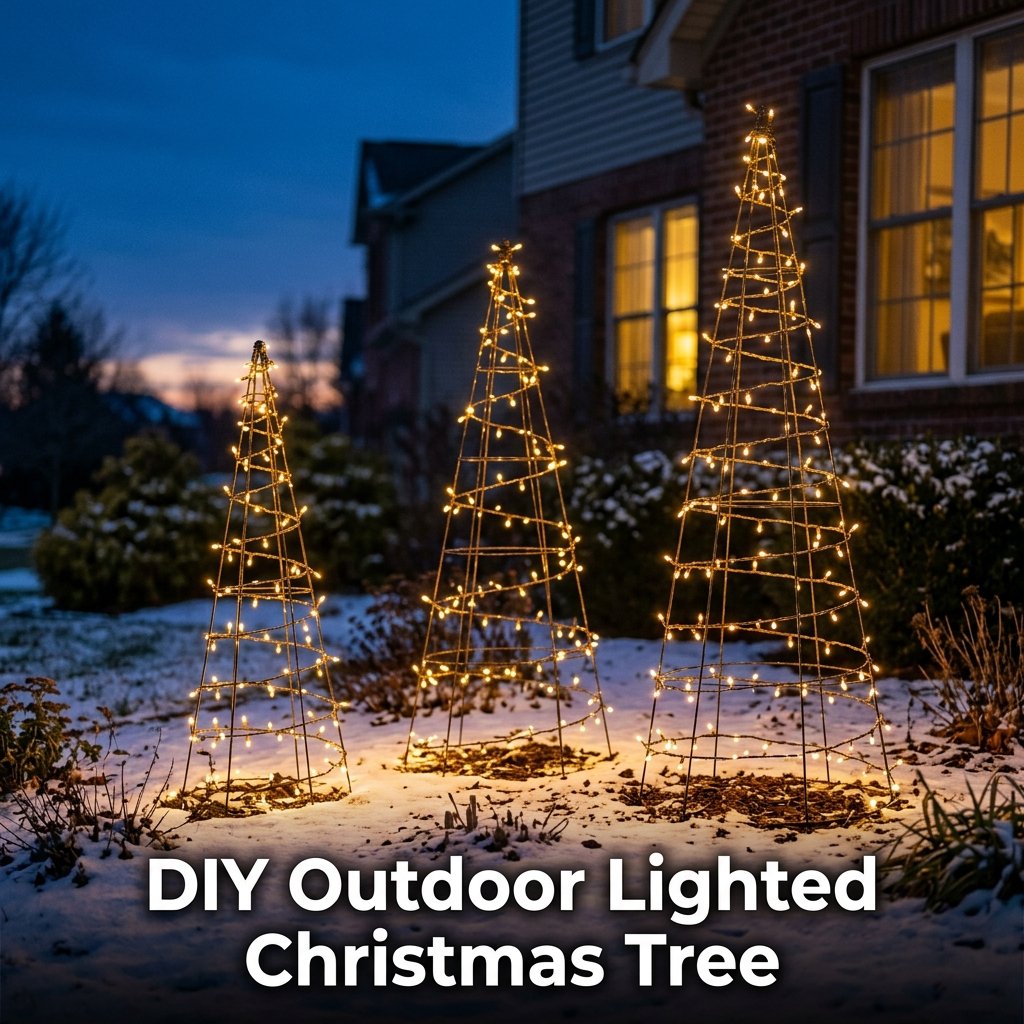
Building the Frame
Invert a large tomato cage so the wide ring sits at the top and the pointed ends push into the ground. Alternatively, cut four lengths of PVC pipe and join them at the top using a PVC cross fitting to create a conical frame. Push the frame firmly into the ground at least six inches deep so wind does not tip it over during the season. I used tomato cages for my first attempt because they require no cutting or assembly beyond inverting and placing.
Wrapping the Lights
Start wrapping the LED string light strand at the bottom of the frame and work upward in a spiral pattern toward the top point. Space each spiral loop approximately three inches from the one below it for even light distribution. Secure the light strand to the frame at regular intervals using small cable ties. Plug the finished tree into an outdoor-rated extension cord connected to an exterior power outlet fitted with a weatherproof cover plate.
6. Wooden Reindeer Yard Decoration
A wooden reindeer yard decoration is a flat silhouette figure cut from plywood, painted brown, and fitted with LED antler lights, placed in the yard as a DIY outdoor Christmas decoration. Three-quarter-inch exterior grade plywood produces reindeer silhouettes that withstand outdoor winter conditions without splitting or delaminating across a full six-week holiday season. I cut two reindeer figures from a single four-by-eight-foot plywood sheet with enough material left over for a small sled shape.
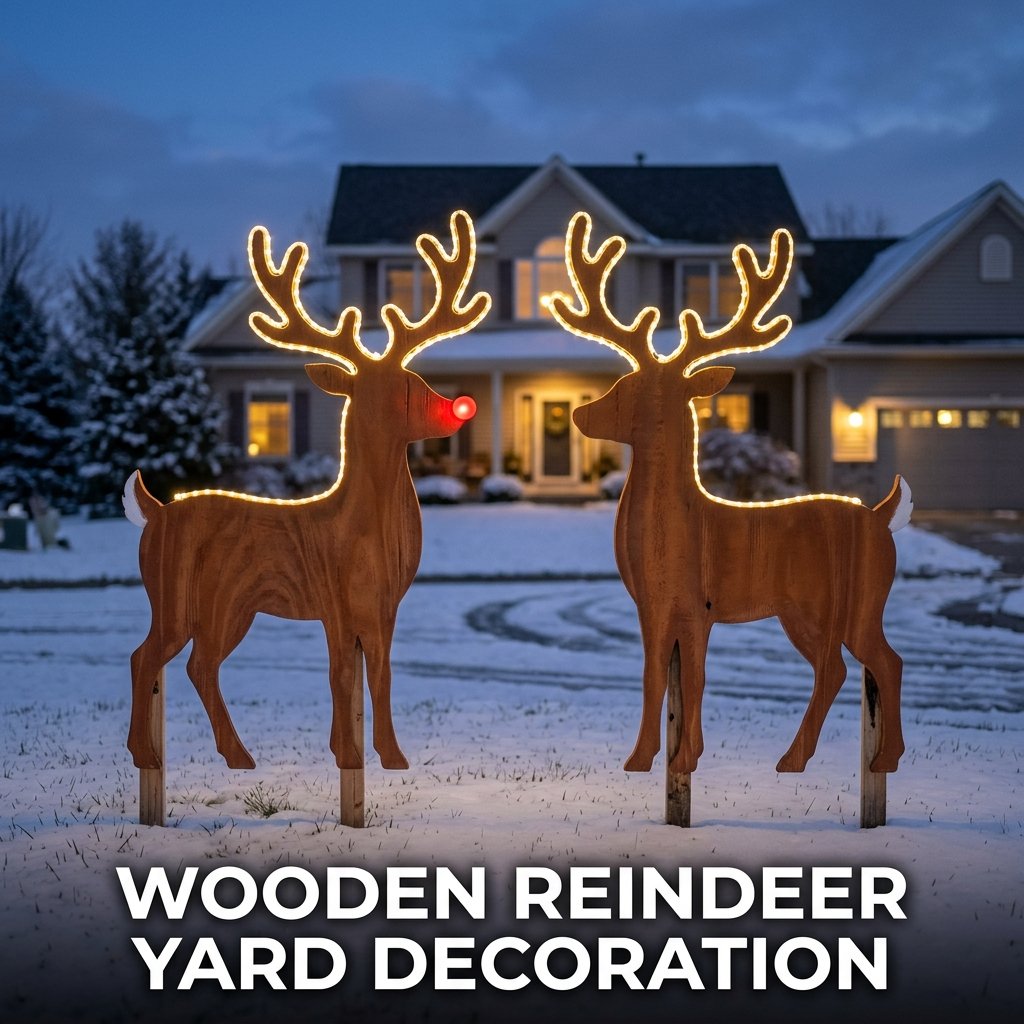
Cutting the Silhouette
Draw or trace a reindeer silhouette onto the plywood surface using a pencil. Cut along the outline using a jigsaw fitted with a fine-tooth blade. Sand all cut edges smooth with 80-grit sandpaper followed by 120-grit for a clean finish. Drill a small hole near the top of each antler where a light strand will later be attached. I used a printed template enlarged to full size at a copy shop to get accurate proportions on my first attempt.
Painting and Lighting
Apply two coats of brown exterior paint to all surfaces of the cut silhouette. Add a white painted patch on the tail area and a red painted nose if making a Rudolph figure. Once the paint cures fully, attach a strand of warm LED lights along the antler outline using small staples or cable ties fed through the pre-drilled holes. Mount the finished figure to a wooden stake screwed to the back and drive the stake into the ground.
7. Mason Jar Luminaries for the Porch
Mason jar luminaries are glass jars filled with a small LED tea light, decorated with paint, twine, or ribbon, and placed along porch steps or a front walkway as DIY outdoor Christmas decorations. Wide-mouth quart mason jars with battery-operated LED tea lights inside produce a safe, weatherproof luminary that requires no open flame and works in temperatures as low as 14 degrees Fahrenheit. I lined my porch steps with eight mason jar luminaries and the effect at night required no other lighting on the porch.
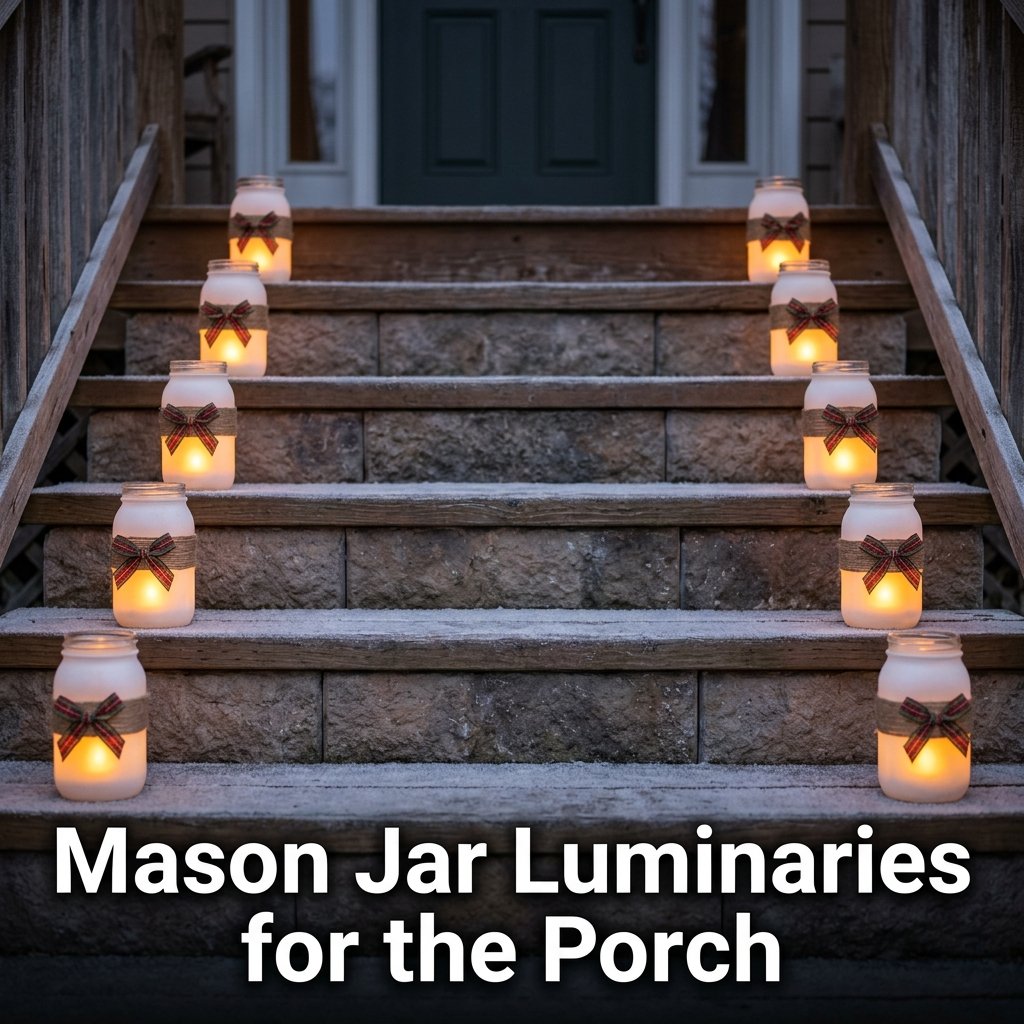
Decorating the Jars
Apply a thin coat of white or translucent glass paint to the outside of each jar using a foam brush for a frosted appearance. Alternatively, wrap the lower half of each jar with natural twine secured with a dot of hot glue. Add a small sprig of artificial holly, a cinnamon stick, or a short piece of plaid ribbon tied around the jar neck for a seasonal decorative element. Allow any paint or glue to dry fully before placing the LED tea light inside.
Arranging the Display
Place the finished luminaries on flat, stable surfaces such as porch steps, a railing ledge, or flat stones along a walkway. Space them evenly at intervals of 12 to 18 inches for a balanced appearance. Turn the battery-operated tea lights on before placing the jars so you do not need to reach inside after positioning them. I used a timer switch on my porch outlet to control a small strand of lights grouped with the luminaries so the entire display turned on automatically each evening.
8. DIY Christmas Garland for the Porch Railing
A DIY Christmas garland for the porch railing uses artificial pine branch sections connected along a wire base and decorated with ribbon, pinecones, and LED lights, then draped and secured along a front porch railing. A garland measuring 9 feet in length covers a standard 8-foot porch railing with enough extra length for two draping swags that hang below the top railing bar. I made a 12-foot garland for my porch railing and decorated it with 100 warm white LED lights and red ribbon bows.
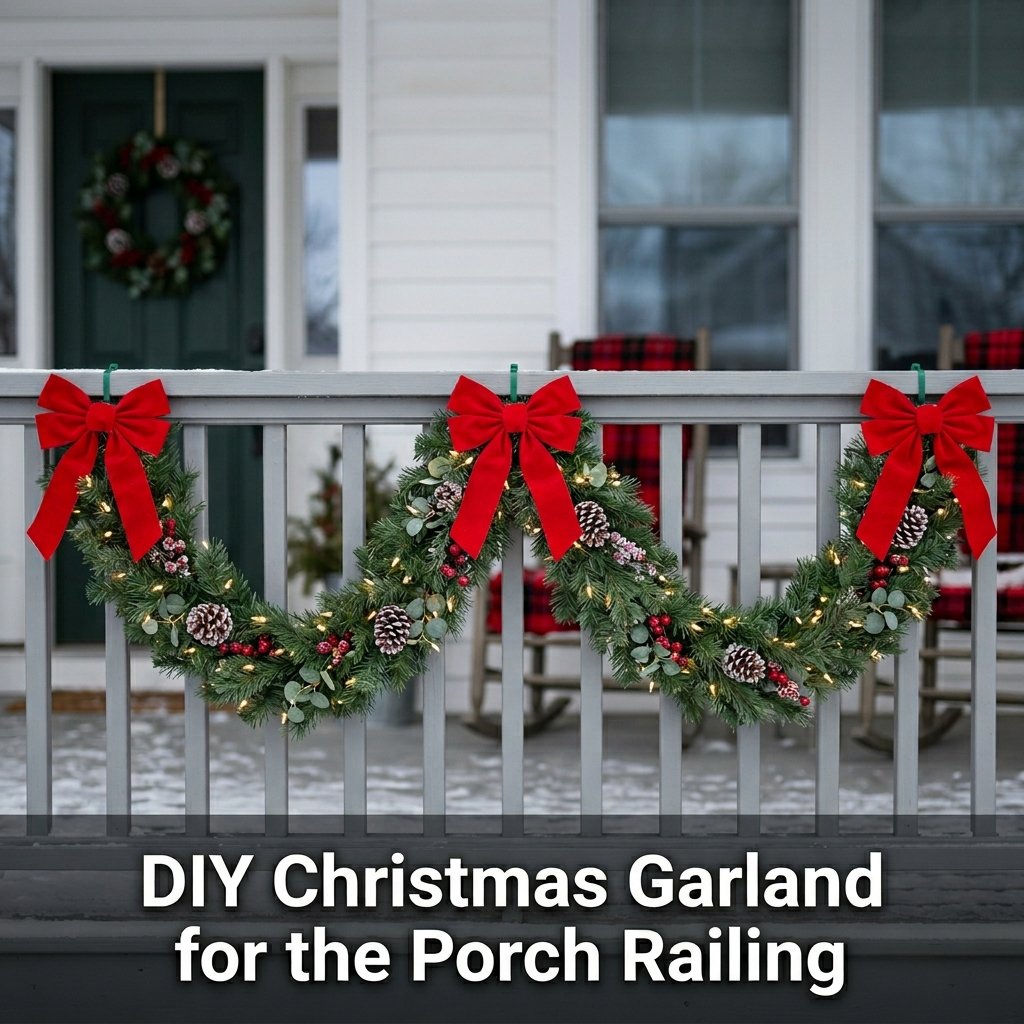
Building the Garland Base
Cut artificial pine branch sections into 12-inch lengths. Bind them along a 9-foot length of heavy gauge floral wire by wrapping each branch stem tightly around the wire and twisting it closed. Overlap each section by two inches so no wire shows through the finished front face. Work in one direction down the full wire length, then add a second layer of branches in the opposite direction to fill any thin areas on the back side.
Attaching the Lights and Hanging
Weave the LED light strand through the garland from one end to the other before attaching it to the railing. Secure the garland to the railing at four evenly spaced points using plastic zip ties attached through the garland wire. Space the zip ties so the garland hangs in two natural swag curves between attachment points. Add ribbon bows at each zip tie location to cover the fasteners and complete the festive appearance of the finished outdoor porch decoration.
9. Spray-Painted Pinecone Ornaments for Outdoor Trees
Spray-painted pinecone ornaments are large natural pinecones coated in metallic or white spray paint, fitted with a wire hanging loop, and hung from outdoor tree branches as DIY outdoor Christmas decorations. Large pinecones measuring three to five inches in length hold their shape outdoors through winter weather without deteriorating when sealed with outdoor clear coat spray after painting. I collected 40 pinecones from a local park and made a full set of ornaments for two outdoor trees in under two hours.
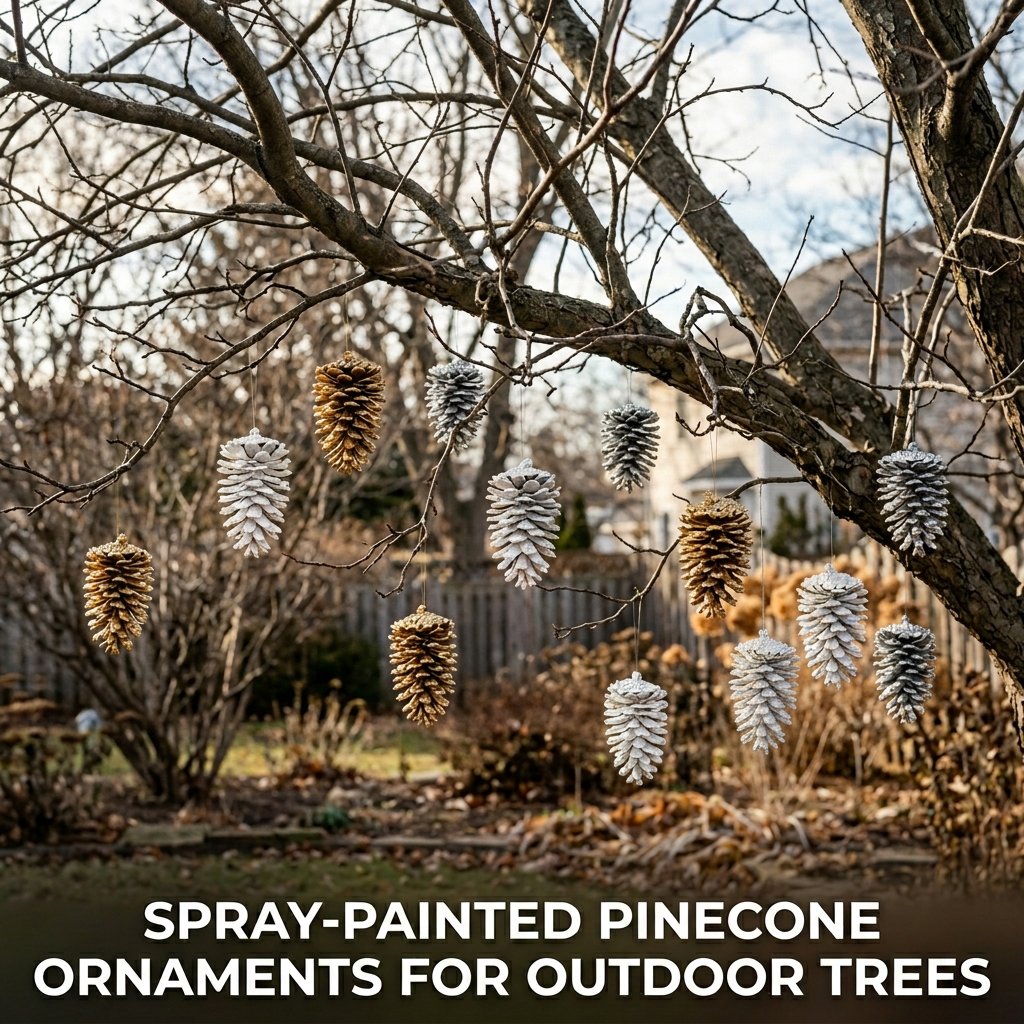
Preparing and Painting the Pinecones
Bake collected pinecones on a lined baking sheet at 200 degrees Fahrenheit for 30 minutes to kill any insects or mold spores present inside them. Allow them to cool completely before painting. Apply metallic gold, silver, or white outdoor spray paint in a light, even coat from a distance of 12 inches. Allow the first coat to dry for 30 minutes before applying a second coat for complete coverage over all visible surfaces.
Attaching the Hanging Loop
Cut an eight-inch length of floral wire for each pinecone. Wrap one end tightly around the base scales of the pinecone and twist the wire closed to secure it. Form the remaining wire into a hanging loop and twist the free end around the loop base to close it. Spray the finished ornaments with one coat of clear outdoor varnish to seal the paint before hanging them on outdoor tree branches using the wire loops.
10. DIY Christmas Star for the Yard
A DIY Christmas star for the yard uses five lengths of wooden dowel or PVC pipe joined at a central point and wrapped in LED string lights to create a large illuminated star shape displayed in the front yard. Wooden dowel rods measuring one inch in diameter and 36 inches in length produce a finished star approximately 48 inches wide, large enough to serve as a focal point decoration in a standard residential front yard. I built one in an afternoon and mounted it on a six-foot wooden post.
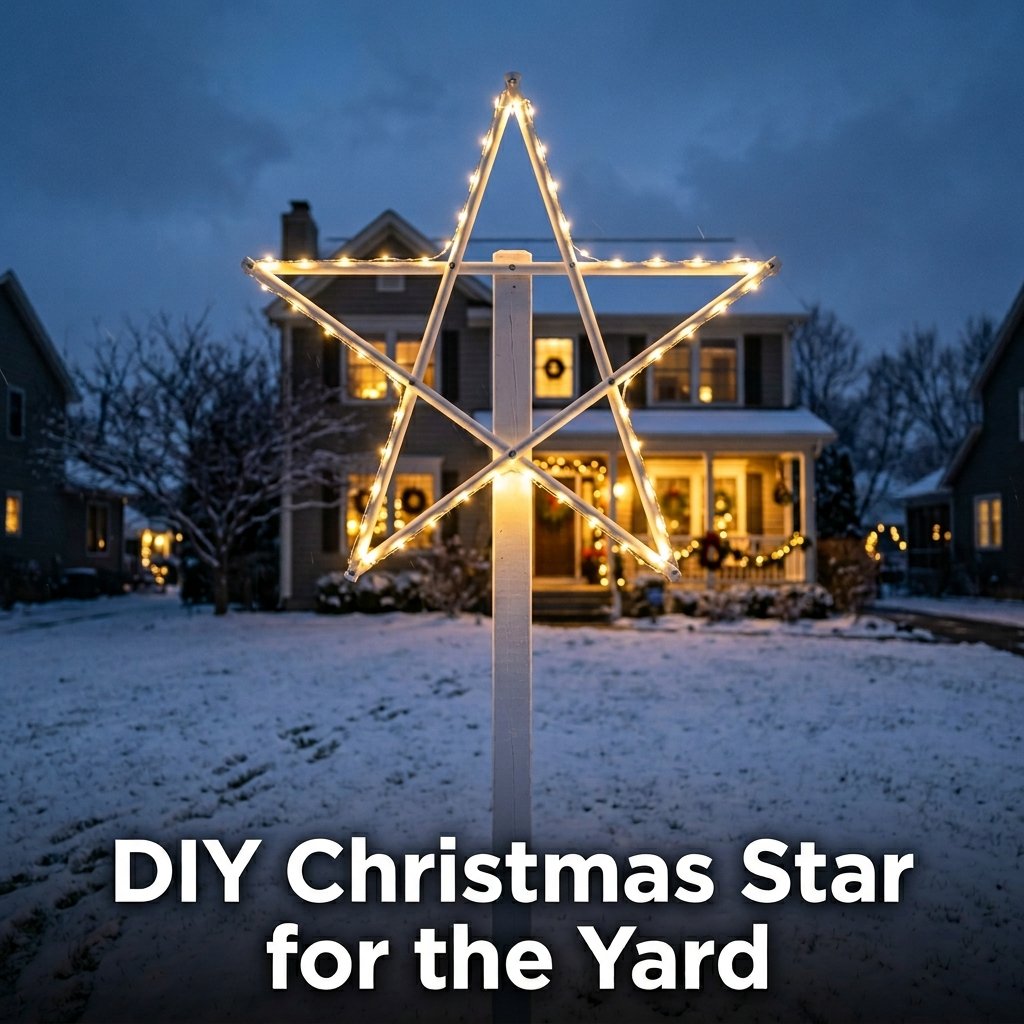
Constructing the Star Frame
Lay five equal-length dowel rods across each other in a star pattern on a flat work surface. Mark the crossing points with a pencil, then drill a small hole through each crossing point on all five rods. Thread a short bolt through each crossing point hole, add a washer and nut on the back side, and tighten with pliers to hold the star frame rigid. Apply two coats of white outdoor spray paint over the assembled frame before adding lights.
Wrapping and Mounting
Wrap a 50-light warm white LED strand around the star frame, following each point from base to tip and back before moving to the next point. Secure the light strand to the frame at regular intervals using small cable ties. Attach the finished star to the top of a six-foot wooden post using two metal L-brackets and exterior screws. Drive the post at least 12 inches into the ground and check that it stands fully upright before releasing it.
11. Outdoor Christmas Lanterns
Outdoor Christmas lanterns are large metal or wooden frame lanterns placed on porch steps, beside the front door, or along a garden path, fitted with LED candles and decorated with greenery and ribbon as DIY outdoor Christmas porch decorations. Galvanized metal lanterns measuring at least 12 inches tall hold up to rain and freezing temperatures without rusting through a full six-week outdoor display season. I placed two 18-inch lanterns on either side of my front door and decorated them with fresh cedar sprigs and red ribbon.
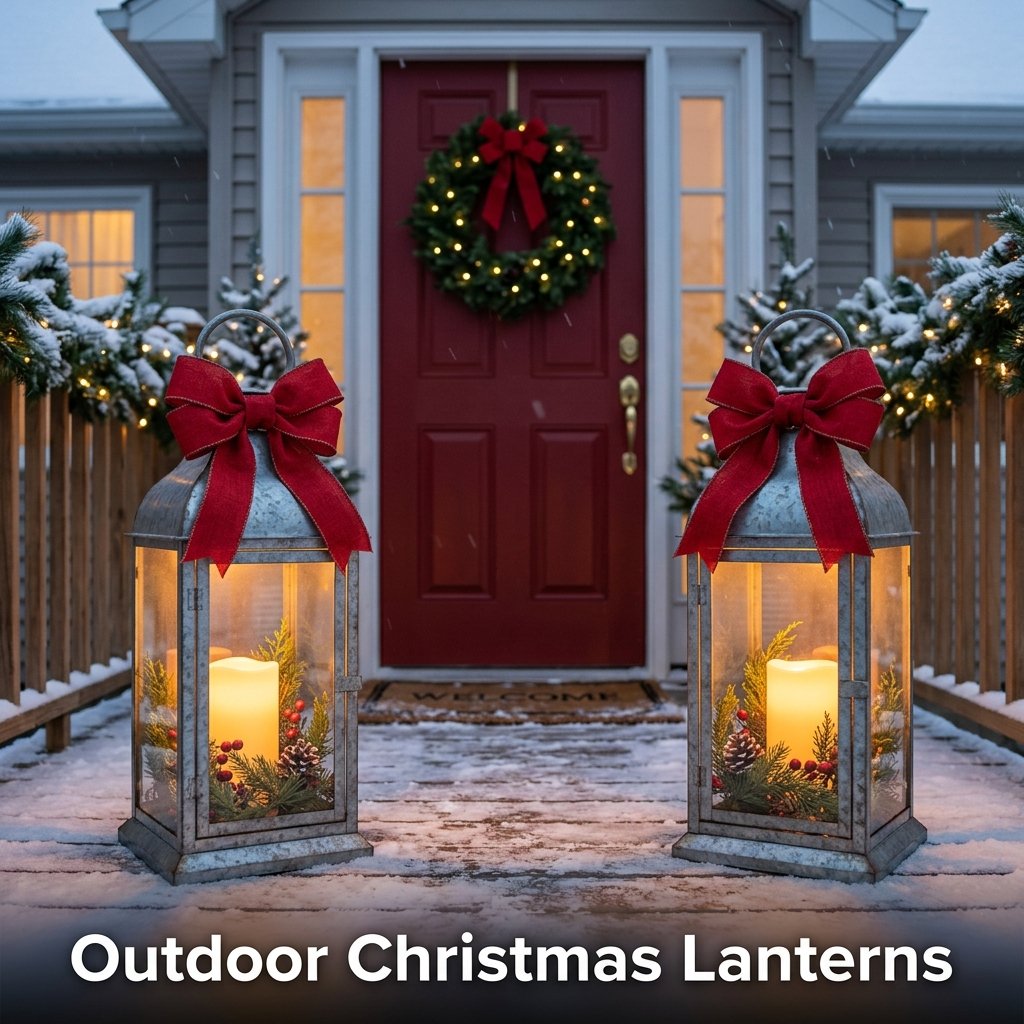
Decorating the Lanterns
Place a battery-operated LED pillar candle inside each lantern on the base panel. Tuck three to five short sprigs of artificial or fresh greenery such as cedar, pine, or eucalyptus around the candle base inside the lantern. Wrap a length of wired ribbon around the lantern handle and tie it into a full bow at the top. I used waterproof ribbon rated for outdoor use because standard craft ribbon frays and loses its shape within one week of outdoor exposure.
Positioning for Maximum Effect
Place lanterns on flat, stable surfaces where they will not tip in wind. Add a flat stone or brick inside the base of each lantern as ballast if the lantern feels light or top-heavy when placed outdoors. I added a smooth flat stone weighing approximately one pound inside each of my lanterns after the first windy night knocked one over and chipped the base panel. The added weight kept both lanterns stable through the rest of the season.
12. DIY Outdoor Gift Box Decorations
DIY outdoor gift box decorations are large cardboard or wooden boxes wrapped in weatherproof paper or painted to look like wrapped gifts, placed in the yard or on the porch as oversized Christmas decorations. Wooden crates or plywood boxes painted with exterior paint and sealed with clear varnish survive outdoor winter conditions for multiple seasons without deteriorating. I made three different-sized gift boxes from scrap plywood and stacked them near my front porch. They lasted three full Christmas seasons before I repainted them.
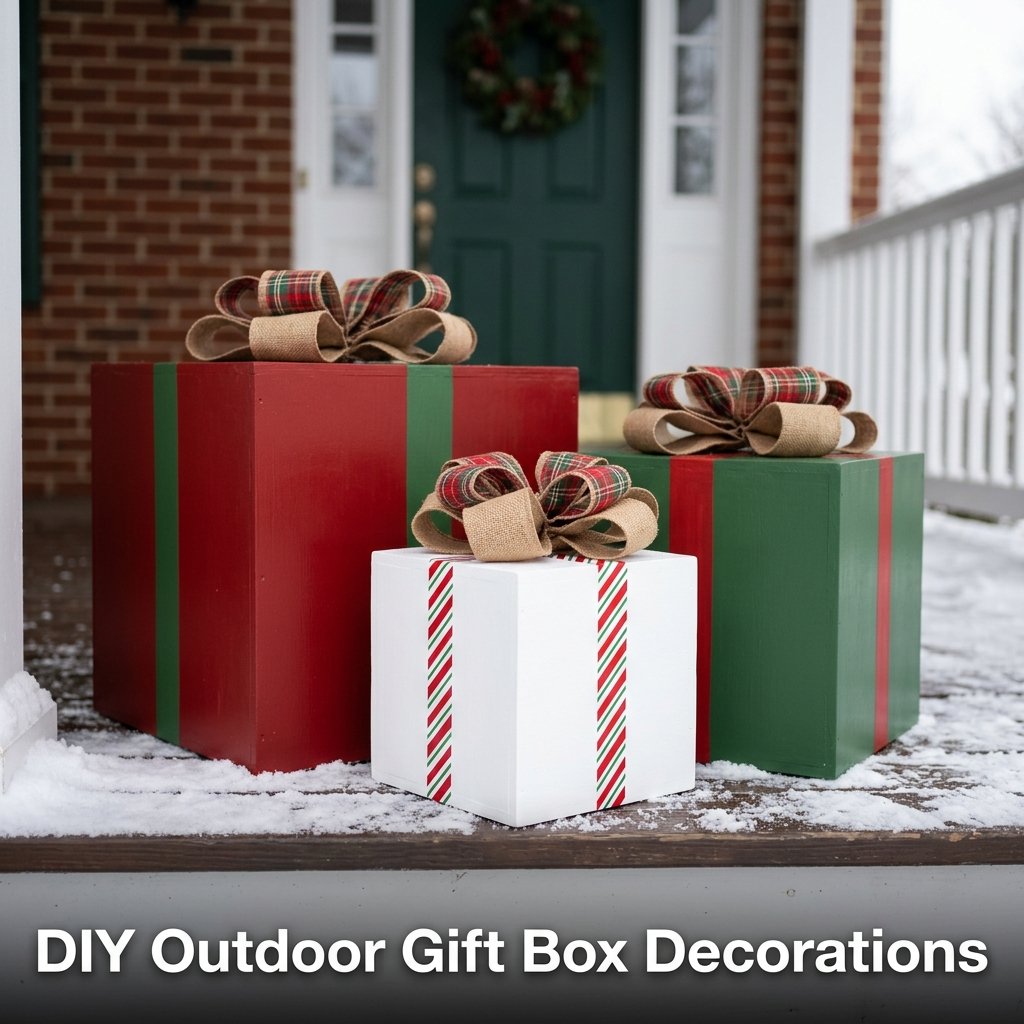
Building the Box Structure
Cut plywood sheets into six equal square or rectangular panels for each box. Join the panels using exterior wood glue and 1.5-inch finishing nails driven through pre-drilled pilot holes to prevent splitting. Fill any nail holes with exterior wood filler and sand the entire box smooth after the filler dries. Apply two coats of exterior primer before painting the base color to prevent moisture from penetrating the wood surface through the painted finish.
Painting and Decorating
Paint each box in a solid Christmas color such as red, green, or white using exterior acrylic paint. Once dry, paint or tape a ribbon pattern across the box in a contrasting color to simulate wrapping ribbon. Apply a large fabric or foam bow to the top of each box using waterproof adhesive. Seal the entire painted surface with two coats of clear exterior polyurethane varnish before placing the boxes outdoors for the season.
13. Hanging Outdoor Christmas Balls
Hanging outdoor Christmas balls are large spheres made from chicken wire or paper mache, painted and decorated, then hung from porch ceilings, tree branches, or shepherd hooks as oversized DIY outdoor Christmas decorations. Chicken wire spheres measuring 12 inches in diameter hold their shape outdoors without deteriorating when finished with weather-resistant paint and clear outdoor sealant. I made four large spheres and hung them from my porch ceiling at staggered heights using heavy-duty outdoor hooks.
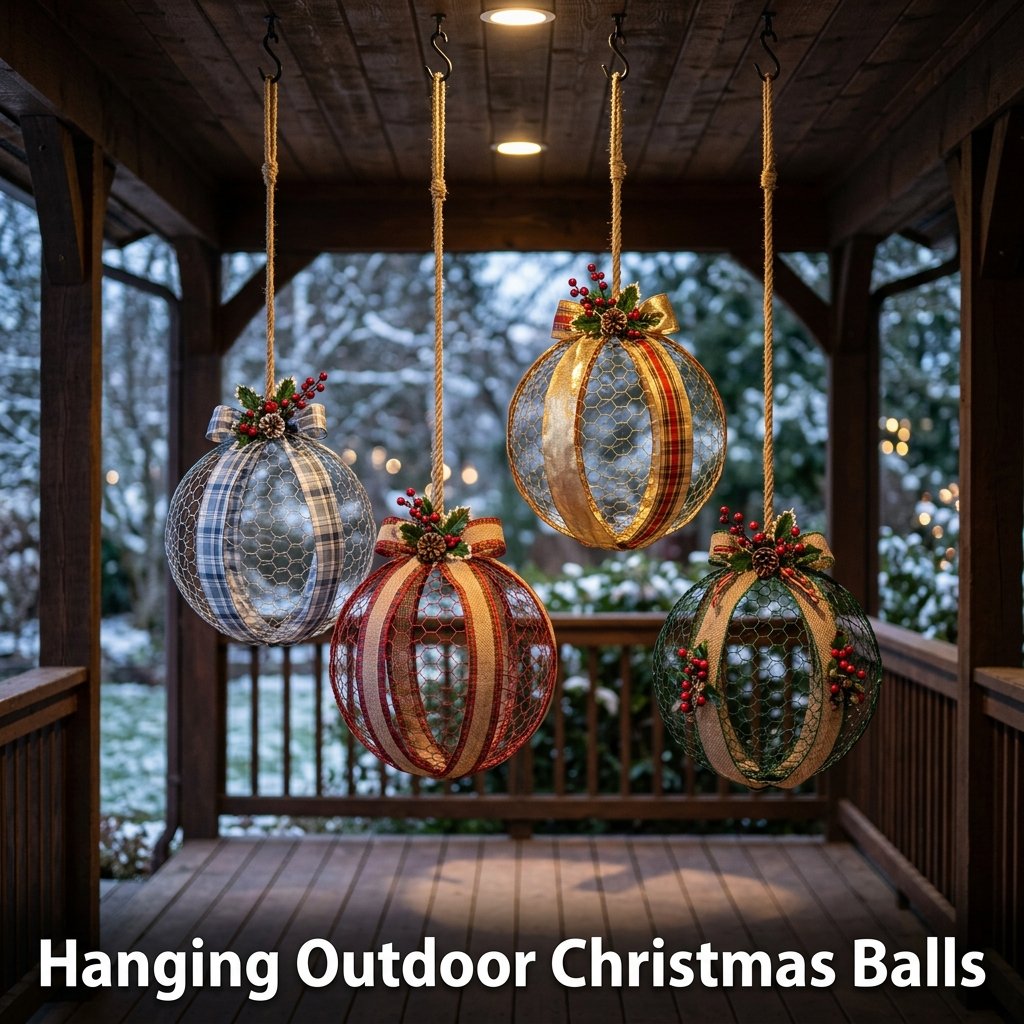
Forming the Sphere Shape
Cut a large piece of chicken wire and roll it into a rough ball shape, pushing the cut edges inward and connecting them with wire ties to form a closed sphere. Work from multiple angles to create a shape that is as round as possible. Fill the finished sphere loosely with crumpled newspaper to help it hold its shape while you apply paint or decorations to the outer surface. Remove the newspaper after the outer finish dries completely.
Finishing and Hanging
Apply spray paint directly over the chicken wire surface in your chosen color. Two light coats produce better coverage than one heavy coat on wire mesh surfaces. Add decorative elements such as ribbon strips, small ornament balls, or artificial berry sprigs by threading them through the wire mesh and securing with floral wire. Attach a heavy-duty metal hook through the top of each sphere and hang using a weather-rated outdoor chain or thick jute rope.
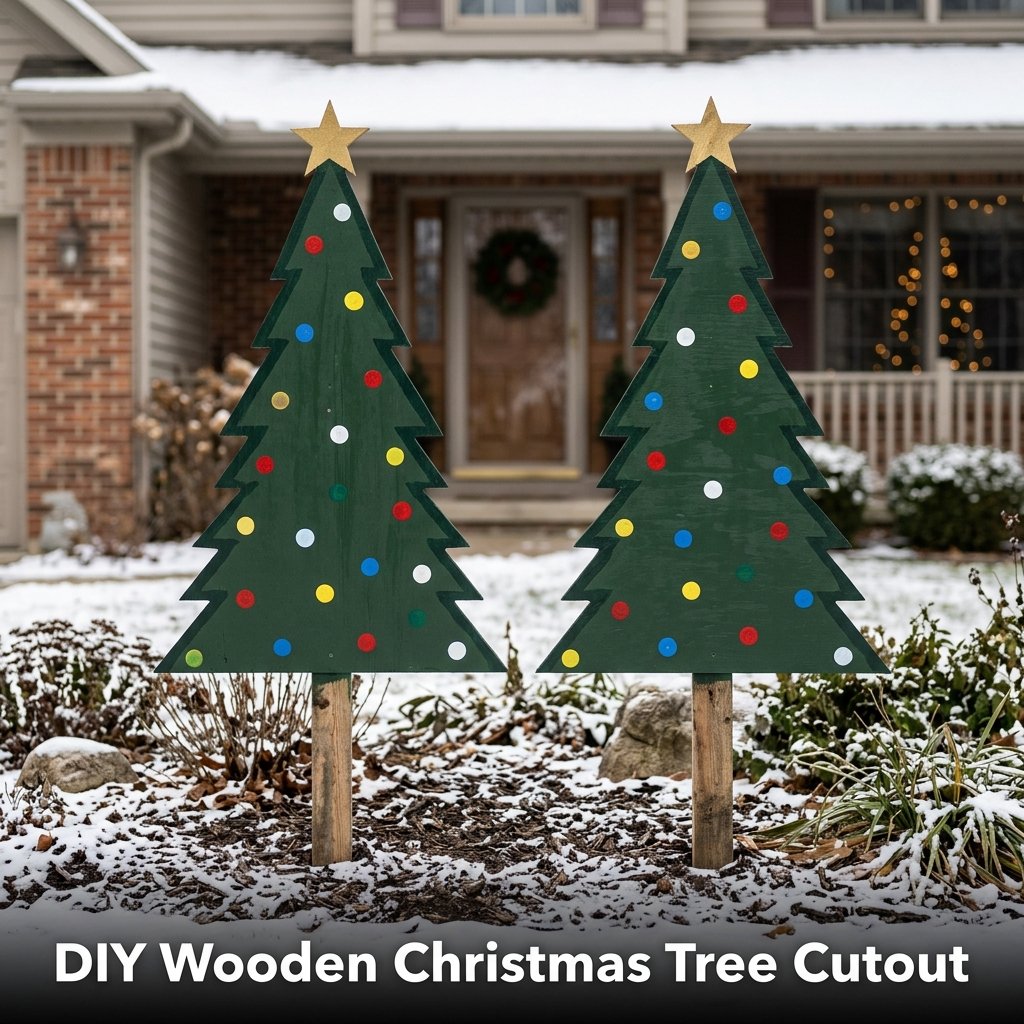
14. DIY Wooden Christmas Tree Cutout
A DIY wooden Christmas tree cutout is a flat triangular silhouette cut from plywood, painted green, and decorated with painted ornament shapes and a star on top, placed in the yard as a DIY outdoor Christmas yard decoration. Half-inch exterior plywood cut into a 48-inch tall triangle produces a Christmas tree silhouette that stands securely when mounted on a wooden stake and weighs little enough to carry and store easily between seasons. I made two matching cutouts for the corners of my front garden bed.
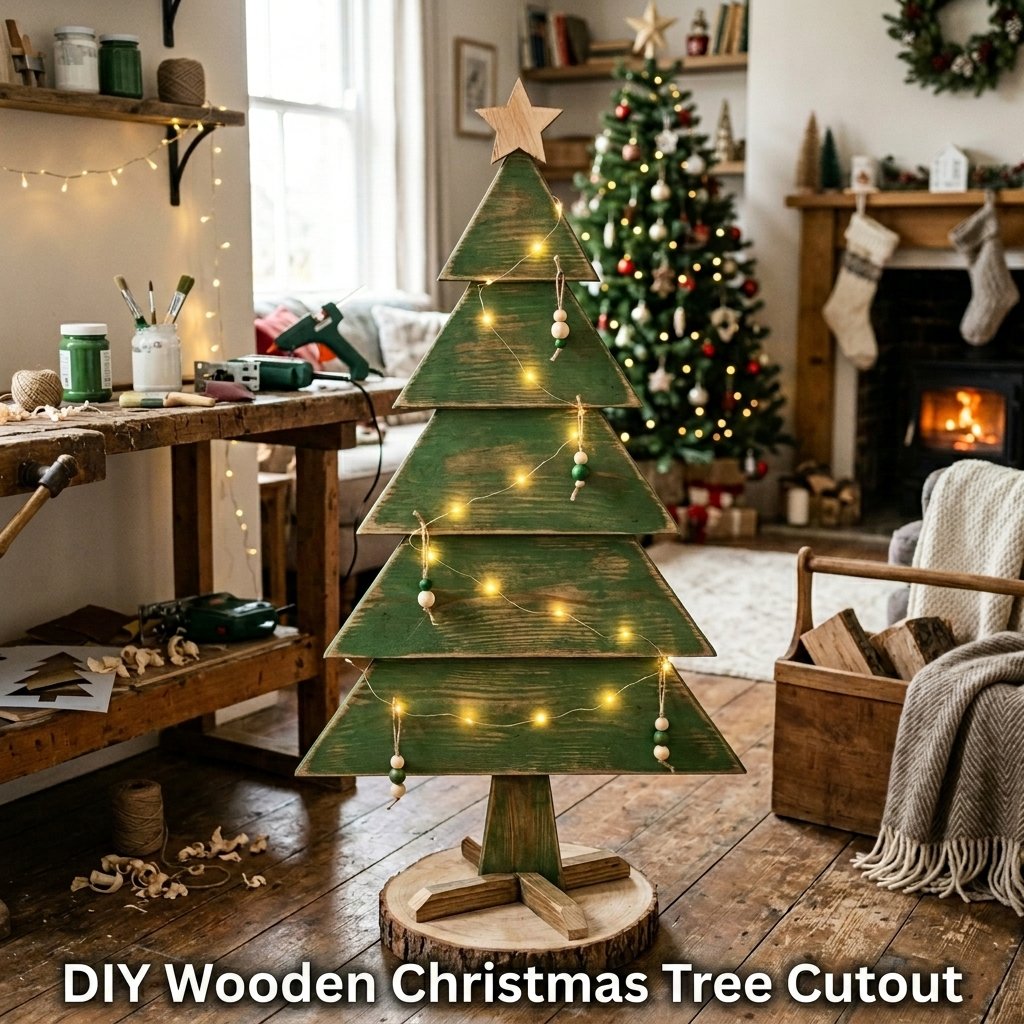
Cutting and Shaping the Tree
Draw a tall isosceles triangle on the plywood surface with a base width of 24 inches and a height of 48 inches. Cut along the outline using a jigsaw. Use the jigsaw to cut a slight zigzag pattern along both angled sides to create the stepped appearance of individual tree branches rather than a straight diagonal edge. Sand all cut edges smooth and drill a pilot hole at the base center where the mounting stake will attach.
Painting and Decorating
Apply two coats of dark green exterior paint to all surfaces. Once dry, paint colorful circle shapes across the front face to represent ornaments in red, yellow, blue, and white. Paint a yellow or gold star shape at the top point of the triangle. Apply clear exterior varnish over the entire painted surface. Attach a one-inch by two-inch wooden stake to the back of the base using exterior screws and drive the stake into the ground to display the finished cutout.
15. DIY Outdoor Advent Calendar
A DIY outdoor advent calendar uses 24 small weatherproof envelopes or boxes mounted on a wooden board or fence panel, numbered one through 24 and displayed outside as a December countdown decoration. Waterproof kraft envelopes sealed with outdoor adhesive and mounted on a treated wooden board withstand light rain when placed in a covered porch area protected from direct precipitation. I mounted mine on the wall beside my front door where it stayed dry under the porch overhang throughout December.
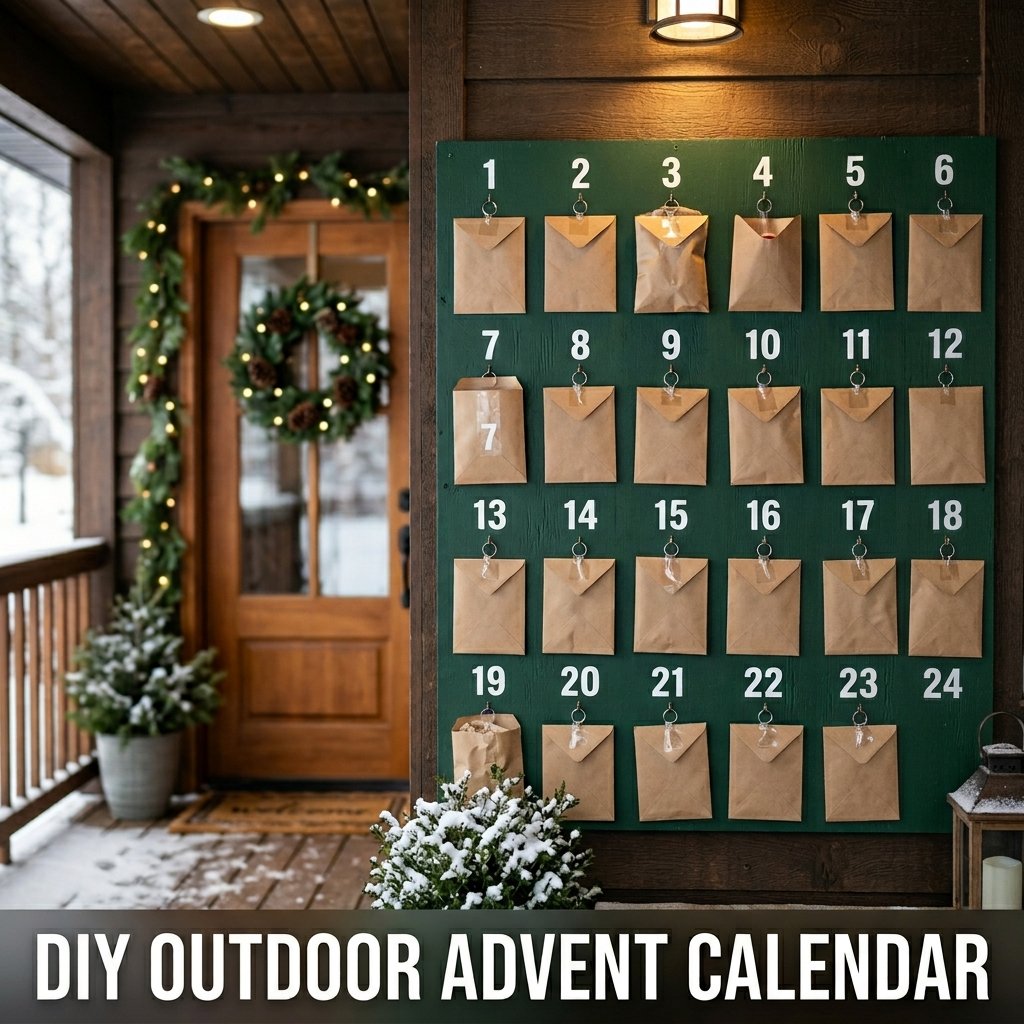
Building the Display Board
Cut a piece of treated plywood to a size of 24 by 36 inches. Sand and prime both surfaces. Paint the front face in a dark green or red base color. Mount 24 small metal hooks in a four-by-six grid pattern across the front surface, spacing each hook six inches from its neighbors. Label each hook position with painted numbers from one to 24 using white exterior paint and a small brush or a paint marker.
Making the Envelopes
Fold small squares of kraft paper into envelope shapes and seal three sides with waterproof craft glue. Fill each envelope with a small note, a wrapped candy, or a small folded activity card before sealing the fourth side. Punch a hole at the top of each envelope and attach a metal ring through the hole for hanging on the board hooks. I covered each envelope with a layer of clear packing tape on the outside to improve water resistance when the temperature dropped and light snow fell on the display.
16. Rope Light Pathway Markers
Rope light pathway markers use sections of outdoor-rated LED rope light bent into candy cane, star, or Christmas tree shapes and placed along a driveway or walkway as illuminated DIY outdoor Christmas decorations with lights. Outdoor-rated LED rope light in 25-foot lengths withstands temperatures as low as minus 40 degrees Fahrenheit and remains safe for continuous outdoor use during the full holiday season. I cut mine into six equal sections and formed each section into a different shape using wire coat hanger frames.

Making the Wire Frames
Bend wire coat hangers into the desired shape using pliers. Simple shapes such as stars, trees, and candy cane hooks require between two and four coat hangers per shape depending on the size. Wrap the LED rope light around the completed wire frame and secure it at regular intervals using small cable ties. Leave a six-inch tail of rope light at the start of each shape for connecting to a power source or extension cord.
Installing Along the Pathway
Push the wire frame bases directly into soft garden soil along the walkway or driveway edge. Space each marker between 24 and 36 inches apart for an evenly distributed light display. Connect all markers in a series using waterproof outdoor extension cords rated for the total wattage of the connected rope light sections. I plugged the full set into a single outdoor timer outlet that turned the pathway display on at dusk and off at 11 pm automatically each night.
17. DIY Christmas Village Scene
A DIY Christmas village scene uses small wooden box structures painted to look like houses, shops, and churches, arranged in the front yard or on a porch shelf as a miniature outdoor Christmas decoration display. Wooden crates and small plywood boxes painted with exterior paint and fitted with battery-operated LED tea lights inside the windows produce a village display that looks illuminated from a distance at night. I built a five-building village scene over two weekends and placed it on a wide porch shelf under the overhang.
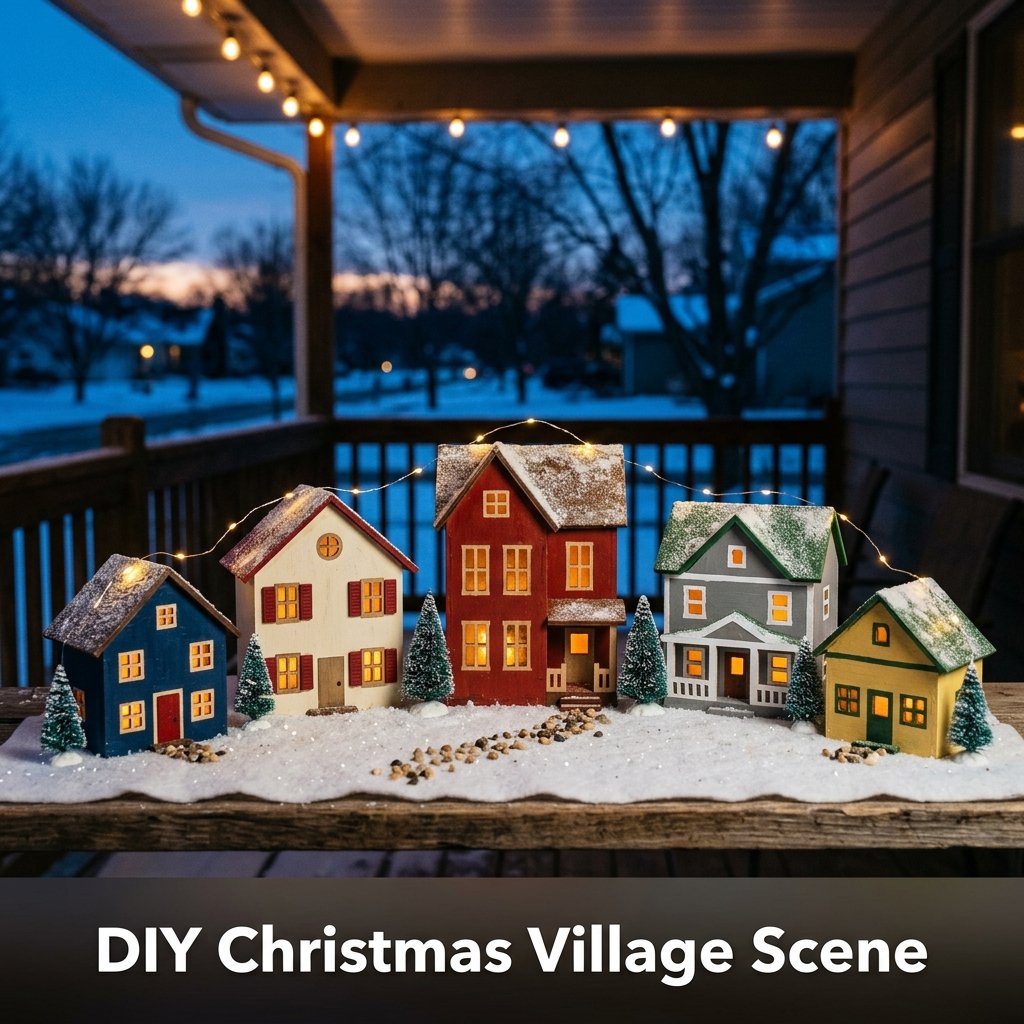
Building the Structures
Cut plywood into rectangular panels for walls and triangular panels for peaked roofs. Join the panels using wood glue and exterior finishing nails. Leave one wall panel partially open or cut small rectangular window shapes into the front wall of each structure so the interior LED light is visible from the front. Paint each structure a different color using exterior acrylic paint and add painted window frames, doors, and shutters using a fine brush.
Arranging the Scene
Place the finished structures at varying heights by elevating some on small wooden blocks or flat stones. Surround the buildings with artificial snow made from white felt or batting fabric cut to fit the shelf surface. Add small plastic evergreen trees, miniature figures, and small LED light strands draped across the buildings for a complete village appearance. I covered the felt surface with a thin layer of white spray paint at the start of each season to keep it looking fresh without replacing the fabric.
18. DIY Outdoor Christmas Wreath for the Mailbox
A DIY outdoor Christmas wreath for the mailbox uses a small wire wreath frame decorated with artificial greenery, ribbon, and weather-resistant ornaments, wired or zip-tied onto the front of a residential mailbox post as a DIY outdoor Christmas decoration. A 12-inch wire wreath frame fits the front panel of most standard residential mailboxes without blocking the mail slot opening or interfering with mail delivery. I made one for my mailbox post using the same wire frame method as my door wreath but scaled down to a 12-inch size.
Sizing and Building the Small Wreath
Attach short six-inch sections of artificial greenery to the wire frame, working in one direction around the full circle. Use lighter decorative elements on a mailbox wreath than on a door wreath since the mailbox location receives more direct wind exposure. Avoid heavy ornaments, glass balls, or wide ribbon bows that catch wind and pull the wreath off the frame. I used small pinecones, red berry picks, and narrow waterproof ribbon as the only decorative elements on my mailbox wreath.
Attaching the Wreath
Secure the finished wreath to the mailbox post using two heavy-duty zip ties fed through the wire frame and around the post. Position the zip ties at the top and bottom of the frame rather than the sides so they hold the wreath flat against the post surface. Cover each visible zip tie with a small ribbon bow to hide the fasteners. I checked the wreath after every major windstorm and retightened the zip ties as needed to keep the wreath sitting flat throughout the season.
19. Painted Rock Christmas Ornament Pathway Display
A painted rock Christmas ornament pathway display uses smooth river stones painted to look like Christmas ornaments, placed along a garden bed edge or walkway border as colorful DIY outdoor Christmas yard decorations. Smooth rocks measuring three to five inches in diameter painted with exterior acrylic paint and sealed with outdoor polyurethane varnish survive outdoor winter conditions including rain, frost, and light snow without the paint lifting or peeling. I painted 20 rocks for my front garden bed border and positioned them every six inches along the full length.
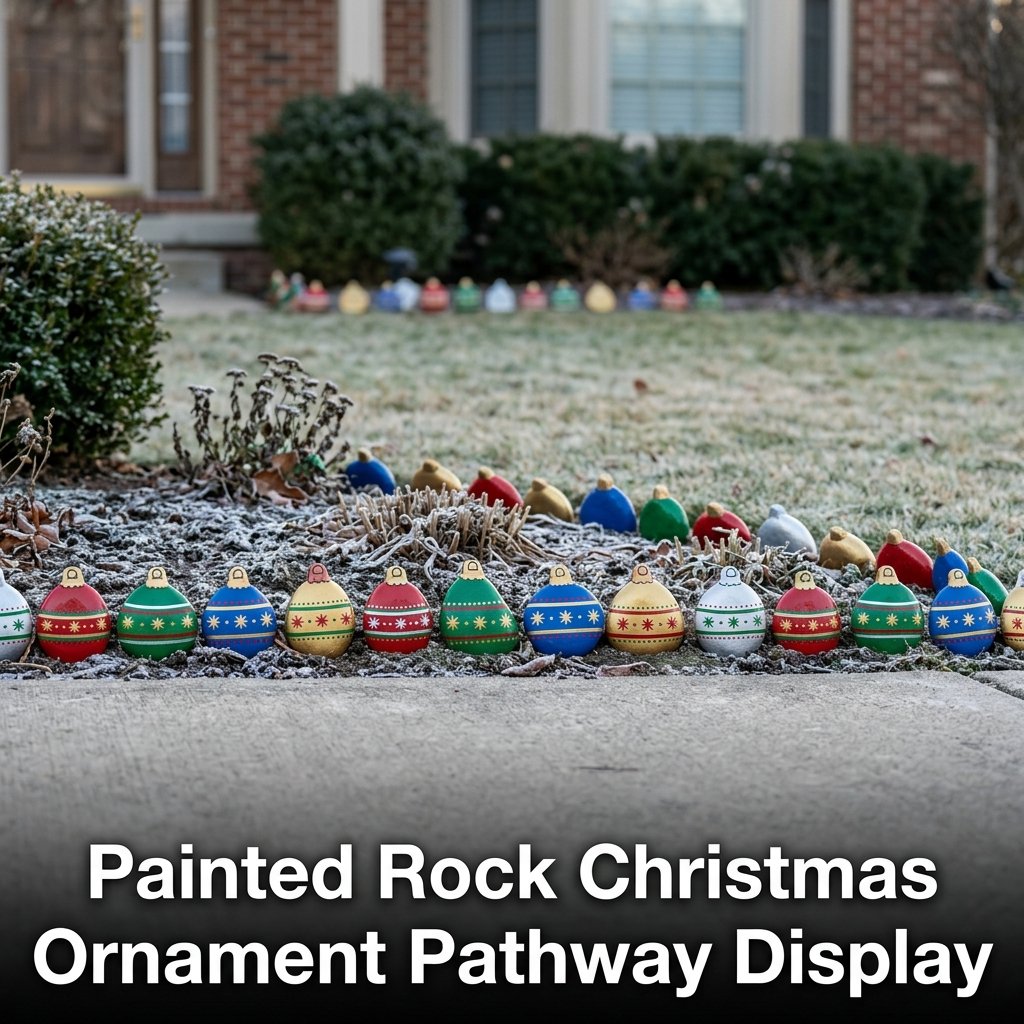
Selecting and Preparing the Rocks
Choose smooth, flat rocks with no cracks or flaking surfaces. Wash each rock with soap and water and dry completely before painting. Apply a base coat of white exterior paint to all rocks and allow it to dry for one hour before adding color. The white base coat makes subsequent colors appear brighter and more accurate than painting directly onto the natural gray or brown stone surface without any preparation step first.
Painting the Ornament Design
Paint each rock in a solid base color: red, green, blue, gold, or silver. Once dry, add a painted cap shape at the top in a contrasting metallic color and paint a small loop shape above the cap to represent the ornament hanger. Add decorative stripe, dot, or star patterns on the lower portion of each rock using a fine-tip brush. Seal the finished rocks with two coats of clear outdoor polyurethane varnish and allow 24 hours of curing time before placing them outside in the garden.
20. DIY Christmas Tree Pallet Sign
A DIY Christmas tree pallet sign uses wooden pallet boards arranged vertically in a decreasing staircase pattern to form a wall-mounted Christmas tree shape, decorated with small ornaments and LED lights as a DIY outdoor Christmas porch decoration. Standard wooden pallets cut into individual boards and reassembled in a staggered pattern produce a tree shape approximately 48 inches tall and 36 inches wide at the base. I mounted one on my porch wall above the seating area and decorated it each December with different ornament colors.
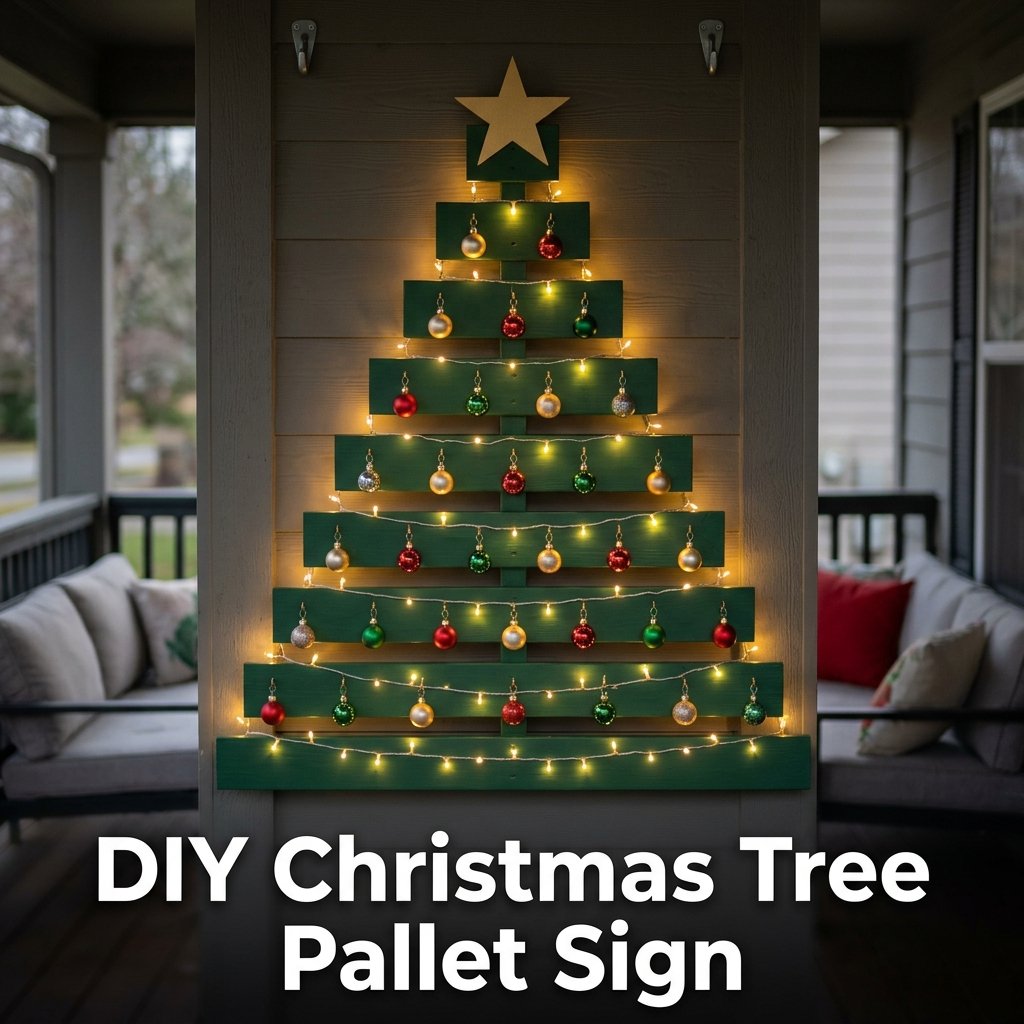
Disassembling and Cutting the Pallet
Use a circular saw to cut a standard wooden pallet into individual boards. Sand all surfaces and edges smooth. Arrange the boards in a staircase pattern with the longest board at the bottom and progressively shorter boards toward the top to form the tree silhouette. Attach all boards to two vertical support boards running behind the full height of the arrangement using exterior screws driven through the front face of each horizontal board.
Painting and Decorating
Paint all board surfaces with dark green exterior paint. Add a yellow or gold painted star shape at the top point of the arrangement. Drill small hooks along the front face of each horizontal board and hang small ornament balls from each hook. Wrap a strand of 50 warm white LED lights across the full arrangement following the staircase pattern from bottom to top. Mount the finished sign to the porch wall using two heavy-duty exterior wall hooks rated for the weight of the completed piece.
21. DIY Outdoor Nativity Scene
A DIY outdoor nativity scene uses flat wooden silhouette figures cut from plywood, painted, and arranged in a stable structure built from rough-cut lumber as a traditional DIY outdoor Christmas yard decoration. Half-inch exterior plywood figures sealed with exterior primer and two coats of outdoor acrylic paint withstand outdoor winter conditions for multiple holiday seasons without the paint fading or the wood splitting significantly. I built my first outdoor nativity scene from scrap lumber and two sheets of plywood over three weekends.
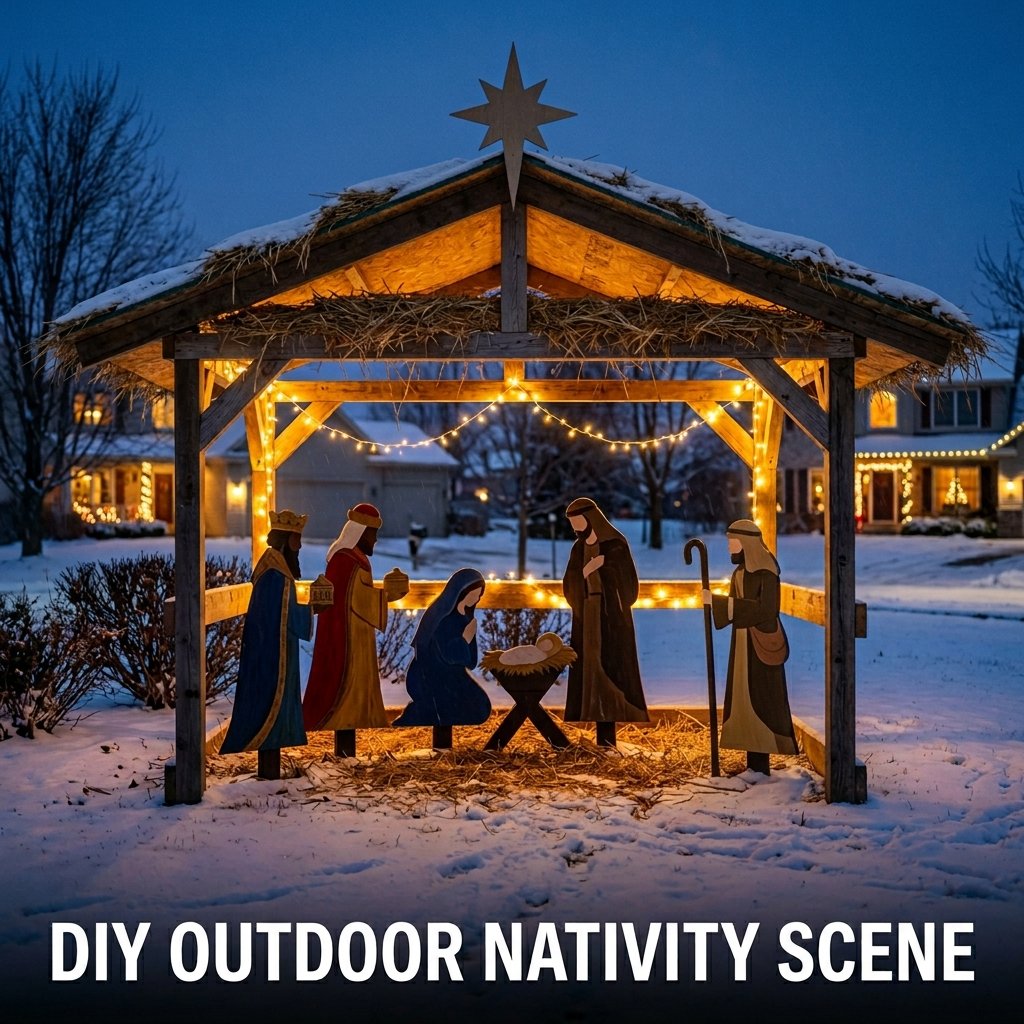
Building the Stable Structure
Cut four rough-cut lumber posts to a height of 48 inches for the corner supports. Join them using horizontal crossbeams at the top and a diagonal roof panel cut from plywood. Nail the roof panel at a 30-degree pitch and cover it with a thin layer of natural straw glued down with exterior adhesive for a rustic stable appearance. Leave the front face of the stable completely open so the silhouette figures placed inside remain fully visible from the street.
Cutting and Painting the Figures
Draw or trace silhouettes of the traditional nativity figures onto plywood sheets and cut them out using a jigsaw. Standard figures include: Mary, Joseph, the infant, three wise men, a shepherd, a donkey, and a star mounted above the stable roof. Paint each figure using exterior acrylic paint in historically accurate colors. Attach a wooden stake to the back of each figure using exterior screws and drive the stakes into the ground inside the stable structure to hold each figure upright throughout the season.
Frequently Asked Questions
What materials work best for DIY outdoor Christmas decorations?
The best materials for DIY outdoor Christmas decorations are pressure-treated lumber, exterior-grade plywood, PVC pipe, galvanized metal, and weather-resistant acrylic paint sealed with outdoor polyurethane varnish. These materials withstand rain, frost, and wind across a full six-week holiday display season. Avoid cardboard, standard craft paint, and untreated wood for any decoration placed in direct contact with outdoor conditions. I use exterior primer on every painted wood surface before applying color because primer prevents moisture from penetrating the wood and causing paint to peel within the first week of outdoor exposure.
How do I weatherproof DIY outdoor Christmas decorations?
DIY outdoor Christmas decorations stay weatherproof when all painted wood surfaces receive two coats of clear exterior polyurethane varnish applied after the final paint coat dries completely. Use outdoor-rated spray paint or exterior acrylic paint for all color applications. Seal any joints or seams in wooden structures with exterior wood filler before painting. I apply one additional coat of clear varnish at the start of each new season to any decoration I reuse from the previous year. That single extra coat restores the protective layer that weathering removes during the display period.
How much do DIY outdoor Christmas decorations cost to make?
Most DIY outdoor Christmas decorations cost between five and twenty-five dollars in materials per project when made at home using basic tools. Simple projects like painted rock ornaments, mason jar luminaries, and PVC candy cane stakes cost under ten dollars each. Mid-range projects like wooden signs, wire wreaths, and lighted tomato cage trees cost between ten and twenty dollars. Larger structures like wooden reindeer, pallet signs, and nativity scenes cost between fifteen and forty dollars depending on whether lumber and plywood are purchased new or sourced as scrap material from previous projects.
Can DIY outdoor Christmas decorations stay outside in rain and snow?
Yes, DIY outdoor Christmas decorations built from weather-resistant materials stay outside in rain and light snow when properly sealed and finished. Wood decorations sealed with two coats of exterior polyurethane varnish resist moisture penetration for a full season. PVC pipe decorations require no sealing and handle rain and freezing temperatures without deteriorating. Metal wire structures painted with rust-inhibiting spray paint resist moisture for multiple seasons. I bring any decoration with fabric elements such as ribbon bows indoors before heavy rain or snow because fabric absorbs moisture and loses its shape even when labeled as water-resistant.
What lights work best for DIY outdoor Christmas decorations?
Outdoor-rated LED string lights and LED rope lights work best for DIY outdoor Christmas decorations because they consume less electricity than incandescent bulbs, produce less heat, and carry a weatherproof rating for safe outdoor use. Look for lights labeled with an IP44 rating or higher, which indicates protection against splashing water from any direction. Warm white LED lights in the 2700 to 3000 Kelvin color range produce the most traditional holiday appearance outdoors. I use battery-operated LED lights for any decoration placed away from an exterior power outlet to avoid running extension cords across the lawn or driveway.